Revised: 5/2021
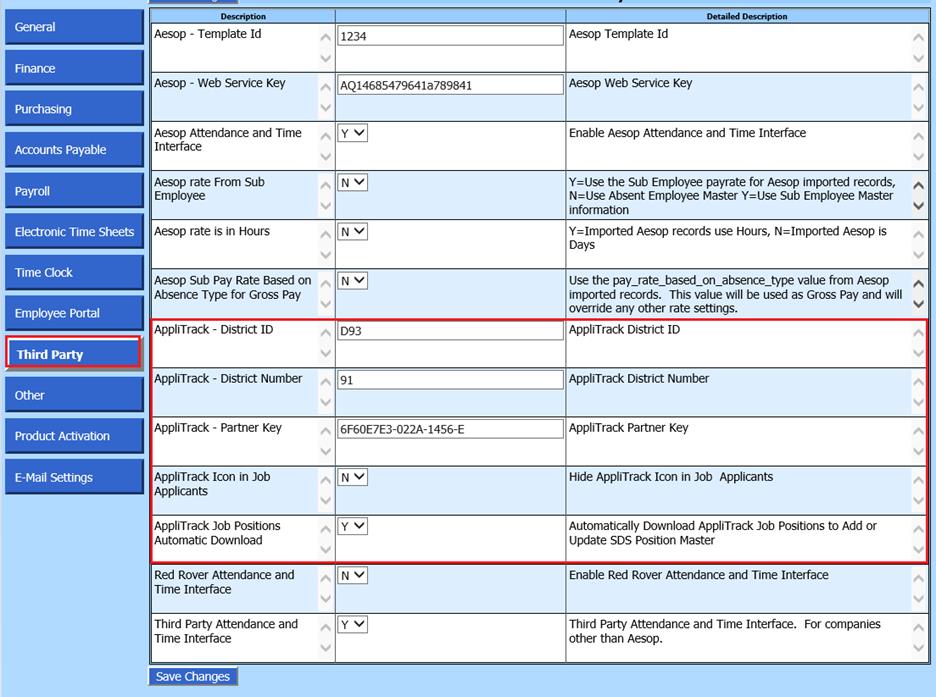
This process allows the ability for AppliTrack to import job applicant information. The AppliTrack District ID, District Number and Partner Key fields are supplied by AppliTrack and must be entered for the program to import applicants.
Activate Applitrack process
1. Select Administrative Utilities
2. Select SDS Web Office Settings
3. Select Third Party
4. Enter information pertaining to AppliTrack
•AppliTrack District ID: Name at the tail of the URL the district uses for AppliTrack (i.e. www.applitrack.com/?????? (the ? marks would be the District ID)
•AppliTrack District Number: District Code supplied from AppliTrack
•AppliTrack Partner Key: Key supplied by AppliTrack
•AppliTrack Icon in Job Applicants: Used to Display or Hide AppliTrack icon
•AppliTrack Job Positions Automatic Download: Automatically Download AppliTrack Job Positions to Add or Update SDS Position Master
5. Select Save Changes
6. Log out/in for changes to be in affect.
Integrating the AppliTrack Applicant into SDS
Districts post positions on the AppliTrack site. To pull those positions into the program
1. Select Human Resources
2. Select Job Applicant Information
3. Select the AppliTrack icon . All
new positions will be added to Position Master (if the correct setting is marked
in the Web Office Settings references at the start of this doc) and the
following message will appear.
. All
new positions will be added to Position Master (if the correct setting is marked
in the Web Office Settings references at the start of this doc) and the
following message will appear. 
If there are no new positions no message will
appear. After selecting the AppliTrack icon the screen will
change.
There are two ways to download the applicant into SDS:
1. Type the applicant number from AppliTrack in the “Enter AppliTrack Applicant” and select the binoculars. The applicant’s name will appear under “Select an AppliTrack Applicant to Import”. SDS will assign and applicant number starting with an A which will show next to “New Applicant ID”. The pertinent information for that perspective employee will also appear on the screen to the applicable fields.
2. Select the “Import This Applicant” icon. The applicant information is now part of the SDS database.
3. An AppliTrack user from the district can go to the AppliTrack site and mark an applicant to hire. When the Job Applicant Information area is entered those employees will be listed. When the “Import This Applicant” icon is selected applicants selected to hire will download into SDS.

4. Once the applicant is downloaded entries can be made for additional information at the bottom of the screen.
5. Once the data is entered select Save
6. There are several options to choose from to
input data for this applicant. By choosing the down arrow next to “Applicant
Basic Information” you can opt to choose Degree Information, Certificate
Information, or Position Information. 
7. Select the appropriate option to enter the
data. After filling in the fields click on the save icon  to save. This information can also be
added once the applicant is integrated to SDS as an employee
to save. This information can also be
added once the applicant is integrated to SDS as an employee
Note: if there is additional information that you feel can be imported from AppliTrack please contact SDS with a list of fields.
Changing Applicant to an Employee
1. Select Applicant Extra Demographics
2. Hire and add to payroll: Enter a “Y”
3. Select Save
4. Select Human Resources
5. Select Add, Change Employee Information entry view
6. Select General Information
7. Select Add
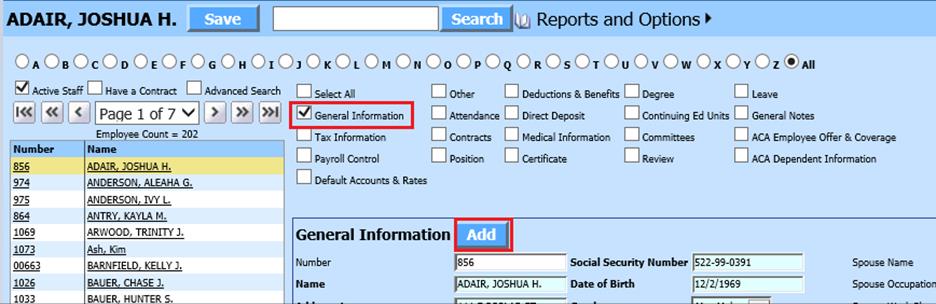
8. 1 New Employee Options: Select Applicant to Import, choose the applicant to become an employee. If you wish to clone an employee select the employee to clone.
9. 2 Will auto complete with applicant data
10. Select “Get Next ID#”.
11. 3 Select Save New Employee
12. Proceed with this new employee with normal processes, when entering a new employee. Any fields filled in on the applicant screen will be brought into the employee area as well.