Revised: 4/2021
The Wage Garnishment process in
SDS follows the federal government’s guidelines for garnishments based on
minimum wage. If the Garnishment is a percentage of income the system will apply
the percentage against the employee’s disposable income.
Setting up a
Wage Garnishment
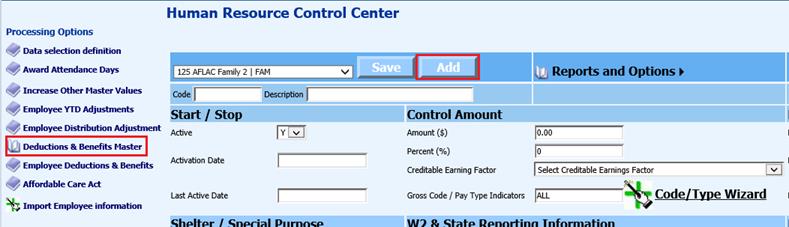
1. Select Human Resources
2. Select Human Resources Control Center
3. Select “Add”
4. Enter in the needed information for new code. See below link for additional detail on Deduction and Benefit Master setup: http://help.schooloffice.com/FinanceHelp/#!Documents/humanresourcescontrolcenterdeductionsbenefitsmaster1.htm
5. Garnishment Uses MWA: Update with needed code. This field has specific requirements for a garnishment code, that will instruct the payroll computation program to evaluate the amount of a wage garnishment and apply the federal Minimum Wage Amount rules.
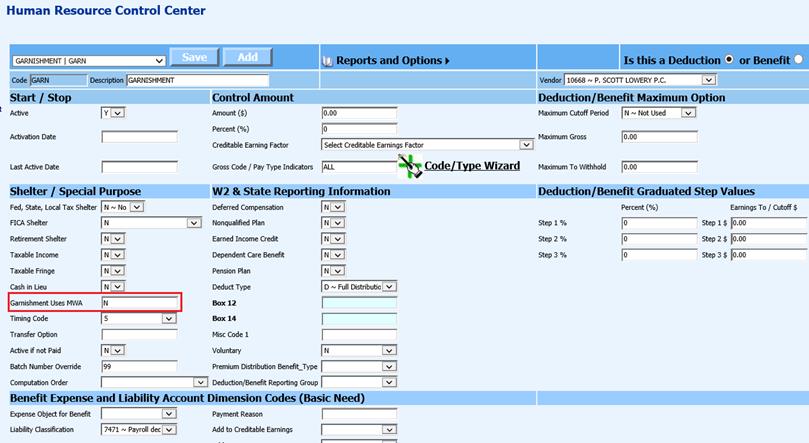
•Blank: Not a garnishment or Do not use the Minimum Wage rules
•N: Not a garnishment or Do not use the Minimum Wage rules
•G: Standard Wage Garnishment
•C: Child Support
•S: you will need one code for each type of garnishment. In the Employee Master “deductions” view when the garnishment is assigned to the employee the vendor that this employee’s garnishment is to be paid to can be assigned to the employee.
Deduction setup for Garnishment withholding
With the garnishment process using the Minimum Wage rules other deductions need to be coded. The field “Garnishment use MWA” is also used to identify the needed information for these deductions during the payroll computation.
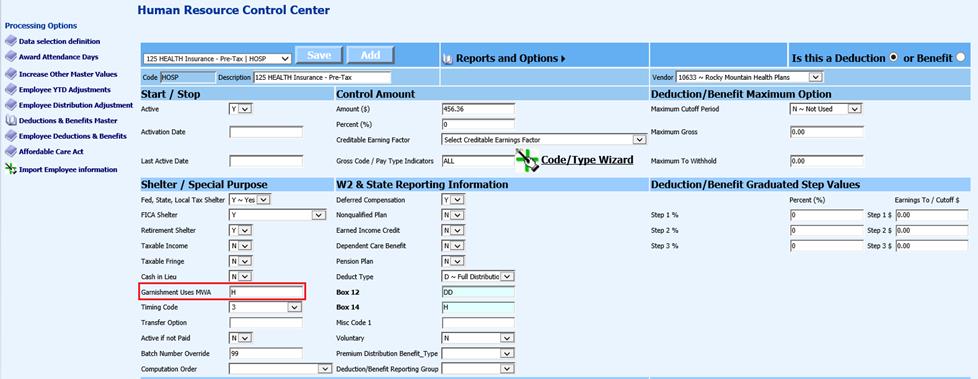
1. Update deduction field with required code
•H= Health Insurance Premiums charges to an employee each payroll period
•R= Involuntary Retirement Payments
•T= Other Taxes
2. Select Save
Assigning the Garnishment Code to the Employee
There are a three different methods of setting up an employee garnishment, Human Resources Control Center and within the Employee Demographics settings.
Garnishment setup using Human Resources Control Center:
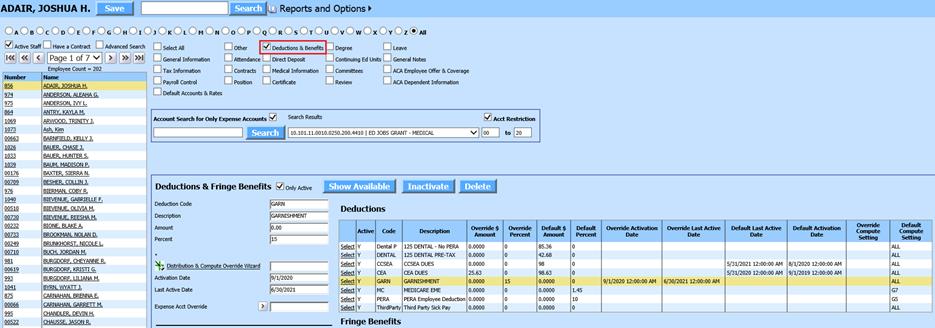
1. Select Employee Deductions & Benefits
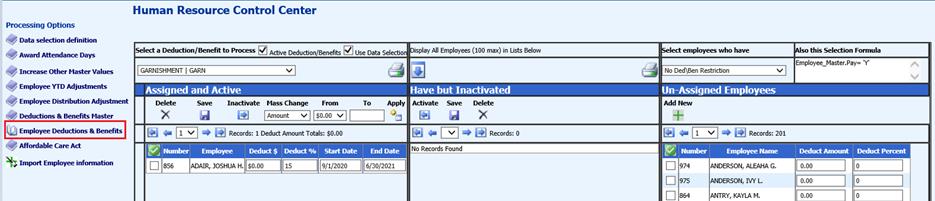
2. Select employee and assign the garnishment code.
o Deduct $: Enter amount, if the garnishment is a fixed amount.
o Deduct %: Enter percent, if the garnishment is a percentage.
o Start date: Enter start date of garnishment.
o End Date: Enter end date of garnishment.
3. Select Save
Garnishment setup using Add, Change Employee Information
1. Select Human Resources or Payroll Processing
2. Select Add, Change Employee Information
3. Select Deductions & Benefits
4. Select employee and assign the garnishment code.
•Amount: Enter amount, if the garnishment is a fixed amount.
•Percent: Enter percent, if the garnishment is a percentage
•Activation Date: Enter start date of garnishment.
•Last Active Date: Enter end date of garnishment
5. Select Save
Garnishment setup using Employee Demographics Vertical entry view
This entry view will allow you to use the Vendor Override field for the garnishment.
1. Select Human Resources or Payroll Processing
2. Select Employee, Contracts, Deductions/Benefits, etc.
3. Entry Views: Select Deductions
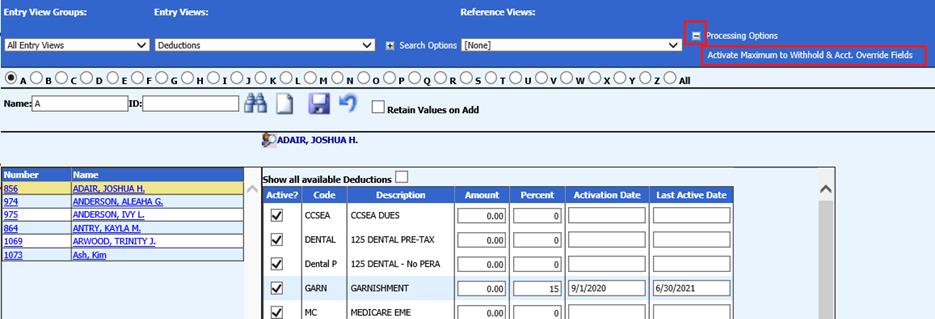
4. + Processing Options
a. Select Activate Maximum to Withhold & Acct. Override Fields
5. Select employee and assign garnishment code.
a. Amount: Enter amount, if the garnishment is a fixed amount.
b. Percent: Enter percent, if the garnishment is a percentage
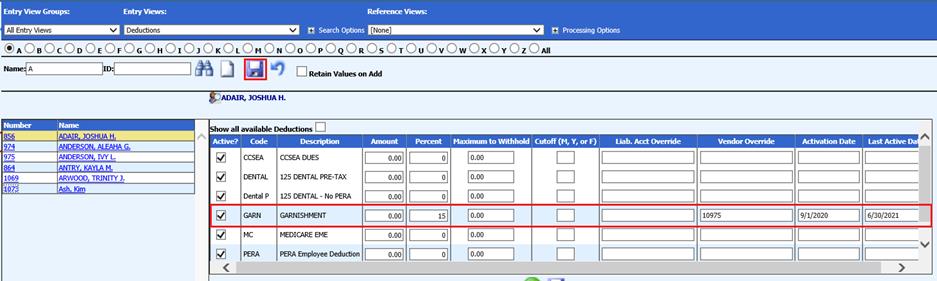
c. Maximum to Withhold: Enter total amount to withhold, or leave blank.
d. Activation Date: Enter start date of garnishment.
e. Last Active Date: Enter end date of garnishment
6. To use the Vendor Override to apply payment to a different vendor from the Deduction Master setup, enter vendor number in Vendor Override field.
7. Select Save
Understanding the
Garnishment Calculation
“Wage Garnishment Calculator” used for
processing garnishments, see link:
http://www.money-zine.com/calculators/loan-calculators/wage-garnishment-calculator/