Revised: 5/2021
Note: If this is for a new benefit or deduction you first need to add the benefit or deduction into the system. See below link for information on adding a new benefit or deduction code.
Once the benefit or deduction code has been created in the system you can add this code to all the employees in the database or to a select group of employees.
Adding a New Benefit or Deduction Code to All Employees
1. Select Human Resources
2. Select Human Resources Control Center
3. Select Employee Deductions & Benefits
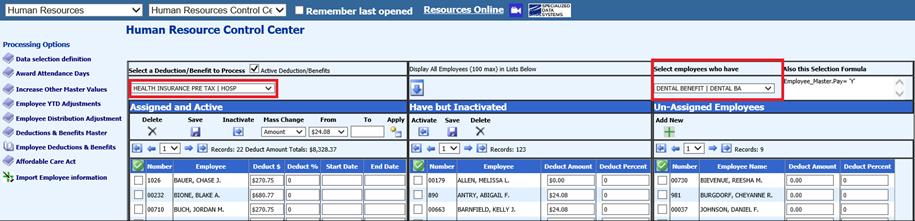
4. Under the option Select a Deduction/Benefit to Process select the new code that was created.
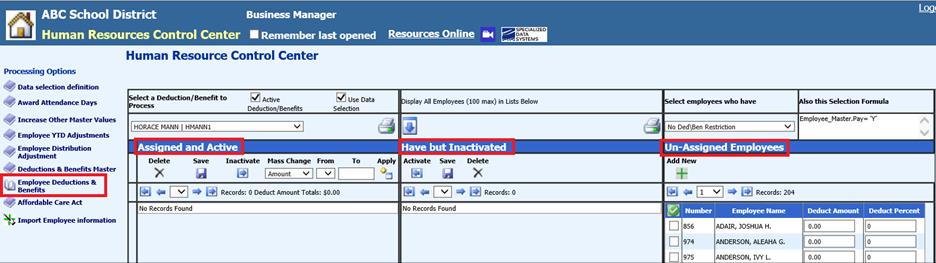
5. This screen has been divided into three areas. The first area of the screen shows all the employees that have been “Assigned and Active” for this code. The next area of the screen shows the employees that “Have but Inactivated” and the third area of the screen shows the employees that are “Un-Assigned Employees.”
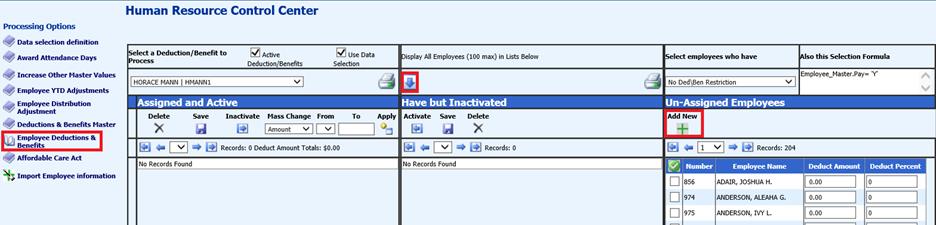
6. To assign this new code to all of the employees, select the check mark in the third area of the screen under the “Un-Assigned Employees.” This will place a check mark next to each employee in this area. This screen will show 20 employees at a time unless the option at the top in the middle section is selected that will “Display All Employees (100 max) in lists below.”

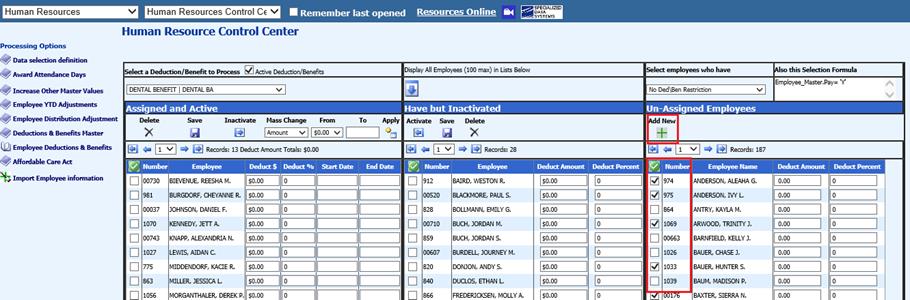
7. Once all of the employees are selected select the green plus button labeled Add New. This will move all of the selected employees over to the section of the screen labeled “Assigned and Active.” You may have to select Add new plus sign a couple of times as the maximum amount of employees that will move over at one time is 100.
Adding a Deduction or Benefit Code to a Select Group of Employees
1. Select Data Selection definition.
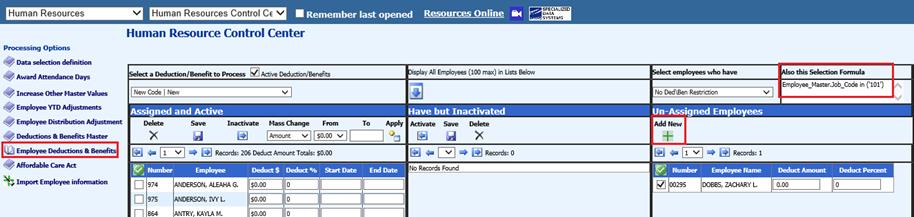
2. The Employee Master table will display and the fields in that table will show below. Select a field that you can use to select a group of employees. Example: Select the field Job Code. In this example the number 101 represent all teachers. Select the number 101 and then click on the arrow button to move the 101 to the selection formulas.
3. Save the Formula
4. This area can be closed by selecting the Data selection definition. After closing this part of the screen select Deductions and Benefit. The formula that was just created in the “Data Selection definitions” area is the formula that will be used when the “Employee Deduction & Benefits” option is selected.

5. The employees that are available to move over to the “Assigned and Active” area of the screen are just the ones with Job Code 101.
6. Select the green check mark button and all the employees in this group will be selected. Then click on the green plus button add new and all of the employees will move over to the “Assigned and Active” area.
Adding a New Benefit or Deduction Code to Employees assigned to another Code
1. In the far right area, select the deduction or benefit code to copy from.
2. In the first area; select the deduction or benefit to work with.
Adding Employees to an Existing Benefit or Deduction Code
1. Select the benefit or deduction code that employees need to be added to.
2. To select just a few employees to be moved into the “Assigned and Active” area from the “Un-Assigned Employees” place a check mark next to each employee and then select the green plus sign “add new.”
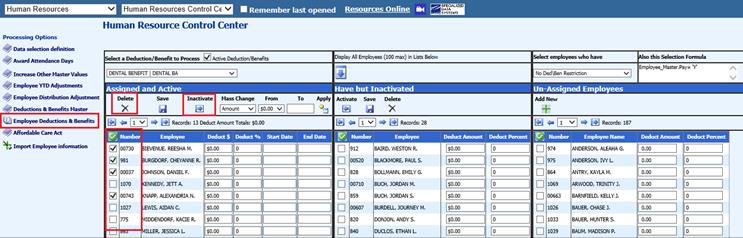
Deactivating an Employee from a Benefit or Deduction Code
1. Select the benefit or deduction code that employees need to be removed from.
2. Select the employee(s) that need to be inactivated from this code under the “Assigned and Active” area. Then either select the “delete” option or the “Inactive” option.
•The delete option will only delete the employee and move it back over to the “Un-Assigned Employees” if the record has no history with it.
•The Inactivate option will move the employee from the “Assigned and Active” area to the “Have but inactivated” area.
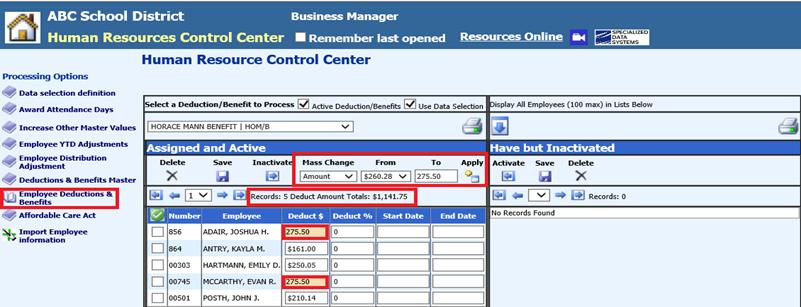
Mass Change the Amounts on a Deduction or Benefit Code
1. Select the deduction or benefit code that needs to have the amount or percentage adjusted.
2. In the “Assigned and Active” area under the “Mass Change” option select either Amount or Percent. Then in the “From” option select the amount or percent that needs to be changed. In the “To” field enter in the new amount or percentage that replaces the amount in the “From” field. Select the “Apply” button. This will change the amounts or percentages for each employee.
3. After reviewing the change select the Save button.
4. Records: 4 Deduct Amount Totals $1,141.75 – gives you the grand total of the deductions that you changed.
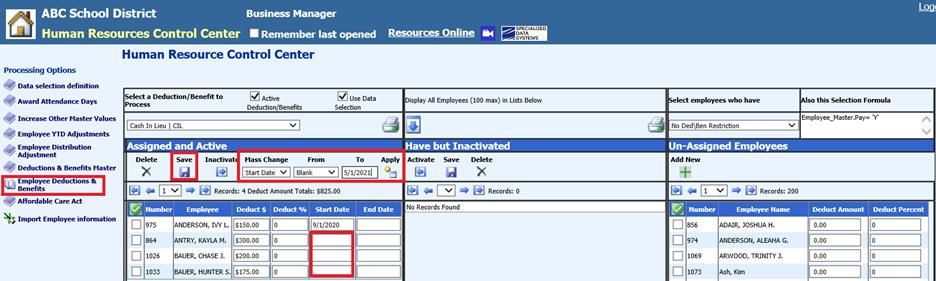
Mass Change the Start and End Dates
1. Select the deduction or benefit code that needs to have the start or end date changed.
2. In the “Assigned and Active” area under the “Mass Change” option select either Start Date or End Date. Then in the “From” option select the Start Date you want to change or Select Blank if there is no start date. Then in the “To” field enter in the new start date for this deduction or benefit. Select the “Apply” button. This will change the start date for each employee. This same process can be done with the end date for the deduction or benefit.
3. After reviewing the change select the Save button.