
Revised: 8/2020
Before you run the Illinois Unemployment (TaxNet) report you may need to setup a unique Job Code in the Employee Demographics for employees that are paid, but not to be reported to unemployment.
This is a user defined code and must be the same code on all employees that are not to be reported.
Assigning a Job Code
1. Select Human Resources
2. Select Employee Horizontal Data Changes
3. Select the entry view Employee Demographics All Fields
4. First Field to edit, select "Job Code"
5. Enter a unique job code that you will use for all employees that get paid but you do not want reported to unemployment. Once you have all these entered, select save.
Create Unemployment Report
1. Select Payroll Processing
2. Select State/Federal Reporting and 3rd Party Data Export
3. Select Your State: Illinois
4. Select State report: Monthly Unemployment Report

5. Dates and Periods:
o Payroll Date From: Starting date of Payroll in Payroll Calendar setup
o Payroll date To: Ending date of Payroll in Payroll Calendar setup
Note: Schools will be filing the 1st and 2nd month of each quarter only (total wages for each month). The month ended will be due at the end of the following month. The third month of the quarter will be included in the quarterly Unemployment (Taxnet) report.
6. District Address, Contact, Account #’s and other coding information:
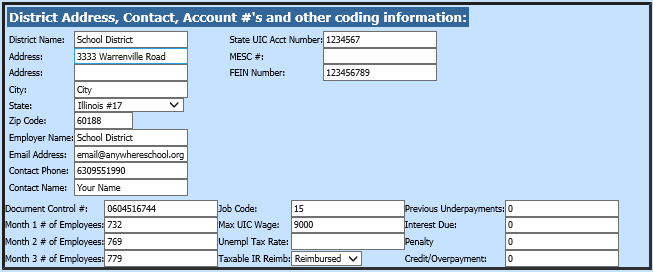
o Month 1,2,3 # of Employees: Enter in number of employees from payroll for each quarter
o Job Code: Enter in same code you created in earlier steps.
o Taxable IR Reimb.: From the drop down select Taxable or Reimbursed.
i. Taxable: Complete the information relating to tax rate and payments.
ii. Reimbursable: The information relating to tax rate and payments does not need to be completed.
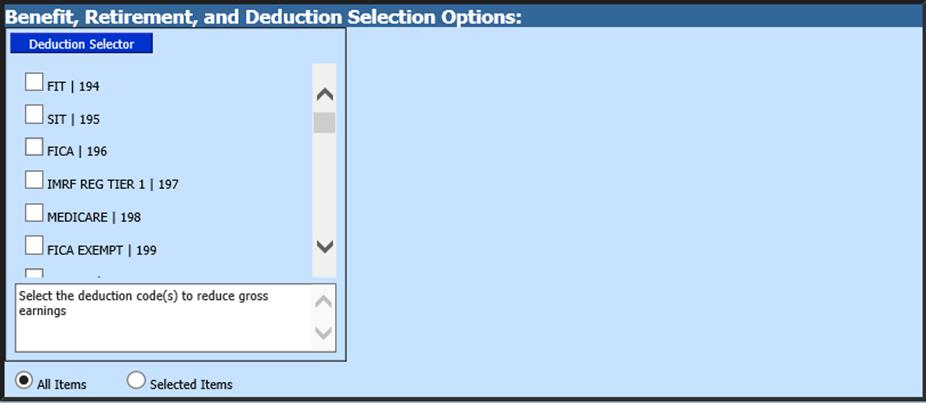
7. Benefit, Retirement, and Deduction Selection Options: Select codes used to reduce Gross Earnings, if any.
8. Select Save Setup

9. Select Create Report

10. The file that is created will be listed at the top of the screen when first created. All files created will have a date and time stamp on them for when they were created.
11. The report is in .csv format.

12. To save the file - right click on the folder and select save target as. Save file to your desktop or other desired location on computer. Do not open the file. The file is ready to be submitted to the state.
o The system will retain all files created. These files can be viewed by selecting Show/Hide Historic Reports.
13. To delete any of the files place a check mark in the box under the Del? Column, then select Delete.
14. Unemployment by Account: This report will breakdown the expense by account numbers, if you are a taxable district.

o Unemployment Report: This report should be printed out, reviewed and kept for your records. This report also provides needed information for filling out the summary form.Verify information in file for submittal to Unemployment.