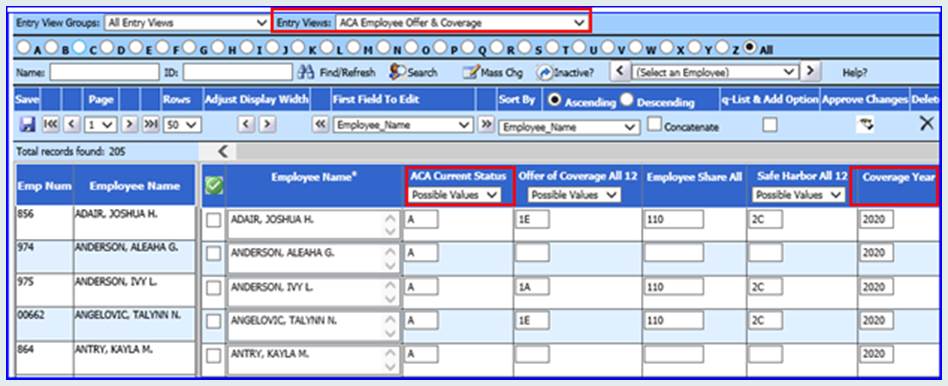

This section will step you though how to review and enter Employee Offer and Coverage information. New in 2023: On the 1095-C, Part II, Plan Start Month is REQUIRED. That field, Plan Start Month, is in this view and would be populated with the two-digit month, i.e. July would be 07, December would be 12.
**A Form will be generated for employees who has the following criteria:**
• ACA_Coverage_Year = 2023
• ACA_Current Status is NOT equal to I (Letter “I” for Inactive)
1. Select Human Resources
2. Select Employee Horizontal Data Changes
3. Select the dropdown next to Entry Views and scroll up to select “ACA Employee Offer & Coverage”
NOTE: The “ACA Employee Status Pay and Job (Set Seg) view is only used by clients processing ACA Forms through a third party company called Set Seg.

4. Determine which Employees will receive a 1095 Form for 2023.
If an employee is to receive a 1095 form, make sure their record reflects:
• ACA_Coverage_Year = 2023
• ACA_Current Status is NOT equal to I (ex: Inactive)
INACTIVE EMPLOYEES:
If an employee has been marked “Inactive for Payment” (Pay=N) within the past year, you will need to access these records to make sure the settings are correct for 1095 Processing.
1. Select the “Inactive?” Icon in the top center of the screen to display any individual marked as an “Inactive” employee. (Pay = N)
2. Review all employee records who should receive a 1095 form.
3. Make sure the Coverage Year is set to 2023
4. Make sure the ACA Current Status has a setting of “A” or the applicable setting that is NOT equal to “I” (Inactive).

Employees that are to receive a 1095 will have ACA Current Status not equal to "I" and Coverage Year ="2023"
5. Review all columns to the right of the employee name and adjust/enter correct data. These are the fields that are reported on the 1095-C form Under Part II “Employee Offer and Coverage”. Please review the IRS instructions for more clarification. https://www.irs.gov/uac/About-Form-1095-C
ASSIGNING REASON CODES AND EMPLOYEE SHARE AMOUNTS IF THE RATE IS UNCHANGED
If the “Offer of Coverage Reason Codes”, “Safe Harbor Reason Codes”, AND “Employee Share Amounts” have the SAME Codes/Rates for all 12 Months of the year, use the fields: “Offer of Coverage All 12”, “Employee Share All”, and “Safe Harbor All 12” . All three must be unchanged in order to be able to use ALL 12. If anything changed, you must fill in individual months and leave the ALL 12 fields blank.
ASSIGNING REASON CODES AND EMPLOYEE SHARE AMOUNTS FOR DIFFERING RATES THROUGHOUT THE YEAR
If the “Offer of Coverage Reason Codes”, “Safe Harbor Reason Codes”, OR “Employee Share Amounts” had different Codes/Rates at all throughout the year, you will need to enter the “Offer of Coverage Reason Code”, “Safe Harbor Reason Code”, and “Employee Share Amount” for EACH month of the year.
Do NOT use the fields “Offer of Coverage All 12”, “Employee Share All”, and “Safe Harbor all 12” if there were ANY differing reportable reason codes or rates. These fields would be used ONLY if the reportable Reason Codes and Rates remained unchanged throughout the year. When you cannot use the ALL 12 fields, here are a few tips!
TIP 1: FILL IN EVERY MONTH, JANUARY THROUGH DECEMBER
When you are unable to use the “All 12 Month” areas, then you must fill in every month. Even if an employee was not employed during a month, there is a code for that. The IRS will not accept forms with less than all 12 months filled out. Consult with your ACA team, if you are unsure what codes to use.
TIP 2: USING SORTS AND MASS CHANGE FOR EASE OF DATA ENTRY
Keep in mind you can use the Search button and Mass Change button when using the Employee Offer & Coverage view, to find a specific group of employees and make a mass changes to ease the data entry for these fields.
TIP 3: INACTIVE EMPLOYEES:
If an employee has been marked “Inactive” within the past year, you will need to access these records to make sure the settings are correct for 1095 Processing.
•Select the “Inactive” Icon in the top center of the screen to display any individual marked as an “Inactive” employee.
•Review all employee records who should receive a 1095 form.
TIP 4: EITHER ALL 12 OR INDIVIDUAL MONTHS:
Forms should either have the three “All 12 months” fields filled in OR every month January through December filled in. Forms should NOT have both the All 12 and individual months filled in. That will be an error.
LOCATING ALL 12 MONTHS OF THE YEAR (2 Options for Entry)
ACA Employee Offer & Coverage-Employee Horizontal Data Changes
If you need to assign an Offer Of Coverage Reason Code or an amount to each individual month of the year, you may use the scroll bar above the data grid, and/or select “First Field to Edit” and select a field (ex: Offer of Coverage May) that will allow you to move across the screen to access the fields for each Month of the Calendar year.
ACA Employee Offer & Coverage- Add, Change Employee Information
A new entry option may also aid in efficient entry of “ACA Employee Offer & Coverage”
•Select Human Resources
•Select Add, Change Employee Information
•Select the Employee for Entry of Different Reason Codes/Employee Share Amounts
•Check the box “ACA Employee Offer & Coverage” at the top of the screen
•All 12 months of the year are displayed on one “easy to use screen”.
•Use the drop down menu options to Enter the “Offer of Coverage” and “Safe Harbor” Reason Codes for each month of the year.
•Select the “SAVE” button at the top of the screen to record the time stamp for saving the data.
