Revised: 4/2021
To begin the payroll process, make sure your master settings and employee demographics are updated. Including completing the employee portal setup and set up a Payroll Calendar date. Once you have the Calendar date setup, you will Activate/Open the payroll and complete the payroll process. The following steps will also walk you through changing or deleting a payroll data.
Payroll Prep
Deductions & Benefits Master Settings
The Deductions & Benefits Master allows for adding and maintaining deductions and benefits used in processing of payroll. If you have any changes on a deduction or benefit, make sure you have them updated before continuing on with payroll.
See below link for additional information on Deductions & Benefits Master setup:
Add New Employee or Update Employee Information
To Add a New Employee
1. Select Human Resources or Payroll Processing
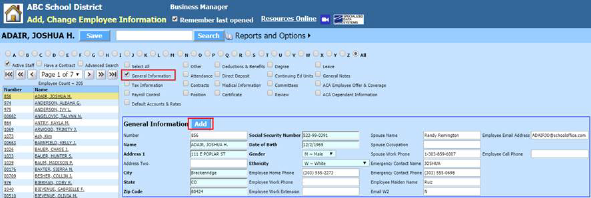
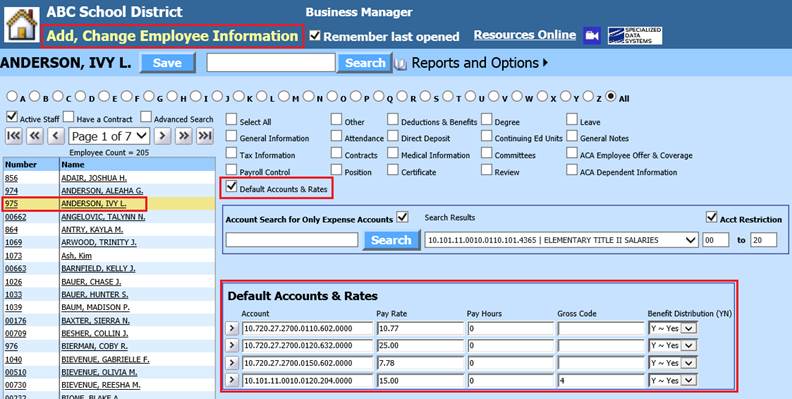
2. Select Add, Change Employee Information
3. Place a check in General Information
4. Select Add
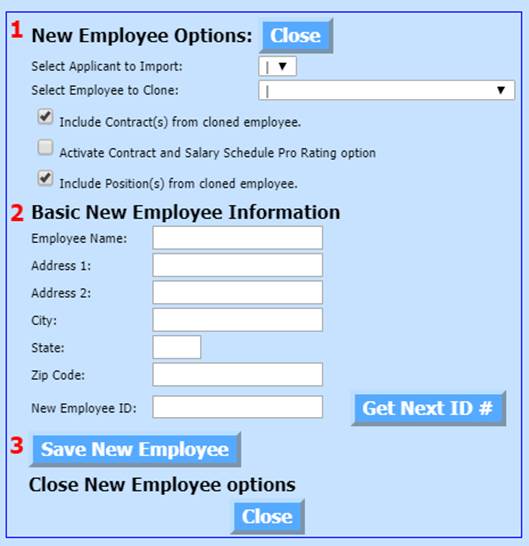
a. Enter in the Employee Name, address, city, state and zip code
b. Select Get Next ID
c. Save New Employee
d. Select Close
5. Select the check boxes for Demographic information to be completed for new employee or use the “Select All” option.

For more information on completing each section, see below link:
http://help.schooloffice.com/financehelp/#!Documents/addchangeemployeeinformation.htm
6. Once you have completed each section in the employee master, select Save. You will receive a time stamp of the save.

Update Employee Information
1. Select the check boxes for Demographic information to be updated for current employees or use the Select All option.

For more information on completing each section, see below link:
http://help.schooloffice.com/financehelp/#!Documents/addchangeemployeeinformation.htm
2. Once you have completed each section in the employee master, select Save. You will receive a time stamp of the save.

Update Employee Portal
1. Select Administrative Utilities
2. Select Security – Application Access
3. Under Options, select Mass Create Employee Portal Users

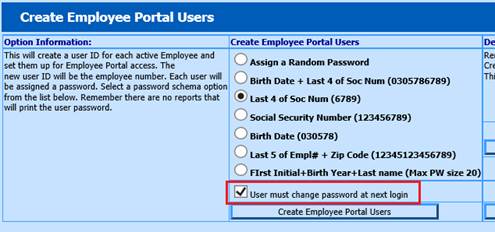
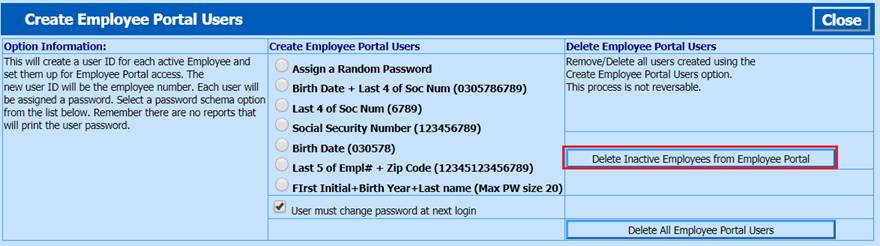
4. Select the Password assignment. After you make your selection, the Create Employee Portal Users selection box will display.

a. This process will create a user ID for each active (Pay = Y in Employee Demographics) Employee and create Employee Look & Browse/Employee Portal access. The new user ID will be the employee number or email address if these are stored in the system. Each user will be assigned a password, based upon what option selected.
b. User must change password at next login: This option is used to force the user to change their password when they login for the first time. This option is not mandated, just a suggestion to allow the employees to create an individual password.
5. Select Create Employee Look and Browse Users
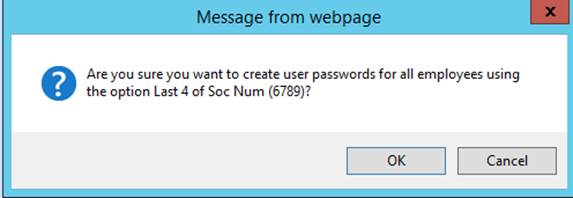
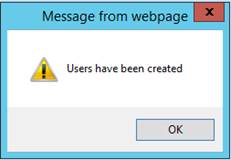
6. You will receive a message from webpage, select OK
7. When the process is complete, you will receive a message confirming this, select OK.
8. Select Close to Exit
Note: Only new employees will be
created with Look and Browse/Employee Portal area, established employees will
keep the same login and password. When printing letters for new employees,
select the corresponding date from the drop box, only the new employee letters
will print.
Print Employee Letter
You can create a letter that can be sent to the employees that have just been created.
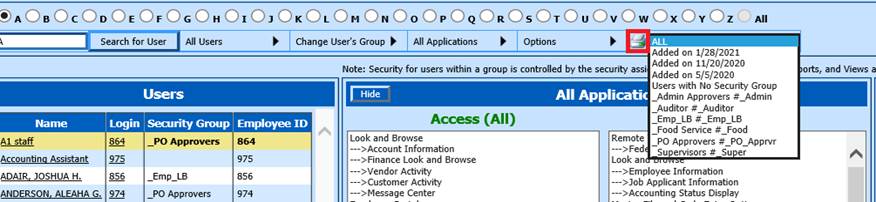
1. Select the Printer Icon to the right of Options
2. Select the desired Added date, Group or ALL
a. Added date: This will only print letters for employee logins created on the selected date.
b. Group: This option will only print letters for employee logins in a security group.
c. All: This option will print letters for all employees with logins.
3. Enter your school’s URL and select Ok:
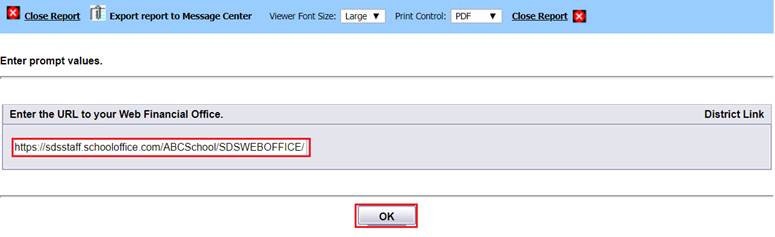
4. The letter will display for you to print and give to your employees.
Delete Inactive Employees from Employee Portal
In the Employee Demographics area, if you have changed the Pay field to “N”, you can delete a user’s access using the Delete Inactive Employees from Employee Portal process
Activate/Open a Payroll
Calendar Setup
To begin payroll, you must have a Payroll Calendar date created. It does not need to be activated, just set up to utilize from for processing Attendance, Time Clock or eTime Clock entries.
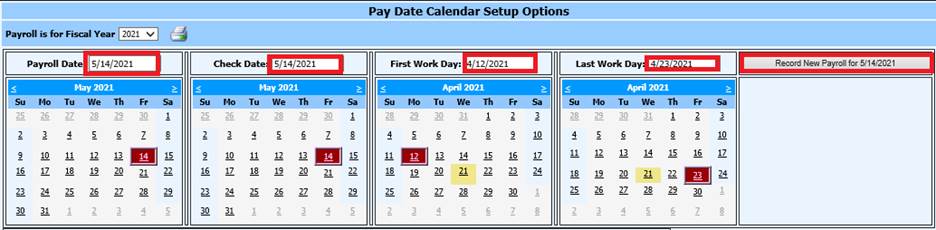
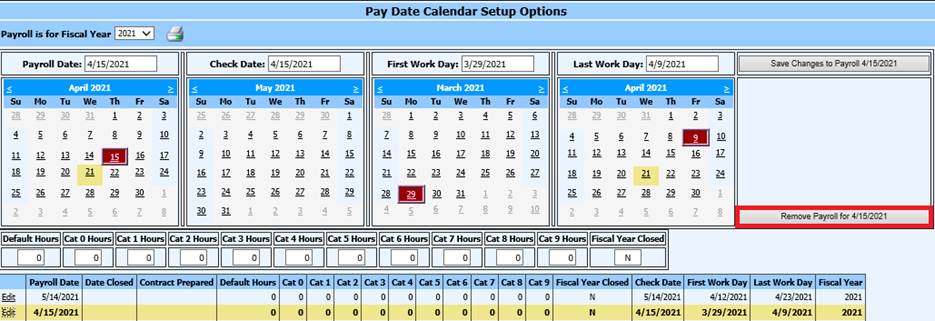
To set up the Payroll Calendar Date:
1. Select Payroll Processing
2. Select Activate/Open a Payroll
3. Select Calendar Setup
4. Payroll Date: Select the Payroll Date
5. When using Gross Pay Entry screen, Timeclock and/or Aesop Processing:
a. Locate the First Work Date and select the date of the first work day to be included in the Payroll Date being Recorded
b. Locate the Last Work Date and select the date of the last work day to be included in the Payroll Date being recorded
6. At the right side of the screen, select the button for “Record new Payroll for (date)”
Changing a Payroll date if Payroll HAS NOT Been Opened
1. Select Payroll Processing
2. Select Activate/Open a Payroll
3. Select Calendar Setup
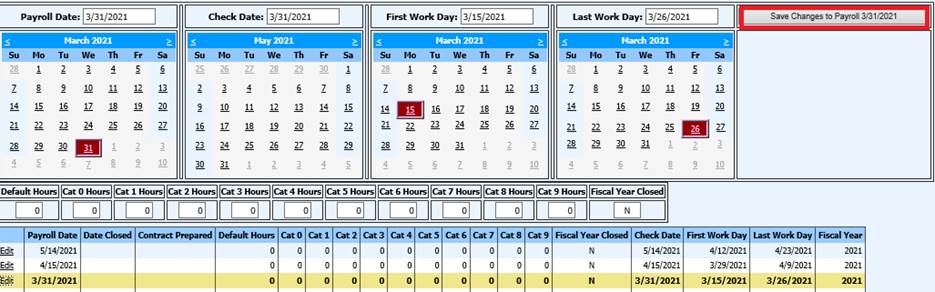
4. Select “Edit” on the Payroll Date you wish to remove or change
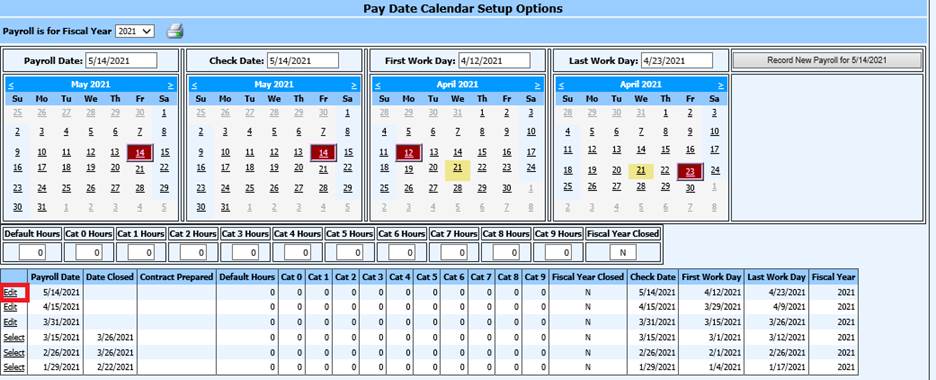
5. Select the new payroll date from the Calendar in the column for “Payroll Date”
a. Change the date on First Work Day or Last Work Day, if needed
6. Select Save Changes to Payroll
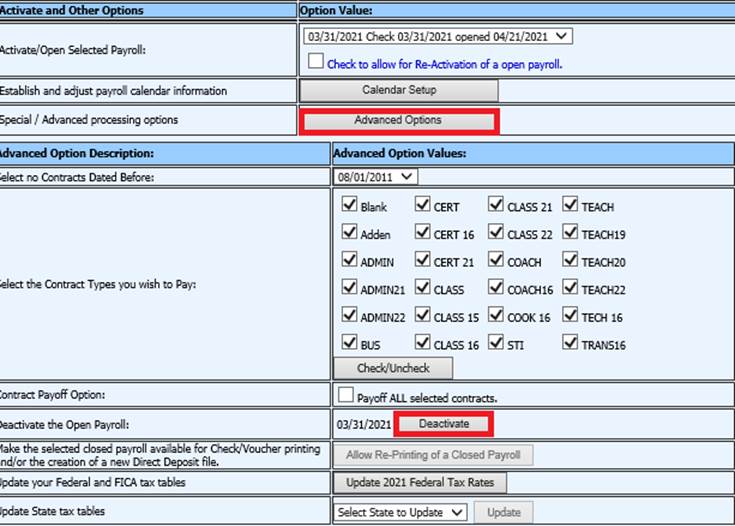
Changing a Payroll date if Payroll HAS BEEN Opened
If the payroll has been opened and activated and you realize you have an incorrect payroll date, you can still edit the calendar date information.
The open payroll must be deactivated
1. Select Payroll Processing
2. Select Activate Open a Payroll
3. Select Advanced Options
4. Select the button to Deactivate Open Payroll
5. Return to the calendar set up
6. Select “Edit” for the payroll date that needs to be changed
7. Change the date in the first calendar “Payroll Date”
8. Save changes to payroll

9. Activate Payroll
10. The program will allow the timecards that have been entered to follow the payroll date change, any manual adjustment should be checked very carefully to ensure they are all recorded after a payroll date change has been initiated
11. Complete payroll as normal
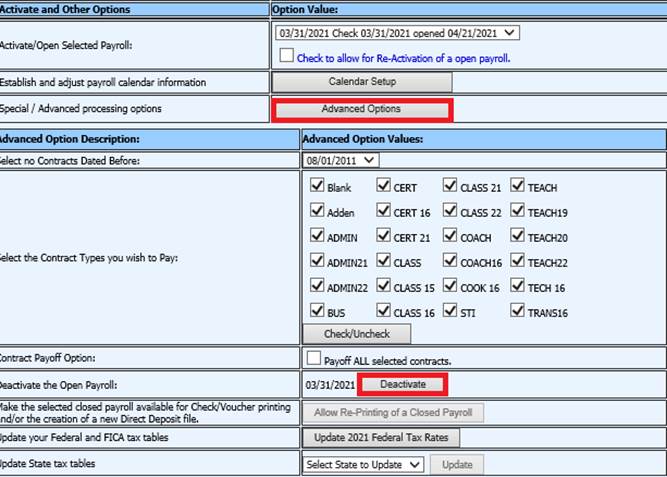
Delete a Payroll Date if Payroll HAS NOT BEEN Opened
The payroll date to be deleted cannot be a payroll activated or with manual time cards posted to it.
1. Select Payroll Processing
2. Select Activate/Open a Payroll
3. Select Advanced Options
4. Select Deactivate
5. Select Calendar Setup
6. Select “Edit” on the Payroll Date you wish to delete
7. Select the option Remove Payroll

Delete a Payroll Date if Payroll HAS BEEN Opened
The payroll date selected for deletion cannot be a payroll that has been activated or manual timecards posted to it.
1. Select Payroll Processing
2. Select Activate/Open a Payroll
3. Select Advanced Options
4. Select Deactivate
5. Select Calendar Setup
6. Select “Edit” on the Payroll Date you wish to delete
7. Select the option Remove Payroll
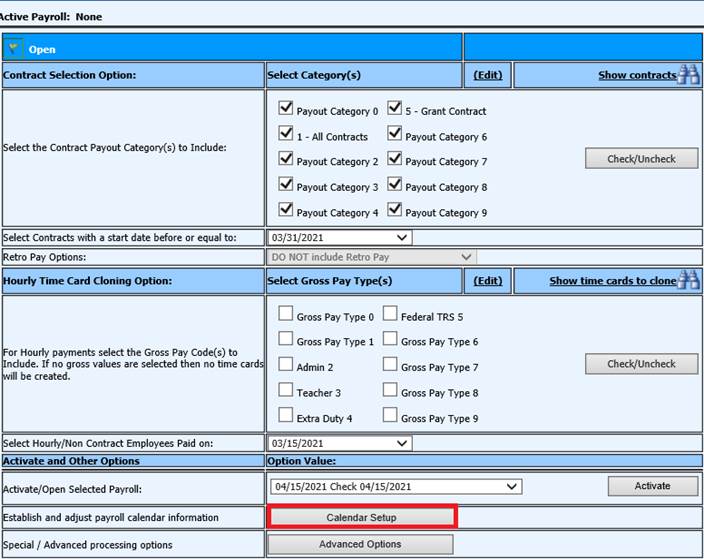
Activate/Open Payroll
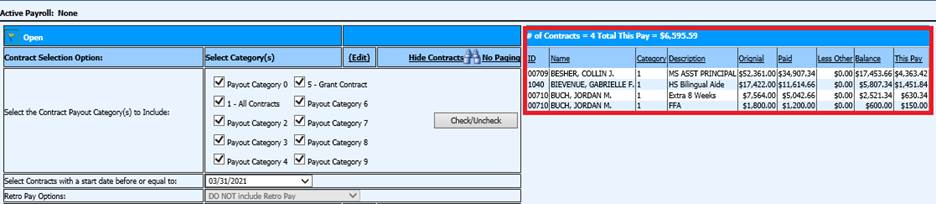
Once the Payroll Calendar Date has been finalized, you are ready to select the Contracts to be paid for this payroll.
1. Select Payroll Processing
2. Select Activate/Open a Payroll
3. Contract Selection Option: Select the Contract Payout Category(s) to Include
4. Select Contracts with a start date before or equal to:

5. Select Show Contracts
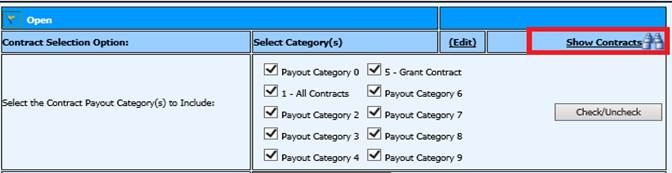
6. Preview Employee Contracts shown on the right side of screen to ensure correctness.
7. Activate/Open Selected Payroll: Select Payroll Calendar date from dropdown selection
8. Select Activate

Check to Allow for Re-Activation of an Open Payroll
If you have activated payroll and changed an Employee Contract in the open payroll, you must select this option to process all updated contracts.

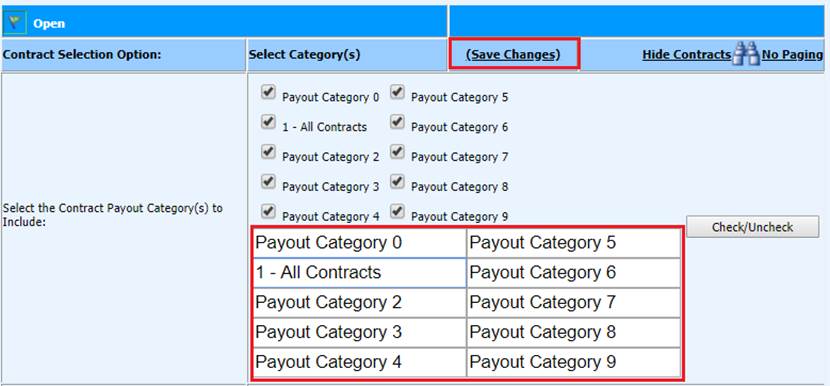
Edit Payout Category Name
1. Select “Edit” to change the contract payout category name

2. Update the selection description
3. Select Save Changes
Payroll Summary Information
This Summary information will list the total payroll summary information from the current payroll selected and prior payrolls.
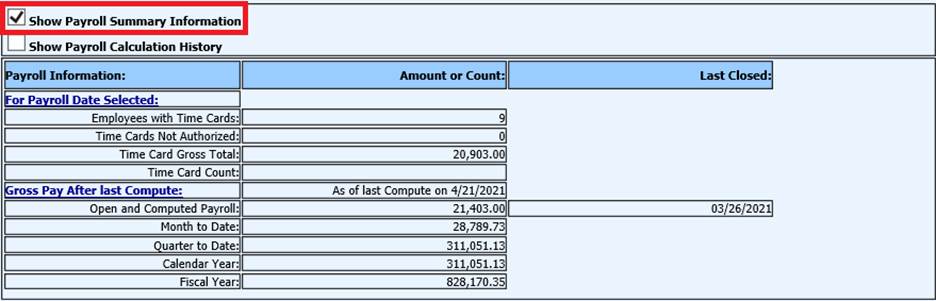
Now that Payroll has been opened and activated, you are ready to print the Gross Pay Report to verify the totals listed for contracted employees.
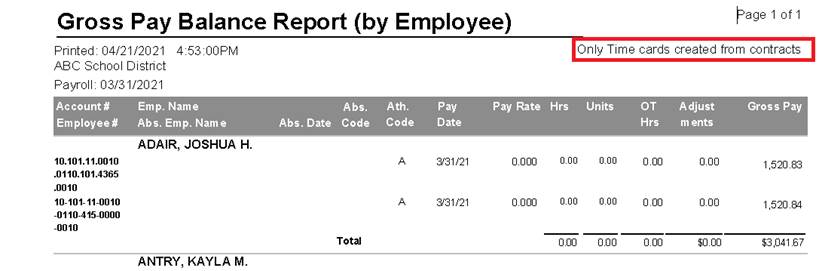
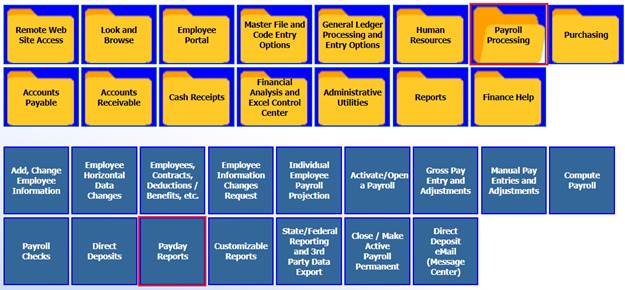
Verify Payday Reports for Employees with Contracts
1. Select Payroll Processing
2. Select Payday Reports
3. Select Gross Pay Report by Employee or Gross Pay Report by Employee & Account
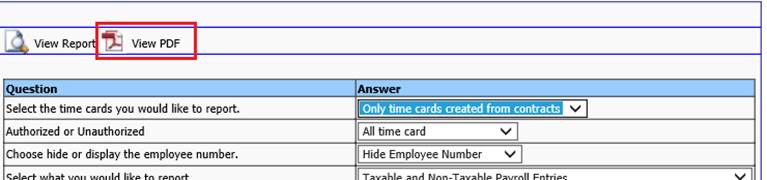
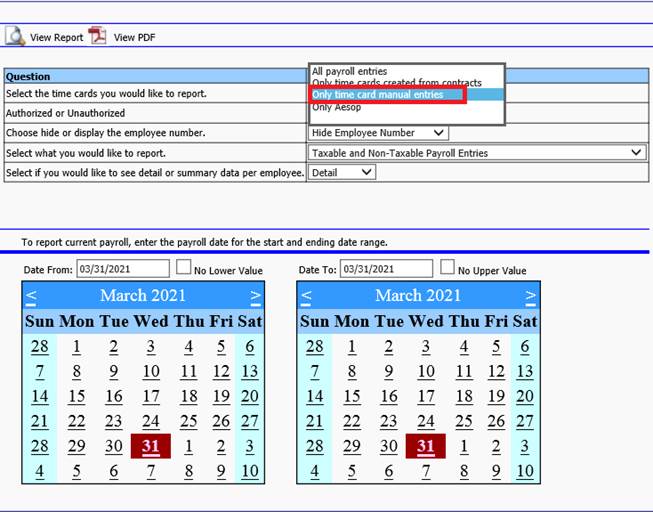
Question:
a. Select the time cards you would like to report: Select “Only time cards created from contracts”
b. Authorized or Unauthorized: Select one
c. Choose hide or display the employee number:
i. Select Hide Employee Number
ii. Select Display Employee Number
d. Select what you would like to report:
i. Select Taxable and Non-Taxable Entries
ii. Report only Employee Expense Reimbursement
iii. Report Taxable Gross Pay information Exclude Expense Reimbursement
e. Select if you would like to see detail or summary date per employee:
i. Select Detail
ii. Select Summary
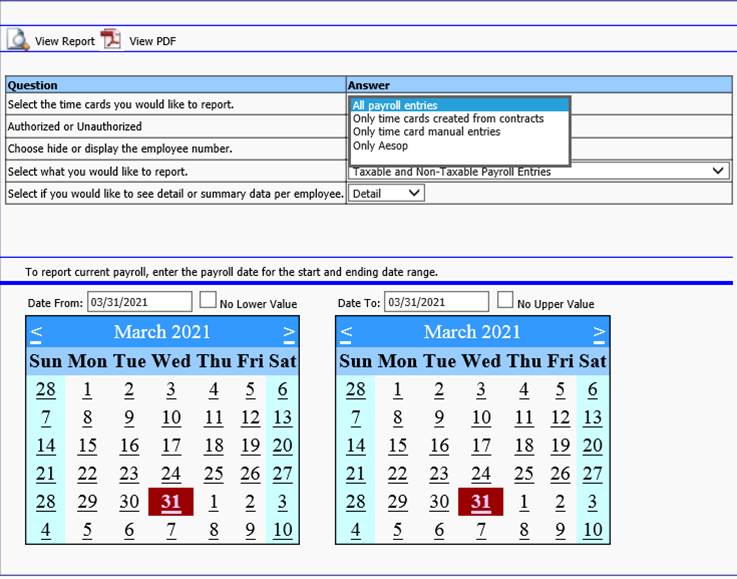
f. Verify the Payroll Date listed
g. Preview Report
h. Verify time cards created from Employee Contracts
i. If you make any changes to Employee Contracts while you have an open payroll, you must Re-Activate Payroll under Activate/Open a payroll in order for these changes to take effect.

Entering Attendance
There are different ways to enter Employee Attendance records. You can manually add it directly into the system or use Frontline (Aesop) processing.
See below link for entering attendance with a Substitute time card:
See below link for entering attendance without a Substitute time card:
See below link for entering attendance using Aesop:
http://help.schooloffice.com/financehelp/#!Documents/aesopprocessing.htm
Gross Pay Entry and Adjustments
The Gross Pay Entry and Adjustments entry view will allow entry of time cards, edit substitute entries from Attendance data entry auto posting and using the Who options.
Gross Pay Entry Views:
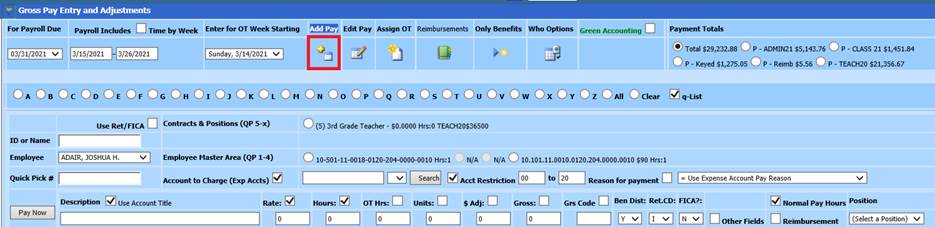
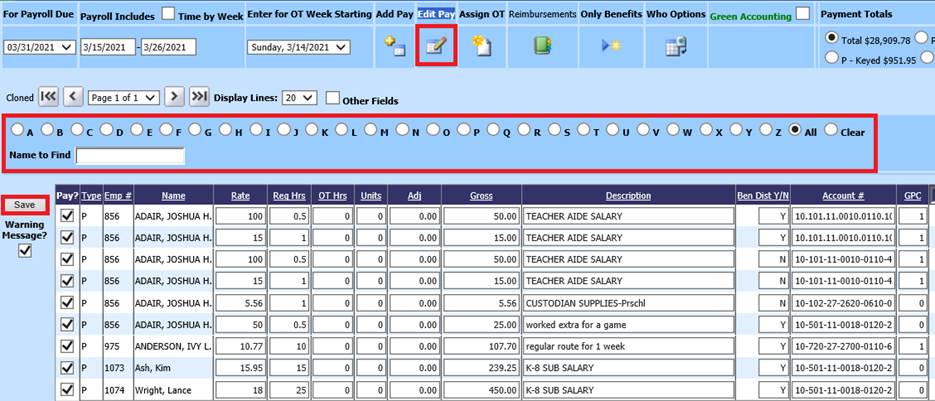
Gross Pay Entry and Adjustment Time Card Entry Screen: Edit Pay
This entry view is used to edit an employee time card previously entered.

Gross Pay Entry and Adjustment Time Card Entry Screen: Add Pay
This entry view is used for initially entering an Employee manual time card.
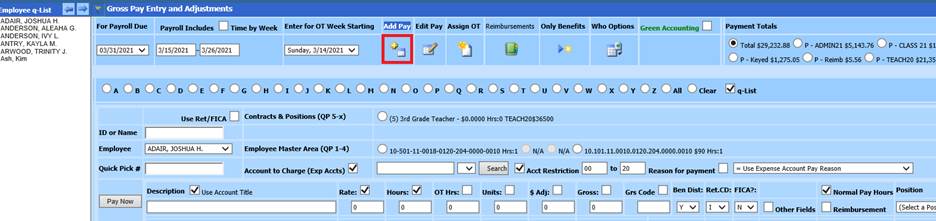
Gross Pay Entry and Adjustment Time Card Entry Screen: Add Pay with “q-list” selected
If you have the “q-list” checked, you will be able to select the employees from the left side of the entry screen
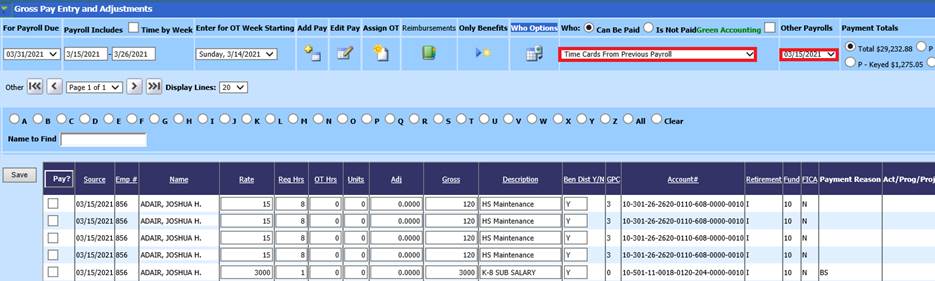
Gross Pay Entry and Adjustment Time Card Entry Screen: Who Options
This entry view will give you two different options to select from for cloning or copying a time card entry by Who can be paid and Who is not paid.


•Who Can Be Paid: All employee that fit the criteria of the below selections
•Who is Not Paid: Employee that fit the criteria of the below selections that don’t already have a time card entry for the payroll selected.
•Accounts and Rates in the Employee Master: This selection will pull in the data information listed in the Employee Master: Default Accounts & Rates section.
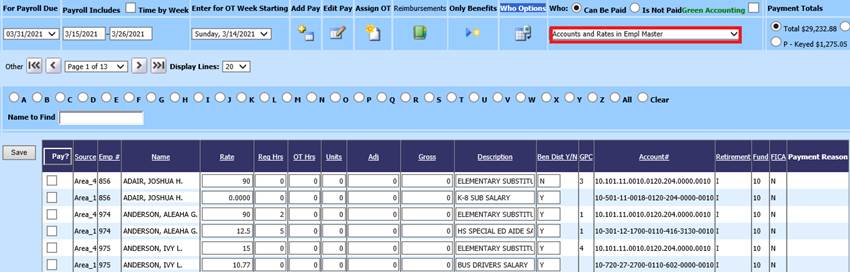
•Time Cards from Previous Payroll: This selection will allow you to select from time cards entered from a previous payroll.
In either entry view, to pay the employee needed follow the steps below:
1. Check mark all employees by selecting “Pay?” or individually check mark each employee to pay
2. Make any adjustments needed for the entries selected
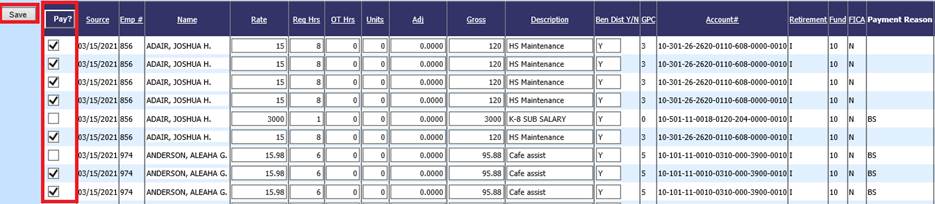
3. Select Save
Time Card Entry
To enter a time card using Employee Demographics area information
1. Select Add Pay
2. Enter the Employee ID or Name
a. If using the Name search and multiple names are listed, select the employee to Pay
3. Enter the Quick Pick #, select from the Accounts to charge or enter the Account number.
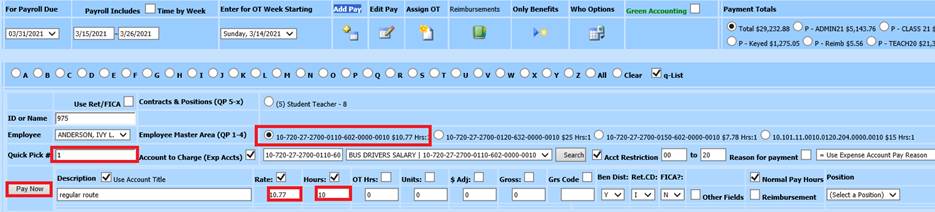
a. Quick Pick # box: Enter a 1 (shown above) to select the first account listed for the employee. The Account listed in Employee Master, #1 field in Default Accounts & Rates field (shown below) will be selected. If the Rates, Hours and Gross Code have been completed; these fields will also auto populate.
4. If you need to make changes to the description, hours or other payroll entry fields, make the needed adjustments at this time.
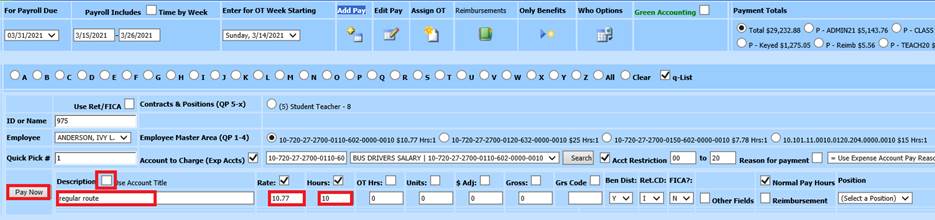
5. Select Pay Now
6. The entry has been moved to the lower section of the screen

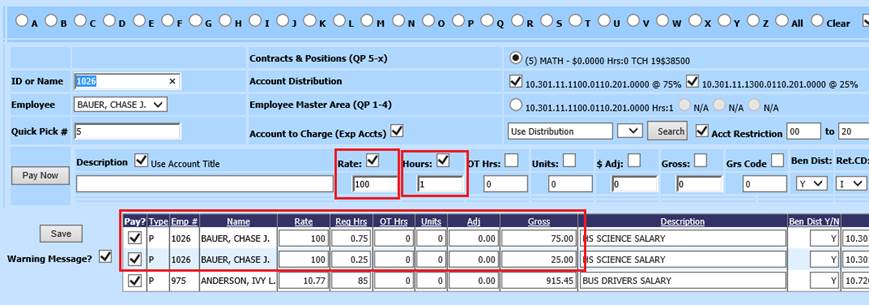
To pay an employee with a contract that has a percentage distribution to more than one account number.
If you have an employee with a contract distributed over to multiple salary accounts:
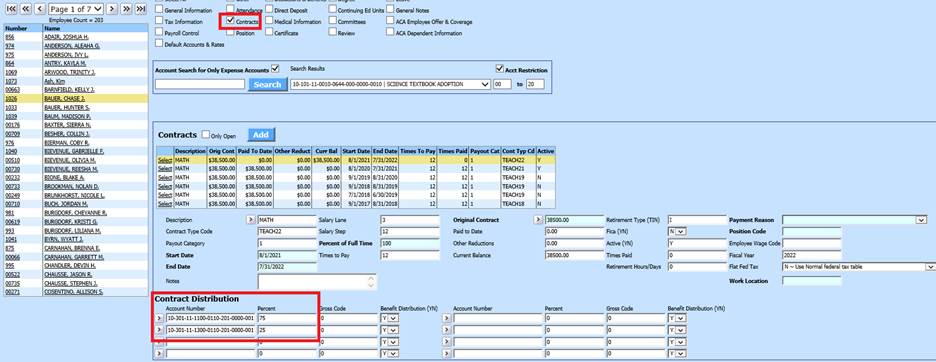
•Select Add Pay
•Enter in the Employee ID or Name
•After selecting the employee the contracts & positions became available in the “Contracts & Positions (QP5-x).

•Enter a 5 in Quick Pick# field (or the number associated with the information you want to pull into the payroll) the screen displays the account numbers associated with the contract and the percentage break down.
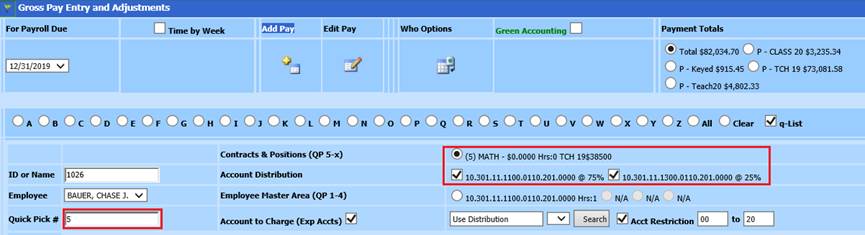
•Enter rate, hours and make any other changes to the payroll fields and hit enter. The program will split the rate according to the percentages from the contract
To pay an employee based on the information entered in the Employee Position area.
If paying an employee using the Employee Position Master follow the steps below:
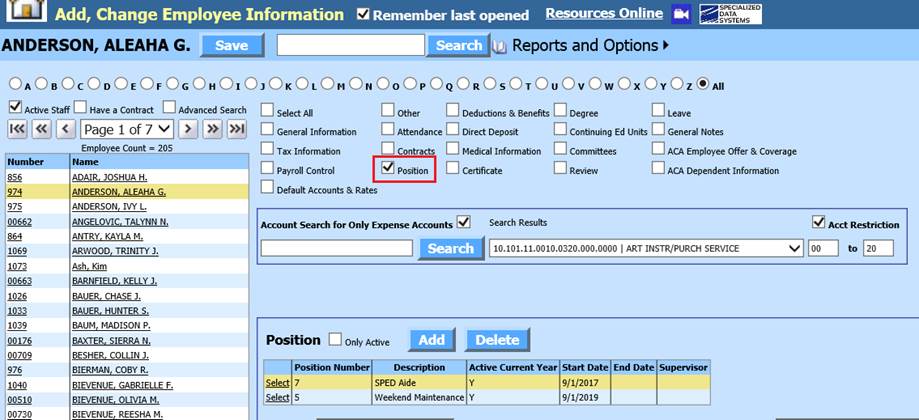
•Select Add Pay
•Select Employee ID or Name
•After selecting the employee, the contracts & positions became available in the “Contracts & Positions (QP5-x).
•Enter a 6 in Quick Pick# field (or the number associated with the information you want to pull into the payroll) the screen displays the account number, hours and rate associated with the employee’s position area.

•Make any other changes to the payroll fields and hit enter to record the time card entry.
Editing Time Entries
1. Select Edit Pay
2. Select the employee by using the name search or alpha radio buttons
3. Make the adjustments needed
4. Select Save
5. If the field that needs to be modified is not showing on the screen, select “other fields” to expand the selection.

6. You can edit multiple time cards by making the changes on each field that is displayed. After you have entered your changes, select the “Save” button. The system will check all your entries when you push save.
7. If something is entered incorrectly the system will highlight the incorrect entry. You can correct your entry and select the save button again.

8. To
eliminate a time card, remove the Check in the column labeled “Pay?” and select
“Save”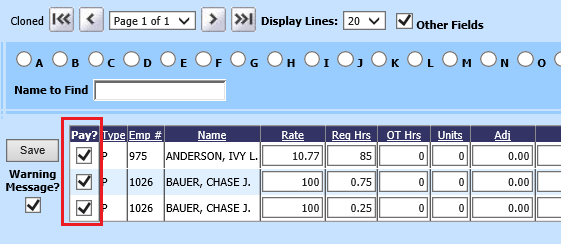
Note: When you are in the “Add Item” area
you can also make changes to any of the time cards displayed. Follow the same
rules that apply to the edit area.
Verify Payday Reports for Employees with Time Card Entries
1. From Payroll Processing
2. Select Payday Reports
3. Select Gross Pay Report by Employee or Time Card Entry Verification Report
Question:
a. Select the time cards you would like to report: Select “Only time card manual entries”
b. Authorized or Unauthorized: Select one
c. Choose hide or display the employee number:
i. Select Hide Employee Number
ii. Select Display Employee Number
d. Select what you would like to report:
i. Select Taxable and Non-Taxable Entries
ii. Report only Employee Expense Reimbursement
iii. Report Taxable Gross Pay information Exclude Expense Reimbursement
e. Select if you would like to see detail or summary date per employee:
i. Select Detail
ii. Select Summary
f. Verify the Payroll Date listed
g. Preview Report
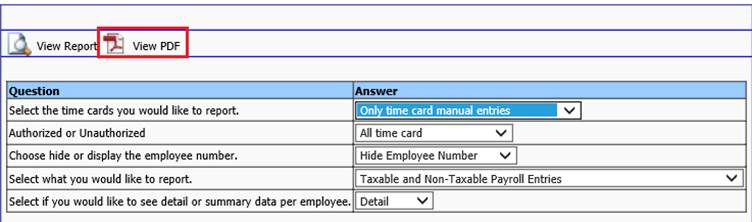
h. Verify time cards created from manual entries
Computing and Timing Codes
Once all entries have been entered and verified follow the steps below:
1. Select Compute Payroll
2. Select the Timing Codes to use for payroll
a. The timing code numbers come from the Deduction/Benefit Master and are used to control which deduction/benefits codes are to be pulled into each payroll. When selected, the deductions/benefits with the associated number will be applied to the payroll. If deselected, the program will ignore deductions/benefits associated with that number.
3. Select Compute
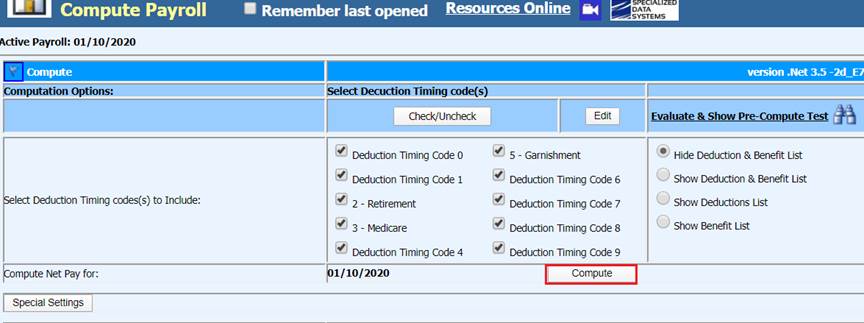
4. After the payroll has computed the Payroll Register Detail Report will display, close this report.
NOTES:
•If changes need to be made to the payroll, after compute, you will need to compute again
•Computing a payroll will remove all check and voucher numbers, if they have been run
•You can Compute Payroll as many times as needed.
•For more detailed information on the Compute Payroll are, view below link: http://help.schooloffice.com/financehelp/#!Documents/computepayroll1.htm
Payroll Reports
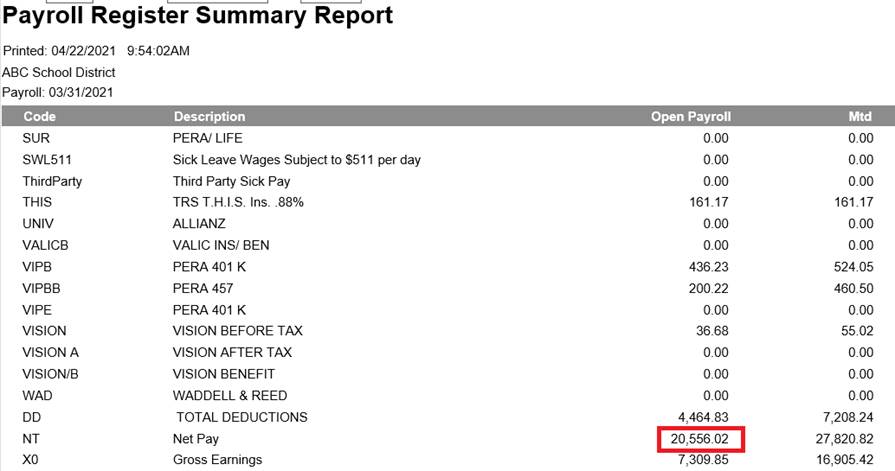
1. Select Payday Reports
2. Select Payroll Summary Report
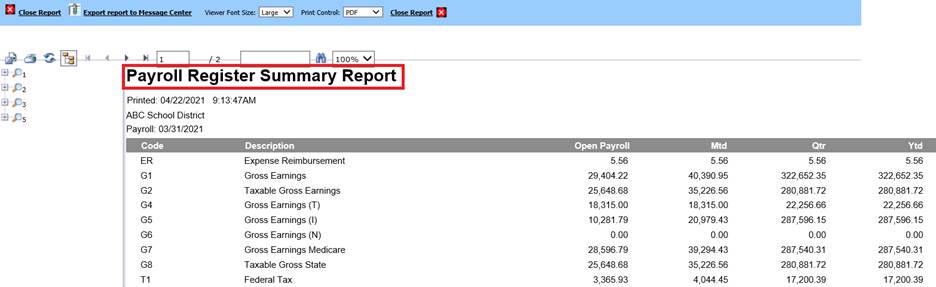
3. Verify Wages
a. G3 – FICA wages x 7.65%. This total should match T2 and your FICA matching code (i.e. FR)
b. G7 – Medicare wages x 1.45%. This total should match your MC & MR codes
c. G4 – Retirement wages x %
d. G5 – Retirement wages x %
e. Click directly on a code, to see a list of employees data comprises this total
Customizable Reports
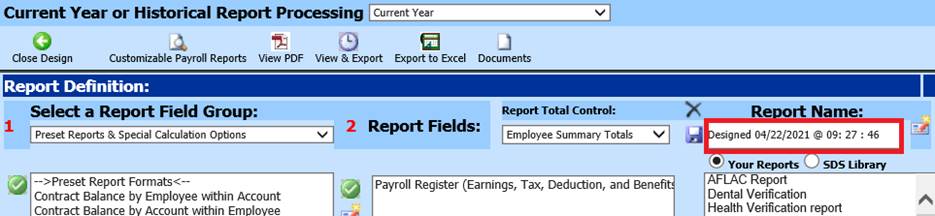
1. Select Customizable Reports
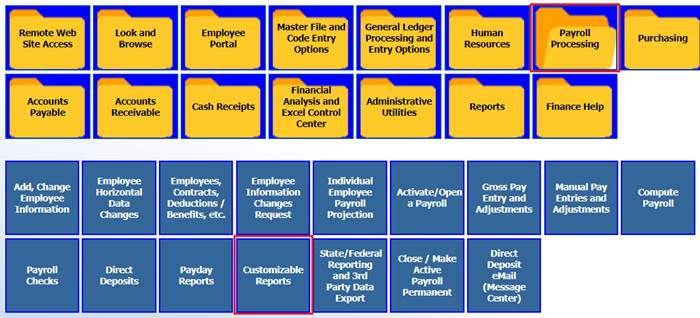
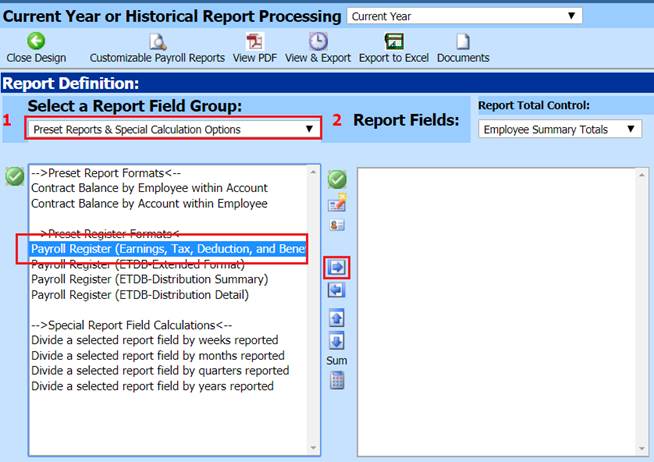
2. 1 Select a Report Field Group: Select Preset Reports & Special Calculation Options
3. From reports listed: Select Payroll Register (Earnings, Tax, Deduction, and Benefits)
4. Use the
 to move over to Report
Fields selection
to move over to Report
Fields selection
5. Verify the Payroll date selection
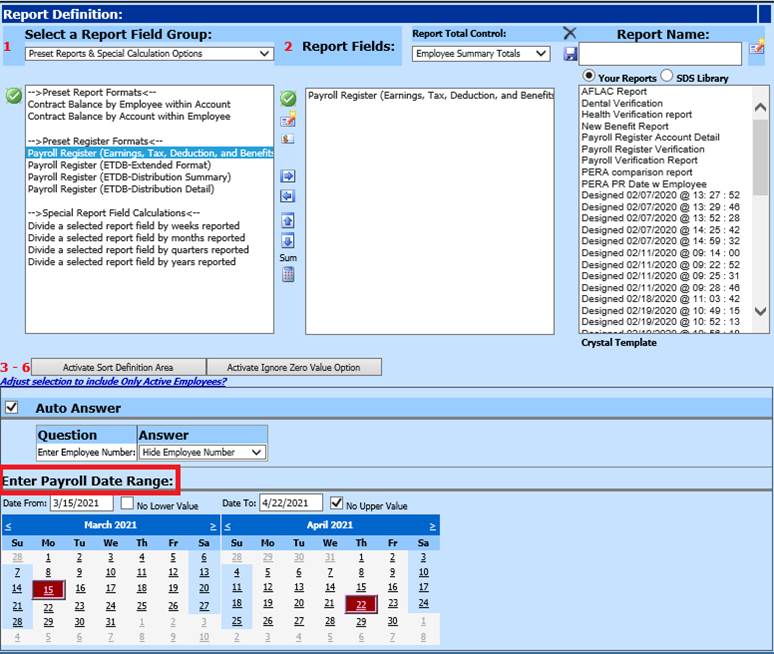
6. Preview Report

7. Verify Payroll report for Earnings, Taxes and Net Pay, Deductions and Benefits

8. Once you have viewed the report, you can customize the report header.
9. Close Report
10. Under Report Name, change the name to your requirements
11. Select Save
12. This report will be displayed in the Reports listed below

13. You will also be able to view the saved report from Payday Reports section for the Active Payroll or All Payroll Dates.
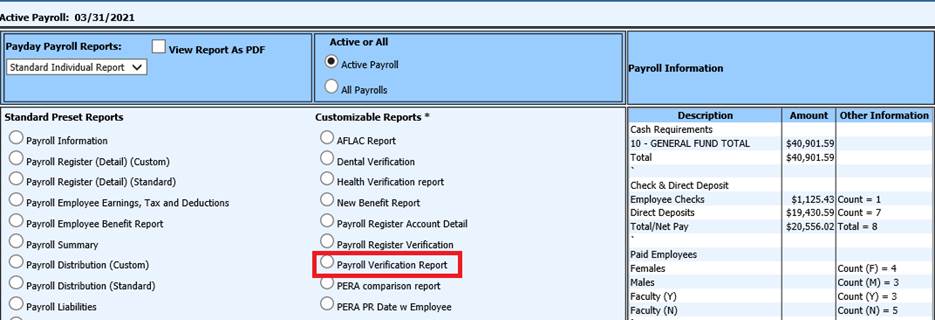
14. Under Standard Preset Reports, verify the remaining Payday Reports listed for Active payroll.
•Payroll Employee Earnings, Tax and Deductions
•Payroll Employee Benefit Report
•Payroll Summary
•Payroll Distribution
•Payroll Liabilities
•Payroll Transaction
•Payroll Account Creation
•Gross Pay by Employee
•Gross Pay by Account
•Time Card Entry Verification Report
•Payroll Distribution by Employee
•Deduction and Benefit Registers
•Tax Registers
•Direct Deposit Report
•Employee Check Register
Note: Once all Payroll reports have been verified, you are ready to create payroll vouchers and checks.
Direct Deposit Processing
1. Select Direct Deposit
2. Select Voucher Date
3. Select Voucher Number or the allow the system to auto populate
4. Verify Voucher Sequence and Format
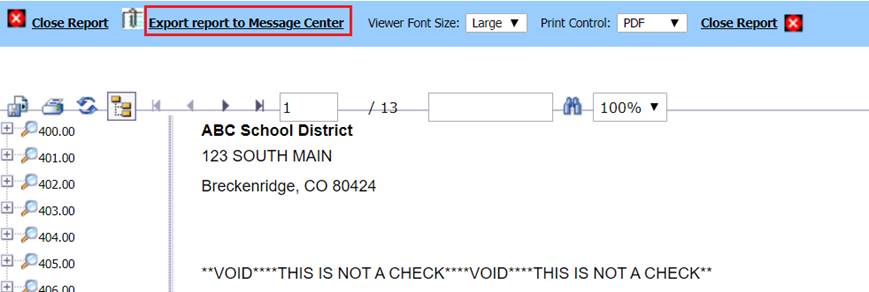
5. Select Print/Display Direct Deposit Voucher
6. Select Export Report to Message Center
Make sure the “Create Direct Deposit Vouchers by Employees” is selected.
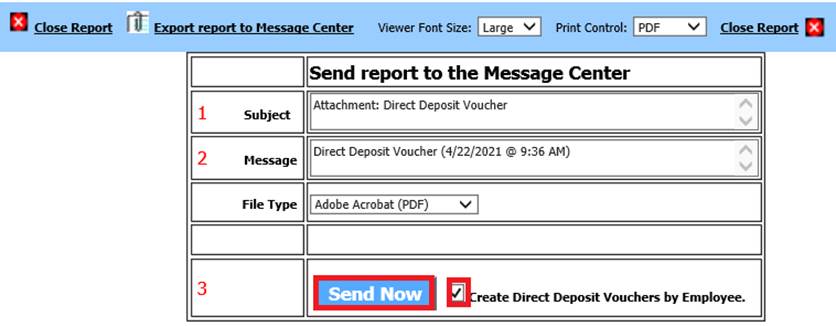
7. Select Send Now
8. Print Vouchers or Close report
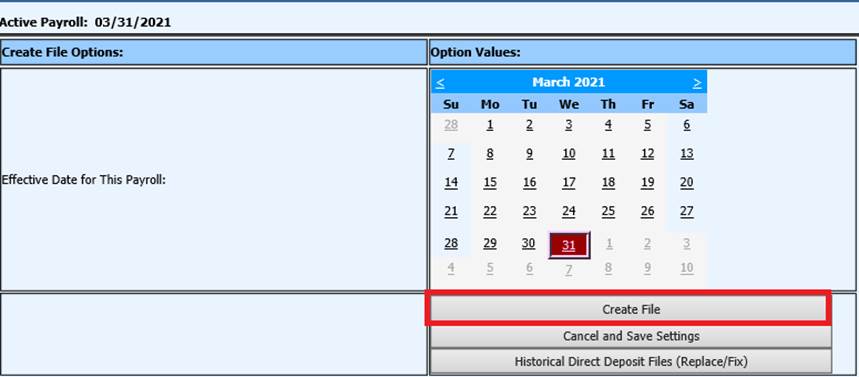
9. Select Create File Options
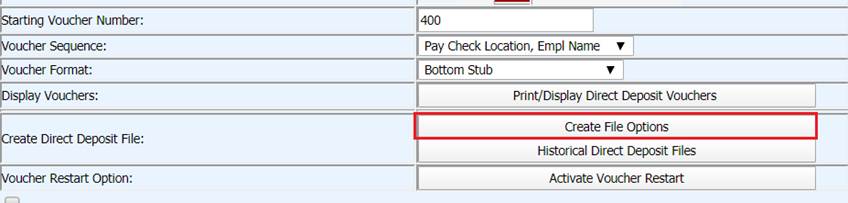
10. Select the Effective Date for This Payroll
11. Select Create File
12. Right click on the yellow folder that was just created. Select Save link as or Save target as:

13. Save the file to your workstation
14. The file is ready to be sent to your bank
Payroll Check Processing
1. Select Payroll Processing
2. Select Payroll Checks
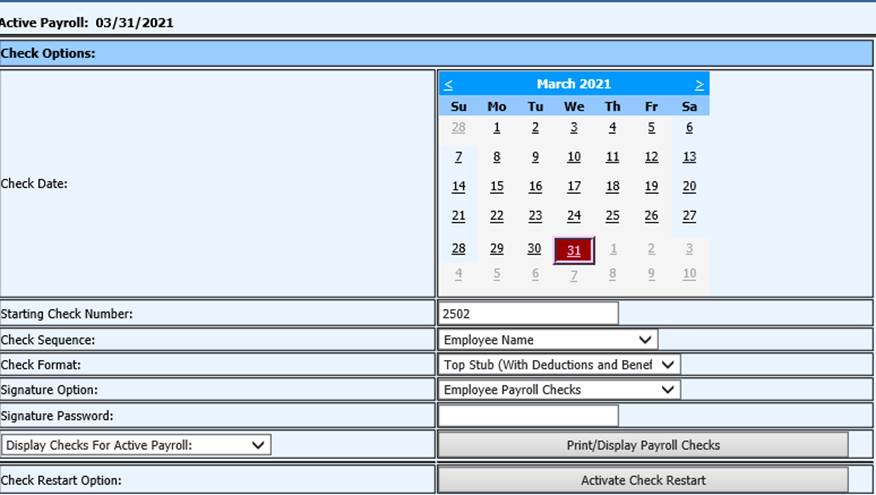
a. Check Date: Select the Date that will print on the checks from the calendar
b. Starting Check Number: Verify number or enter a new number
c. Verify Check Sequence
d. Verify Check Format
e. Signature Option: If using Premier Check Signature, enter the Signature Password
f. Select Export Report to Message Center
g. Select Send Now
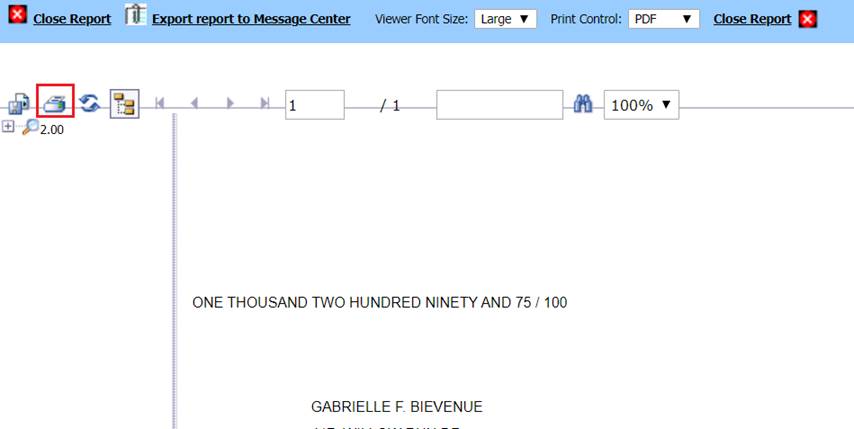
h. Select Print/Display Payroll Checks
3. Print Check
Payroll Checks and Voucher Reports to Print or Save
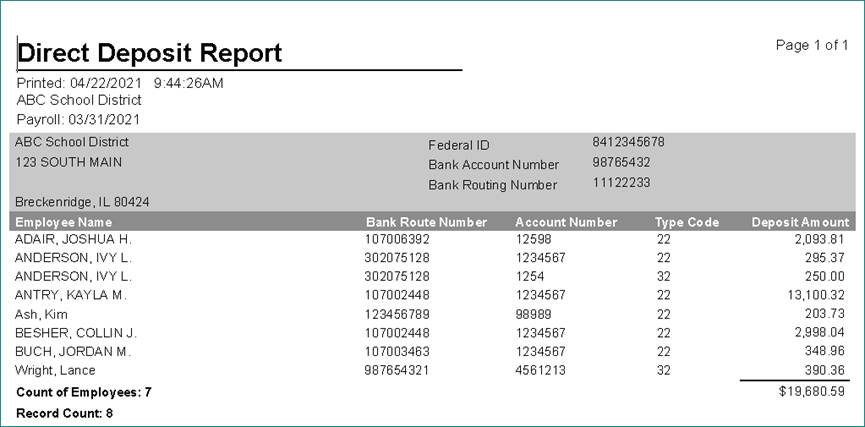
1. Select Payday Reports
2. Select Direct Deposit Report. This report will display employee bank information in detail
3. Select Employee Check Register. This report will show all Direct Deposit and Payroll Checks.
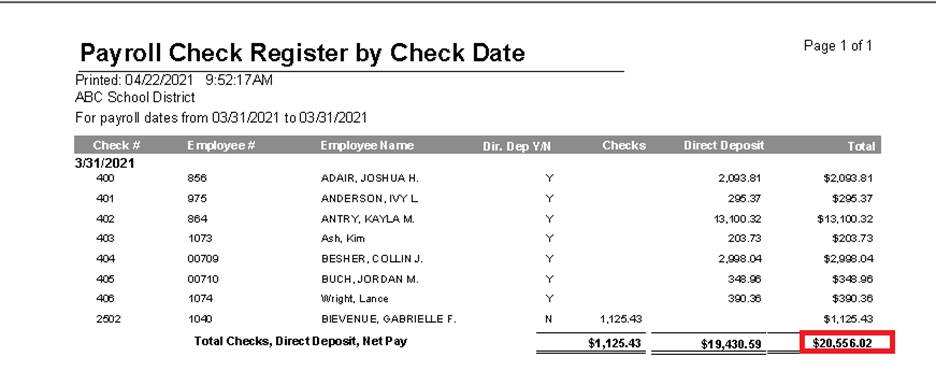
a. When viewing this report, you can verify the Total of Direct Deposit and Payroll Checks with Net Pay amount listed on the Payroll Summary Report.
NOTE: If these two totals do NOT match, review employee direct deposit settings and Compute Payroll again, before submitting Payroll Direct Deposit file to bank for processing.
Completing the Payroll
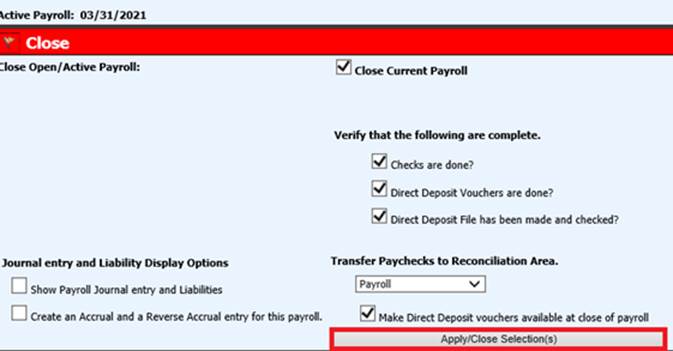
Closing Payroll
1. Select Close/Make Active Payroll Permanent
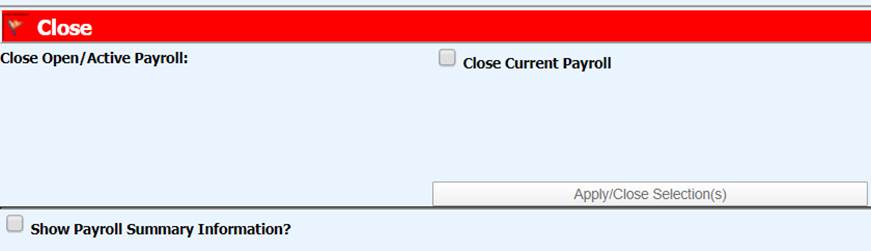
2. Select Close Current Payroll
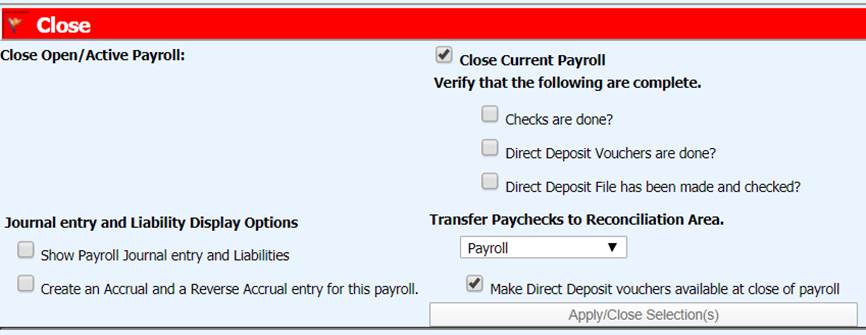
a. Select Checks are done?
b. Select Direct Deposit Vouchers are done?
c. Select My Direct Deposit File has been made and checked?
NOTE: If any of these steps are not completed, do NOT close the payroll
3. Transfer Paychecks to Reconciliation Ares: Select the Check group to post the payroll transactions.
4. Place a Check in Make Direct Deposit vouchers available at close of payroll, to allow employees to receive vouchers prior to payroll. If you do not check this box, the employees will not see their vouchers until the actual payroll date.
5. Select Apply/Close Selections
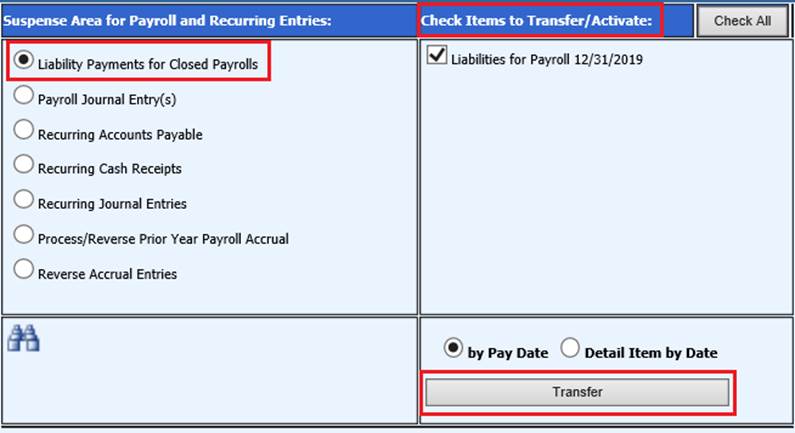
Transfer Payroll
1. Select General Ledger Processing
2. Select Transfer Payroll Data and Recurring Entries
3. Select Liability Payments for Closed Payrolls
a. Verify the payroll to be transferred to accounts payable
b. Select Transfer
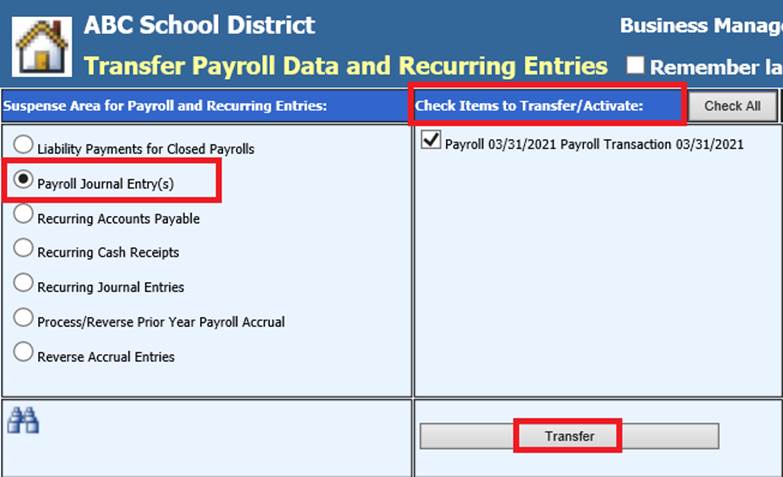
4. Select Payroll Journal Entry(s)
a. Verify the payroll to be transferred to the general ledger
b. Select Transfer
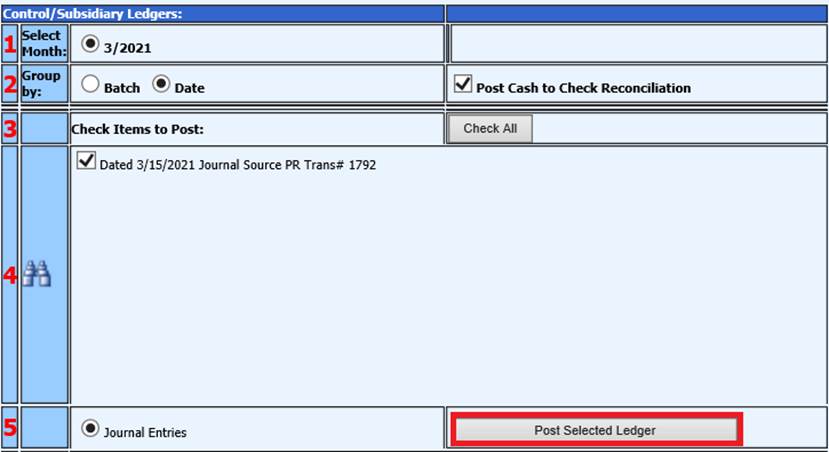
5. Make journal entries permanent
a. Select General Ledger Processing and Entry Options
b. Select Make New Transactions Permanent
c. Select the payroll to be posted
d. Post Selected Ledger
Paying Payroll Liabilities
Verify Payroll Liabilities Reports
1. Select Accounts Payable
2. Select Disbursements/Accounts Payable Entry
3. Select Open Accounts Payable report

4. In the A/P or Disbursement Categories, select the “P” for Payroll liabilities
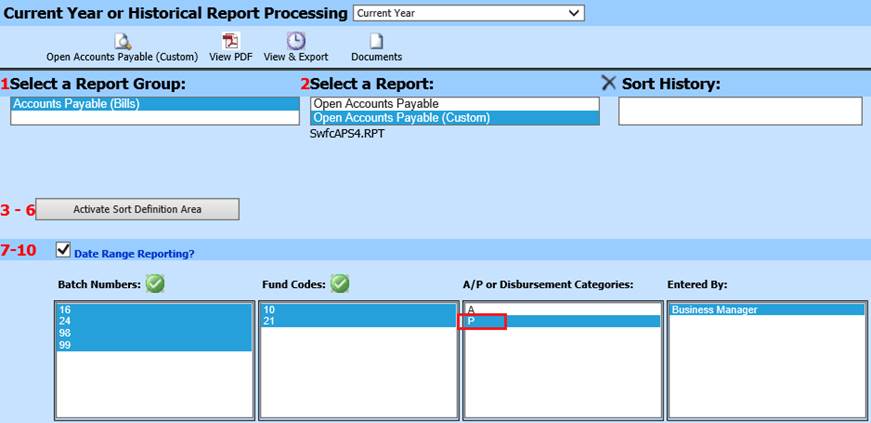
5. Verify date on calendars
6. Review report for open payroll liabilities
Payroll Liability Adjustments
If you have adjustments to enter for a Payroll Liability, you will enter this in Accounts Payable.
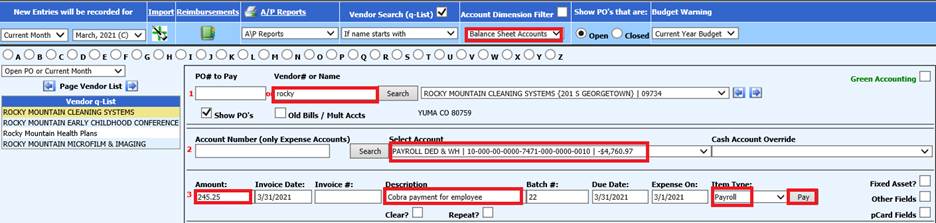
1. From Disbursement/Accounts Payable Entry
2. Select Month
3. 1 Enter Vendor # or Name
4. 2 Enter Account Number: Enter in part or all of the Account number or Account Description
5. Select Search and select account from drop down selection
6. 3 Complete fields needed for Invoice entry. Item Type field, make sure you use Payroll.
7. Select Pay
8. Verify Open Accounts Payable Report, with new entries
See below link for additional information on Accounts Payable entry:
http://help.schooloffice.com/financehelp/#!Documents/disbursementaccountspayableentry.htm
Print Payroll Liability Checks
1. Select Check/Voucher Processing
2. Select Checks
a. Payment Type Selection: Select Payroll

b. Select Current, Next Month or Both
c. Invoice Selection By: Select Vendor/Inv#
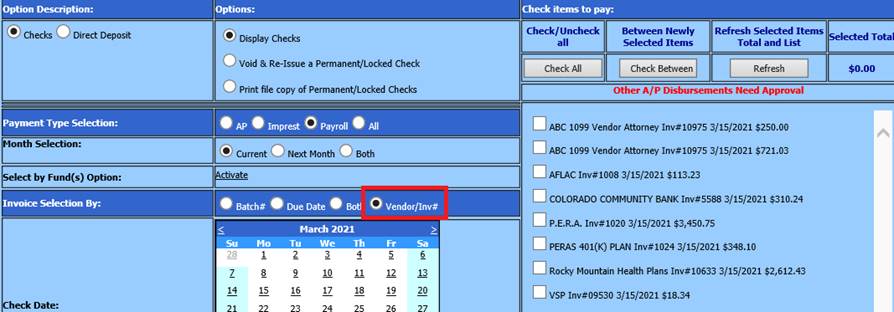
d. On the right hand column, select the vendor(s) required for the check run
e. Select the refresh button

f. Select the date for the checks from the calendar
g. Change the starting check number if needed
h. Check sequence
i. Check format: Bottom stub, top stub, or custom
j. Signature options: Enter the password if needed
k. Print / Display Checks
l. Select Export Report to Message Center
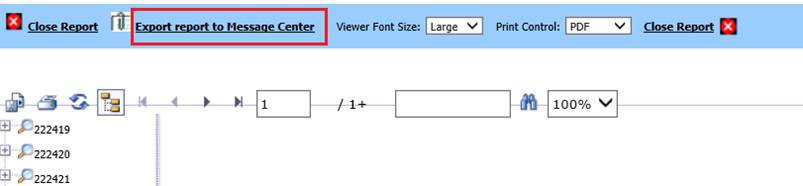
m. Select Send now
n. Print the checks
o. Close the print screen
Print Payroll Liability Direct Deposit (ACH or EFT) Vouchers
1. From Check/Voucher Processing
2. Select Direct Deposit
a. Payment Type Selection: Select Payroll
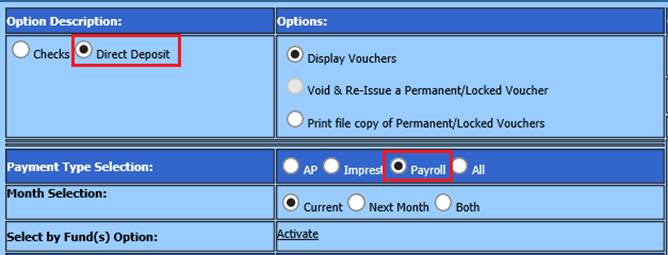
b. Select Current, Next Month or Both
c. Invoice Selection By: Leave as Vendor/Inv#
d. Select the vendor(s) required for the voucher run
e. Select the refresh button
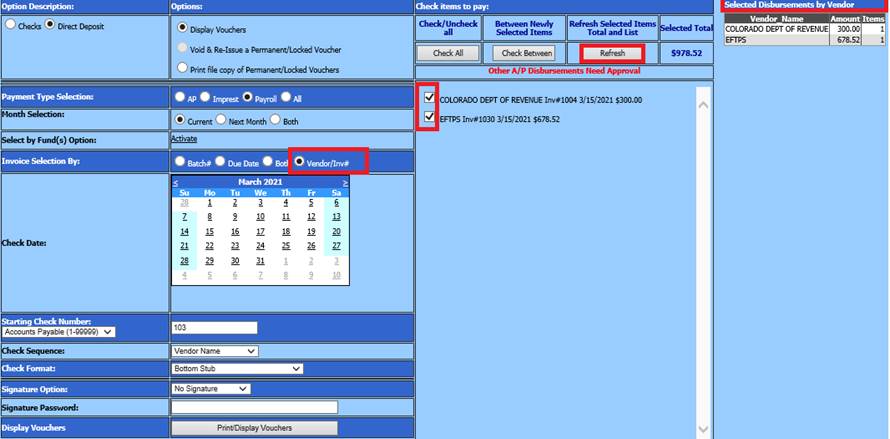
f. Select the date for the vouchers from the calendar
g. Change the starting voucher number if needed
h. Check sequence
i. Check format: Bottom stub, top stub, or custom
j. Signature options: Change to No signature
k. Print / Display Vouchers
l. Select Export Report to Message Center
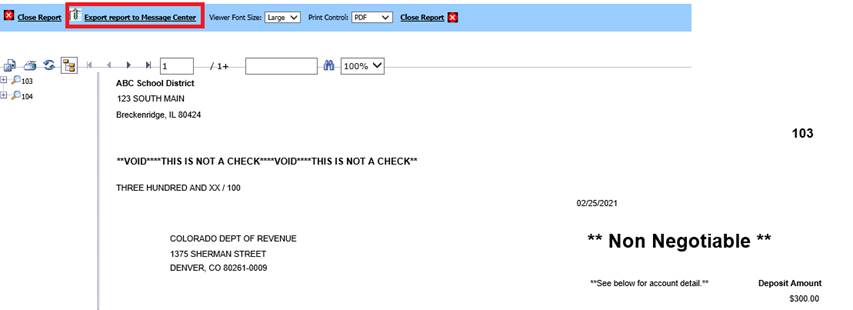
m. Select Send now
n. Print the vouchers, if needed
o. Close the print screen
Make Payroll Liabilities Permanent
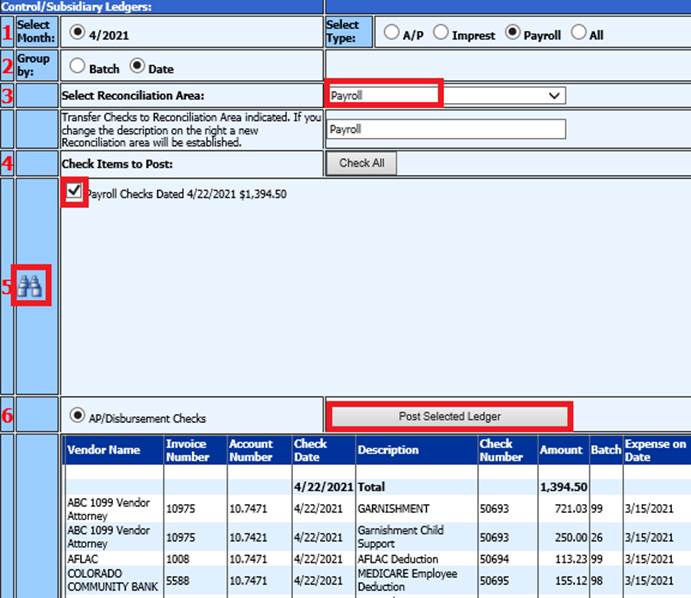
1. Select Make Check Permanent (Post to Ledger)
2. Select Payroll
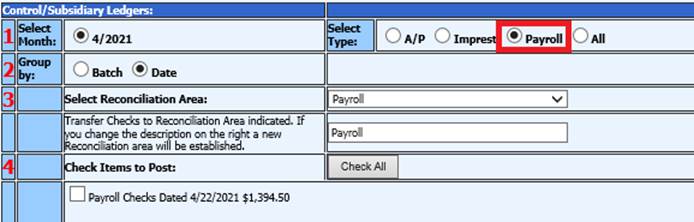
3. Select Reconciliation Area
4. Select items to post
5. Preview items posted
6. Select Post Selected Ledger
State & Federal Reporting
The State and Federal Reporting section maintains reports mandated by the Federal Government and by each State. This reporting area also is used for reporting information mandated by a number of third party reporting and 403b Administrators, if used by each district.
Follow below links for step by step instructions for the reporting needed. Items created in this section are dependent upon your institution’s specific reporting requirements.
Federal Reporting Links:
Quarterly 941 Reporting Process:
http://help.schooloffice.com/financehelp/index.html#!Documents/quarterly941report.htm
Social Security Administration Reporting Process:
http://help.schooloffice.com/financehelp/index.html#!Documents/ssaemployeeverification.htm
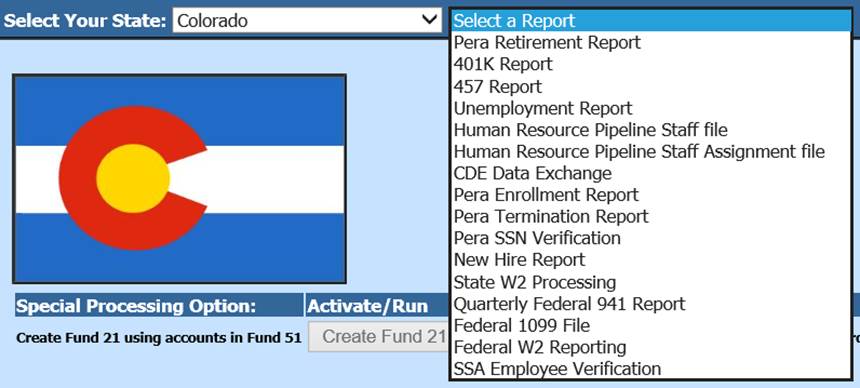
State Reporting Links:
1. Select Payroll Processing
2. Select State & Federal Reporting
3. Select your state
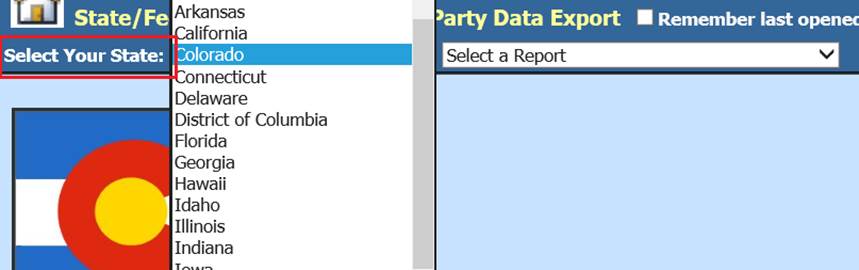
4. Select Report to work with
NOTE: Below are examples of a few different state reporting’s available:
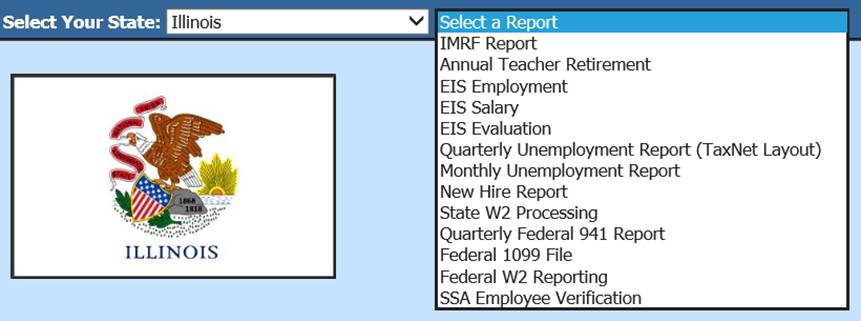
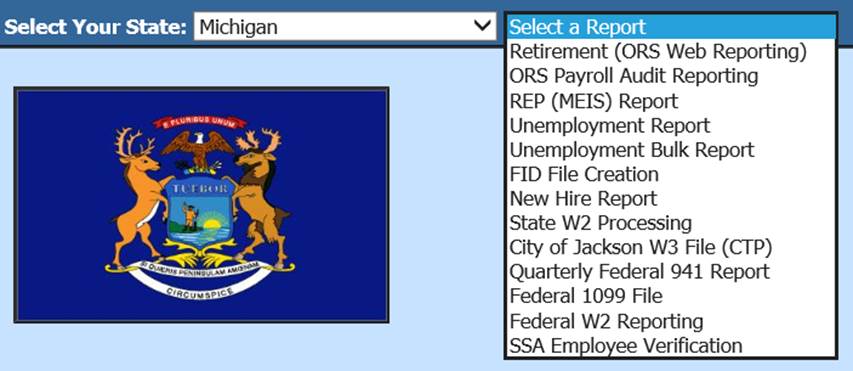
Under the below links, select the state in which you reside in, to view specific State Reporting processes:
•http://help.schooloffice.com/financehelp/index.html#!Documents/statespecificreporting1.htm
Payroll Processing Check List
|
Basic Checklist for Payroll | |||||
|
Completed | |||||
|
Deduction & Benefit Master Additions and Changes |
|||||
|
Human Resources |
|||||
|
Human Resources Control Center |
|||||
|
Deductions & Benefits Master adjustments |
| ||||
|
Employee Additions and Changes |
|||||
|
Payroll Processing or Human Resources |
|||||
|
Add, Change Employee Information |
|||||
|
General Information |
| ||||
|
Tax Information |
| ||||
|
Payroll Control |
| ||||
|
Default Accounts & Rates |
| ||||
|
Other |
| ||||
|
Contracts |
| ||||
|
Position |
| ||||
|
Deductions & Benefits |
| ||||
|
Direct Deposit |
| ||||
|
Update Employee Portal |
|||||
|
Administrative Utilities |
|||||
|
Security - Application Access |
|||||
|
Update Employee Portal access |
| ||||
|
Print Employee access letter |
| ||||
|
Run a Payroll |
|||||
|
Payroll Processing |
|||||
|
Activate/Open a Payroll |
|||||
|
Calendar Setup & Dates Worked |
| ||||
|
Select Contract Categories to Open |
| ||||
|
Preview Contracts |
| ||||
|
Payday Reports |
|||||
|
Verify Contract Amounts to be paid |
| ||||
|
Enter in Attendance |
|||||
|
Complete Attendance Entry |
| ||||
|
Gross Pay Entry and Adjustments |
|||||
|
Enter in manual time card and extra pay |
| ||||
|
Payday Reports |
|||||
|
Verify manual time card entries |
| ||||
|
Compute Payroll |
|||||
|
Verify/select Timing Codes |
| ||||
|
Payday Reports |
|||||
|
Verify Payroll computation in Payday reports |
| ||||
|
Verify Customizable Payroll Reports, if needed |
| ||||
|
Direct Deposit |
|||||
|
Print & Export to Message Center, Direct Deposit Vouchers |
| ||||
|
Create Direct Deposit file |
| ||||
|
Save Direct Deposit file to computer |
| ||||
|
Payroll Checks |
|||||
|
Print & Export to Message Center, Payroll Checks |
| ||||
|
Payday Reports |
|||||
|
Run other payday reports as needed |
| ||||
|
Close/Make Active Payroll Permanent |
|||||
|
Close current payroll |
| ||||
|
Submit Direct Deposit file to bank |
| ||||
|
Transfer Payroll and Liabilities to General Ledger |
|||||
|
General Ledger Processing and Entry Options |
|||||
|
Transfer payroll Data and Recurring Entries |
|||||
|
Select Liability Payments for closed payrolls |
| ||||
|
Select Journal entries for closed payrolls |
| ||||
|
Make Transactions Permanent |
|||||
|
Make the Payroll transactions permanent |
| ||||
|
Pay Payroll Liabilities |
|||||
|
Accounts Payable |
|||||
|
Disbursement/Accounts Payable |
|||||
|
Print Open Accounts Payable report for review |
| ||||
|
Check Voucher Processing |
|||||
|
Choose Vendor/Inv# for liabilities to be paid |
| ||||
|
Make Checks Permanent |
|||||
|
Select Payroll Liability Batches to make permanent |
| ||||
|
Run State and Federal Reports |
|||||
|
Payroll Processing |
|||||
|
State and Federal Reporting |
|||||
|
Print Month and Quarter Reports |
| ||||