
Revised: 6/2021
The Salary Schedule allows you
to work with different salary scenarios in negotiations. You have the ability to
change the base salary, increase or decrease money between steps and lanes and
increase or decrease by percentage differences between steps and lanes. All
these changes will be reflected in New Money and Percent of New Money on your
display. Your display will also include the total cost of the original salary
schedule scenario.
The Salary Schedule system creates new employee
contracts from a Saved Salary Schedule. It will also increase the salary step
your employees are assigned to. After creating a salary schedule and contracts,
you do have the ability to remove any created contracts in mass, basically an
undo feature.
Getting Ready to Use the Salary Schedule and
Employee Cost Projection
Before working with the Salary
Schedule area, all employees with a contract should be assigned to a salary
schedule group with a contract type code. All employees paid using a salary
contract should also have their current salary schedule step and lane entered.
Entering this information gives the Salary Schedule the ability to show a
scatter gram of current employees.
Setting up the Contract Type Code
and Salary Lane and Steps
1. Select Human Resources or Payroll Processing
2. Select Employee Horizontal Data Changes
3. Entry Option: Select Contracts (All Fields)
4. Update/verify Contract Type Code (this code is user defined).
5. Updated employee salary lane and salary step they are currently on for the current school year contract.
6. Select Save
Salary Schedule
1. Select Human Resources
2. Select Salary Schedule and Employee Cost Projection
This section will cover how to create a new salary schedule, using three different options:

1. Definitions by $ amounts.
2. Definitions by %.
3. Actual Values for the schedule can be entered.
Example of Salary Schedule:
|
Step |
BA |
BA+15 |
BA+30 |
MA |
MA+15 |
MA+30 |
|
1 |
34000 |
34500 |
35000 |
36000 |
36500 |
37000 |
|
2 |
34500 |
35000 |
35500 |
36750 |
37250 |
37750 |
|
3 |
35000 |
35500 |
36000 |
37500 |
38000 |
38500 |
|
4 |
35500 |
36000 |
36500 |
38250 |
38750 |
39250 |
|
5 |
36000 |
36500 |
37000 |
39000 |
39500 |
40000 |
|
6 |
36500 |
37000 |
37500 |
39750 |
40250 |
40750 |
|
7 |
37000 |
37500 |
38000 |
40500 |
41000 |
41500 |
|
8 |
37500 |
38000 |
38500 |
41250 |
41750 |
42250 |
|
9 |
38000 |
38500 |
39000 |
42000 |
42500 |
43000 |
|
10 |
38500 |
3900 |
39500 |
42750 |
43250 |
43750 |
|
11 |
39500 |
40000 |
43500 |
44000 |
44500 | |
|
12 |
40000 |
40500 |
44250 |
44750 |
45250 | |
|
13 |
40500 |
41000 |
45000 |
45500 |
46000 | |
|
14 |
41000 |
41500 |
45750 |
46250 |
46750 | |
|
15 |
41500 |
42000 |
46500 |
47000 |
47500 | |
|
16 |
42500 |
47250 |
47750 |
48250 | ||
|
17 |
43000 |
48000 |
48500 |
49000 | ||
|
18 |
43500 |
48750 |
49250 |
49750 | ||
|
19 |
49500 |
50000 |
50500 | |||
|
20 |
50250 |
50750 |
51250 | |||
|
21 |
51500 |
52000 | ||||
|
22 |
52250 |
52750 | ||||
|
23 |
53000 |
53500 | ||||
|
24 |
54250 | |||||
|
25 |
55000 | |||||
|
26 |
55750 |
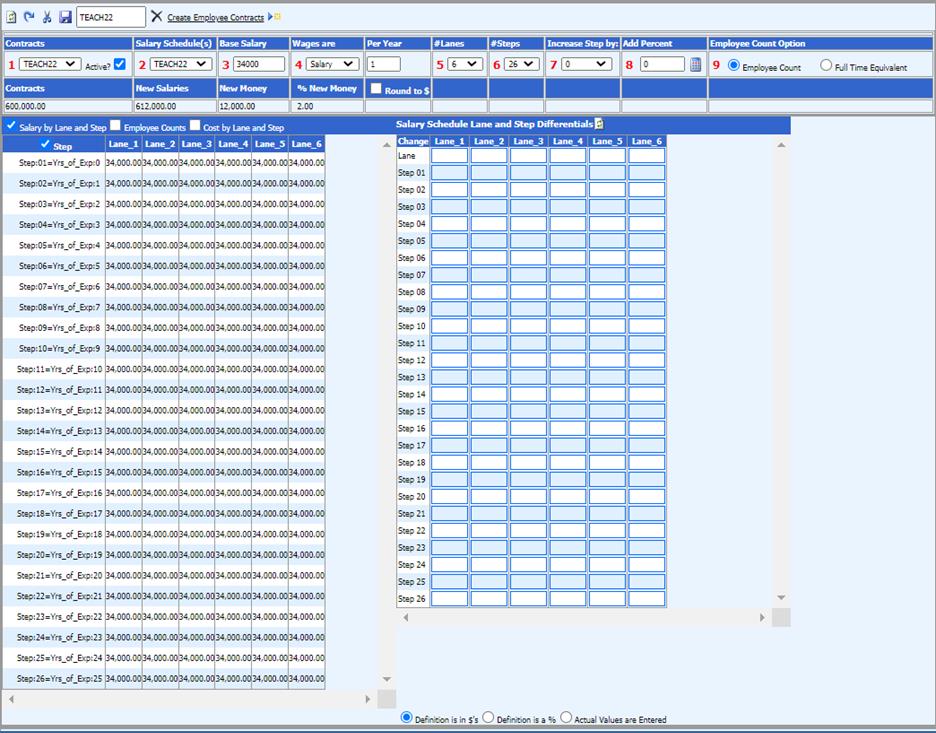
Creating a New Salary Schedule
1. The first time using the salary schedule area the Salary Schedule SP-01 will be selected. You cannot delete this schedule.
2. 1 Contracts: Select Contract Type Code used in the Employee Contract area.
3. 2 Salary Schedule(s): Select Salary Schedule
4. 3 Base Salary: Update base salary to the amount on the salary schedule
5. 4 Wages are: Select from; Hourly, Daily, Weekly, Monthly, Salary, Other
o Update Per Year
6. 5 #Lanes: Update # of Lanes, i.e. 6 lanes
7. 6 # of Steps: Update # of steps, i.e. 26 lanes
o 7 Increase Step by:
8. 8 Add Percent: Update with percentage

9. Then select which definition to use in creating the salary schedule. For this example we will be selecting the Definition by $amounts.
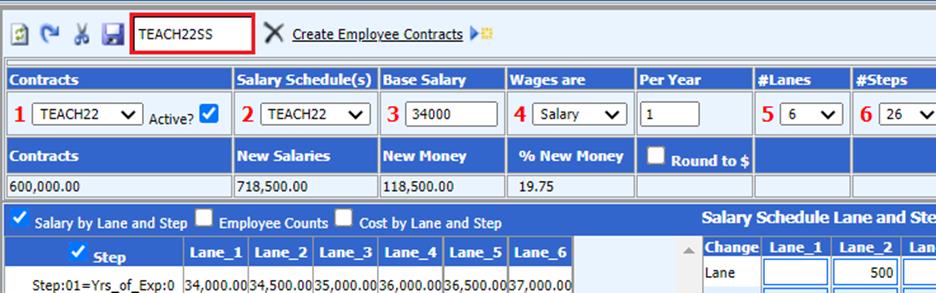
10. On this salary schedule the lanes increment by $500 for the first three lanes and then by $1000 on the fourth lane and back to a $500 increment on the remaining two lanes. To change this on the schedule in Lane/Lane_2 put in $500 and in Lane/Lane_4 put $1000 and in Lane/Lane_5 put in $500.
11. Then select the Salary Schedule Lane and Step Differentials. The salary schedule will change over to the left of the screen.
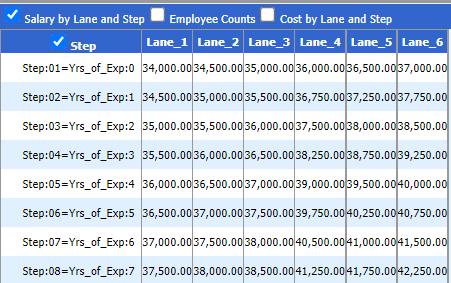
12. Then in Step 02 Lane_1 put in $500 and select the Salary Schedule Lane and Step Differentials. This same process can be done on the other Lanes in Step 02 to make the same changes on the salary schedule.
13. On this salary schedule it stops incrementing in the first lane on step 10. To accomplish this go to Step 11 Lane_1 and put in a 0 (zero). Then select the Salary Schedule Lane and Step Differentials. Again the schedule will change. This same process can be done for each Lane on the Step that stops incrementing.

14. Next save the schedule by changing the name of the schedule at the top of the screen where the SP-01 appears and selecting the diskette button to finish the save process. A new schedule has been created.
15. This same process can be accomplished by using the definitions by a % or by actually entering in the salary schedule values.
Using the New Salary Schedule
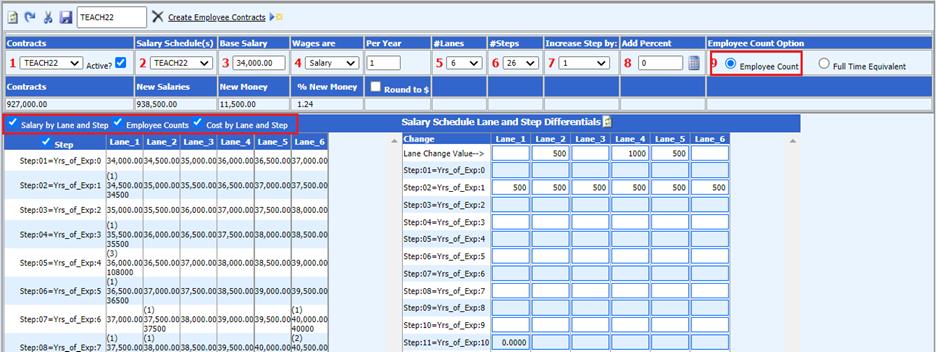
1. 1 Contracts: Select contract type
2. 2 Select salary schedule
3. At this point the amount of the contracts for the contract type selected under step one will be showing under the contracts field.
4. Select the option of employee counts. The salary schedule shows how many employees are on each lane and step for the selected salary schedule.
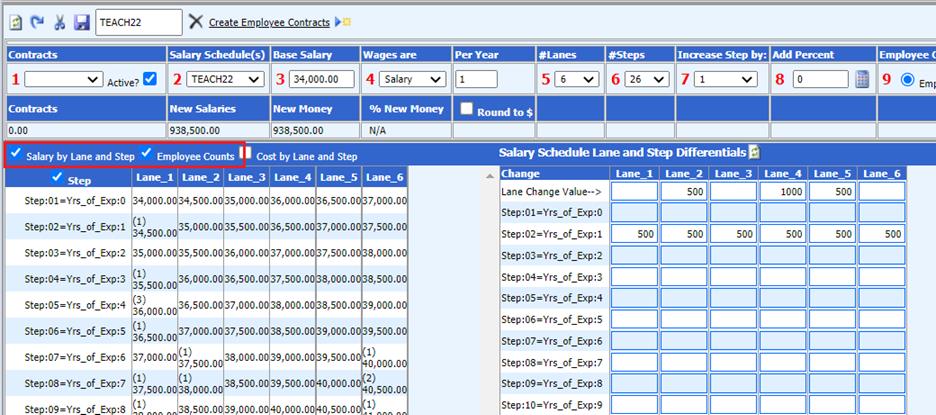
5. Select the option of cost by lane and step. The salary schedule will now show the cost per lane and step. If the option of Employee Count is used the calculation will be the number of employees in that step times the amount of salary for that step.
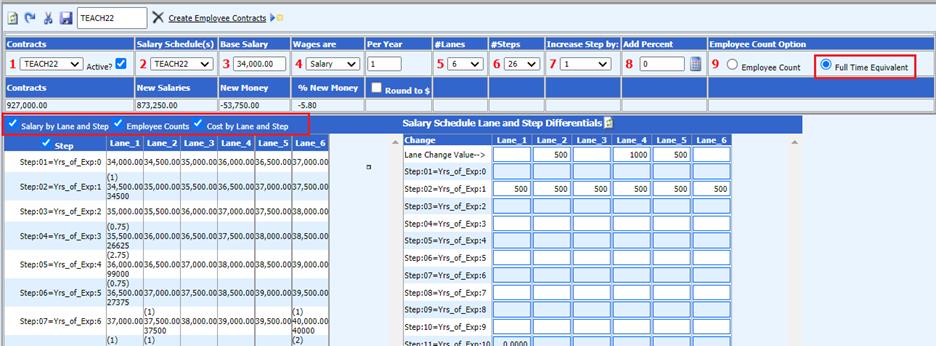
6. If the option of Full Time Equivalent is used for the employee count option the system will calculate the dollar amount based on the Full Time Equivalent of the employee in that lane and step.
7. The Full Time Equivalent is entered into the employee’s contract under the field Percent of Full Time. This field can be found by selecting Human Resources or Payroll Processing from the menu tree. Then select Employee, Contracts, Deduction/Benefits, etc. Under the Entry Views select Contracts (All Fields).
8. This information can be copied into an excel spreadsheet by highlighting the schedule then right click. Select copy. Then open an excel spreadsheet and then paste the information into the spreadsheet.
9. Under the #7 option to Increase a Step by: Select how many steps the employees will move down on the salary schedule. This change will then show the amount of new money needed for this step increase and the % of new money.
Creating New Employee Contracts
1. After setting up the new Salary Schedule select the option to Create Employee Contracts.

2. Make sure the correct salary schedule is being used at the top of the screen.
3. Next Select the Employee Contracts From. It will show you how many active contracts there are in the system for this contract group.
4. Next select if the employee’s in this group will move down a step.
5. Select the contract start date on the calendar and the contract end date on the calendar.
6. Select the number of payments.
7. Enter the correct fiscal year for the new contracts that will be created.
8. Select the button to create new contracts. At this time the system will assign a control number to the new contracts. This number can be used if the contracts as a group need to be deleted.
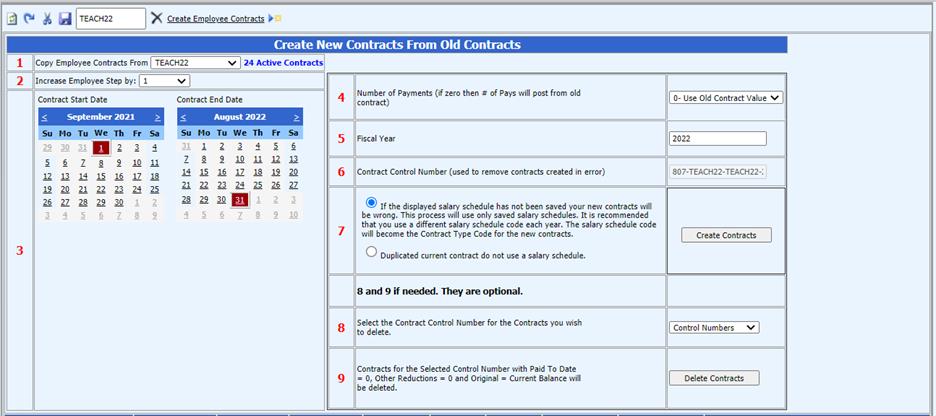
9. Enter the correct fiscal year for the new contracts that will be created.
10. Select the button to create new contracts. At this time the system will assign a control number to the new contracts. This number can be used if the contracts as a group need to be deleted.