
Revised: 12/2020
This option includes the best of both time tracking worlds. This option would allow you to track not only the time actually worked for each employee, but also to generate the timecards for authorization and approval by the employee, supervisors, and business office. The time clock log displays on the eTimesheet screens to show the time actually worked. This actual time worked, along with the records created for daily time worked, can add a valuable comparison of actual time worked versus the time determined by the employee’s position records. This time comparison, along with a notes area, adds a key communication element to this dynamic process.
Time Clock
Time Clock is used for electronic tracking of employee time. An employee clocks in, at the start of the job, at a dedicated computer terminal. They can use a swipe card, proximity card, or keyboard to indicate their login time. An employee logs out using the same method at the end of their position, lunch, or at the end of the day. If an employee returns to their position, they would login again. The login/out process is compiled within the system and is kept in a separate screen, aside from payroll, until at which time the time clock entries are authorized and approved. The records can then be automatically transferred to payroll for payment.
eTimesheet
Each employee would receive a unique User ID and Password to log into SDS – usually set up along with Employee Portal. The Employee’s login would restrict rights within SDS to just allow access to areas of the program that you designate they should access. Each payroll, a pay record is automatically generated by the system for each day worked for each employee. The settings for this record come from the Employee Master/Position Master. Each payroll, each employee would log into the program and approve/deny/edit the time that is shown for payment. The supervisors and/or business office then approve the electronic timecards and the records are then transferred into the payroll for processing with the regular payroll.
Activate SDS Web Office Settings for Time Clock and eTimesheet
1. Select Administrative Utilities
2. Select SDS Web Office Settings
3. Select Product Activation
a. Activate the Employee Portal Option
b. Change the “Payroll Time Clock” to a Y
c. Activate the Daily Electronic Time Sheets “eTime” (this option will be hidden, once activated)
d. Add “Et” to the Special/Custom feature activation key under the Product Activation tab. If you currently have any codes listed here, add the “Et” at the end. (Enter the Et without quotation marks)
4. Select “Save Changes”
5. Select Time Clock
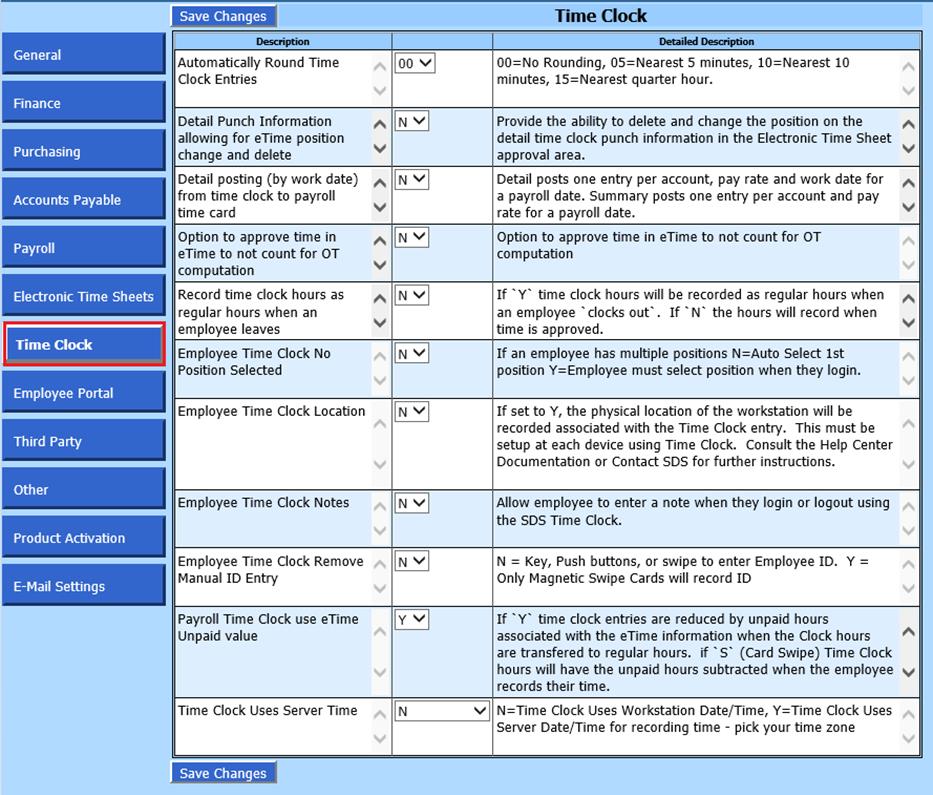
6. The following options can be reviewed to reflect the way the time clock is setup for your specific data
•Automatically Round Time Clock Entries: Determine if the system should round Time Clock Entries and to what limit.
•Detail Punch Information allowing for eTime position change and eTime position change and delete: Provide the ability to delete and change the position on the detail time clock punch information in the Electronic Time Sheet approval area.
•Detail Posting (by work date) from Time clock to payroll time card:
o Y = Detail Time Posting in Payroll Time card Entry
o N = Summary Time Posting in Payroll Time card entry
•Option to approve time in eTime to not count for OT computation: This option is used to approve time in eTime to not count for OT computation.
•Record time clock hours as regular hours when an employee leaves: If “Y” time clock hours will be recorded as regular hours when an employee clocks out. If “N” the hours will record when time is approved.
•Employee Time Clock No Position Selected:
o Y = Employee must select a position upon Time Clock login; this only affects employees who work in more than one position
o N = Employee’s first position will be used
•Employee Time Clock Location:
o Y = The physical location of the workstation will be recorded with the Time Clock entry.
o N = The location will not be used when recording the Time Clock entry
•Employee Time Clock Notes:
o Y = Allow the Employee to enter a note upon login
o N – The Employee will not be able to enter any notes upon login
•Employee Time Clock Remove Manual ID Entry:
o Y = Only Magnetic Swipe Cards will record ID
o N = Key, Push Buttons, or Swipe to record ID
•Employee Time Clock use eTime Unpaid value:
o Y = The Time Clock entries are reduced by unpaid hours associated with the eTime information when the Clock hours are transferred to regular hours
o N = The Time Clock will not use the Unpaid value field
o S = The Time Clock hours will have the unpaid hours subtracted when the employee records their time.
•Time Clock uses Server time:
o Y = Time Clock Uses Server Date/Time for recording time - pick your time zone
o N = Time Clock Uses Workstation Date/Time
7. Select “Save Changes”
8. Select Payroll
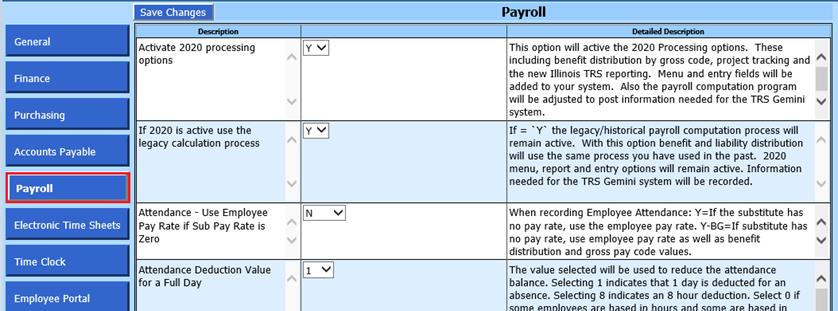
9. The following options can be reviewed to reflect the way the time clock is setup for your specific data
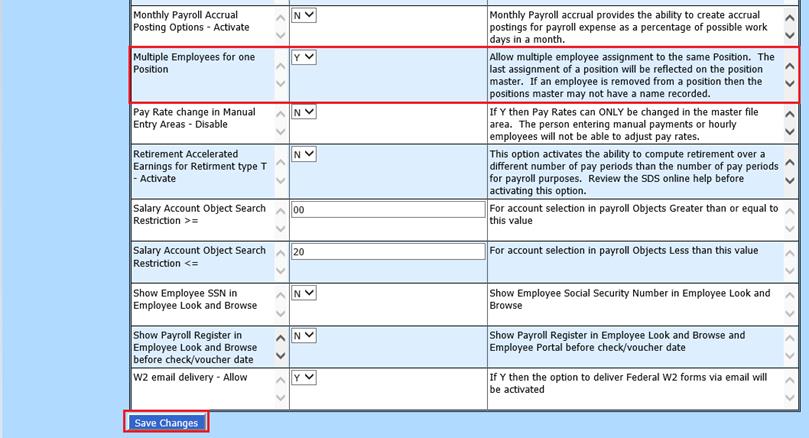
•Multiple Employees for one Position:
o Y = This will allow multiple employee assignments to the same Position. For example, one code represents the maintenance staff, and all maintenance staff are position-coded the same way.
o N = Do not allow multiple employee assignments for the same Position. For example, each maintenance staff member has his/her own position code.
10. Select “Save Changes”
11. Select Electronic Time Sheets
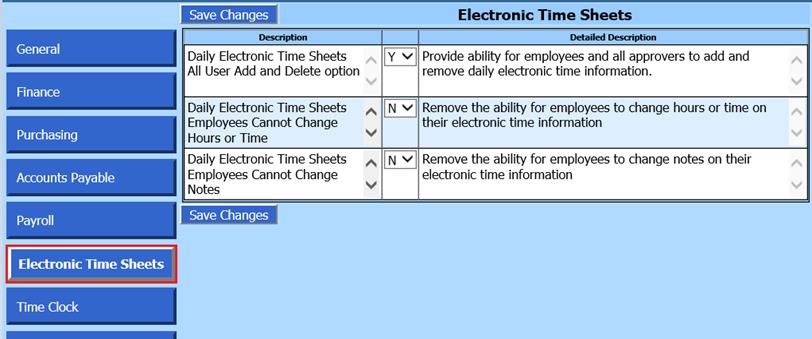
•Daily Electonic Time Sheets All User Add and Delete option: Provides the ability for employees and all approvers to add and remove daily electronic time information
•Daily Electronic Time Sheets Employees Cannot Change Hours or Time: Remove the ability for employees to change hours or time on their electronic time information
•Daily Electronic Time Sheets Employees Cannot Change Notes: Remove the ability for employees to change notes on their electronic time information
12. Select “Save Changes”
13. Log out and back into the system for all changes to take affect.
Employee Portal Setup
1. Select Administrative Utilities
2. Select Security – Application Access
3. If you have not yet setup Employee Portal users; under Options, select Mass Create Employee Portal Users
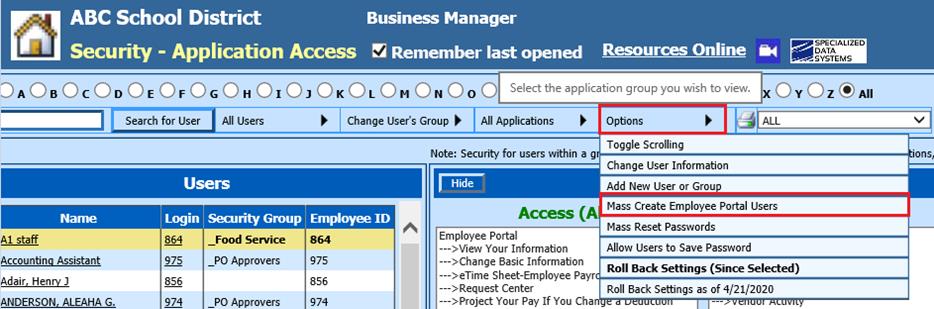
4. The below view will display
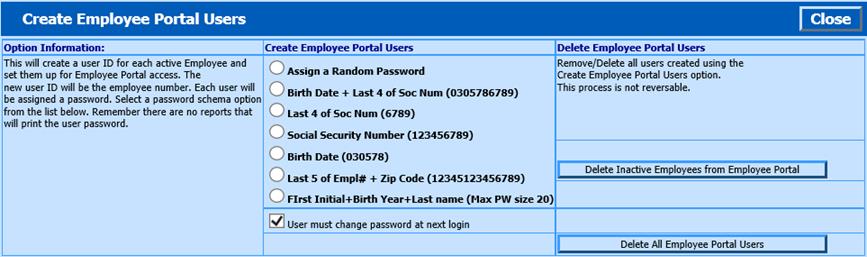
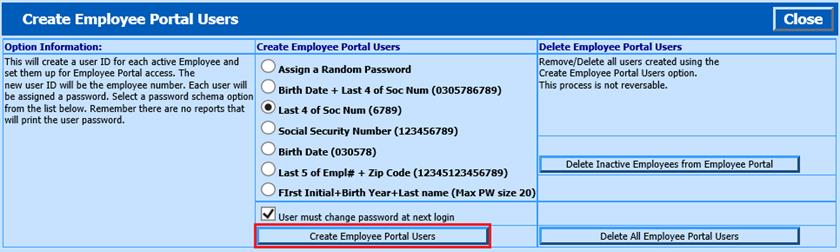
e. Create Employee Portal Users: Select password option for employees
f. Check mark “Users must change password at next login”. This option will force employees to change their initial password assigned.
g. Select Create Employee Look and Browse Users
h. The system will create a security group named _Emp_LB. It will also create a security sign in for each employee. The password will be given to each employee from the option that is selected.
See link for additional setup of Employee Portal: http://help.schooloffice.com/FinanceHelp/#!Documents/settingupsecurityfortheemployeeportal.htm
Setting up Positions
The Position Master is used for determining which positions each employee will be working and, in turn, the positions for which they can be paid. You can setup multiple positions for the same job type or you can add one position record for each job type and assign multiple employees to that one position.
5. Select Master File and Code Entry Options
6. Select Master File Vertical Data Entry and Changes
7. Entry Options: Select Position Master
8. If using
Positions for the first time, select the  to setup
a new position
to setup
a new position
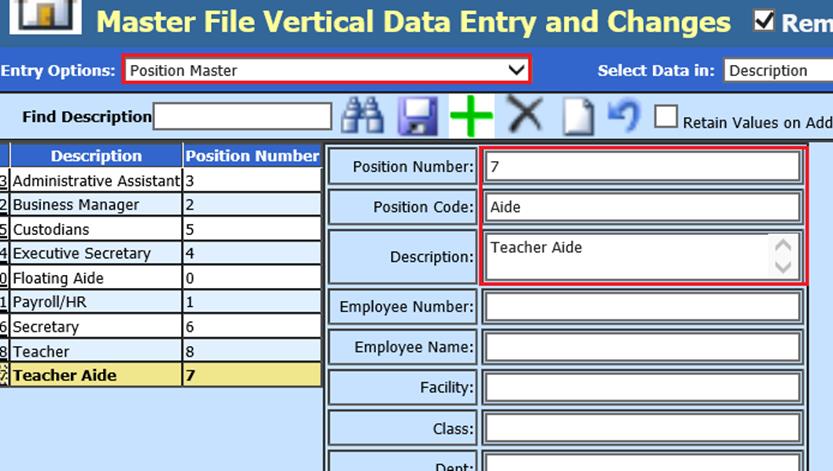
•Positions Number: User defined Number, i.e. 7
•Position code: User defined Code, i.e. Aide
•Position Description: Description of the position.
Note: If you have identical positions (i.e. teacher, sub or aide, etc.) that you are adding, checkmark “Retain values on Add”. Click the green plus sign and click the diskette to save. Keep doing this until you have your number of identical positions added. You may wish to change the description on each duplicate position to make it a unique position description, and then enter the new position and follow the same steps.
Assigning Positions to Employees
7. Select Human Resources or Payroll Processing
8. Select Add, Change Employee Information
9. Select the employee
10. Select Position
11. Select Add
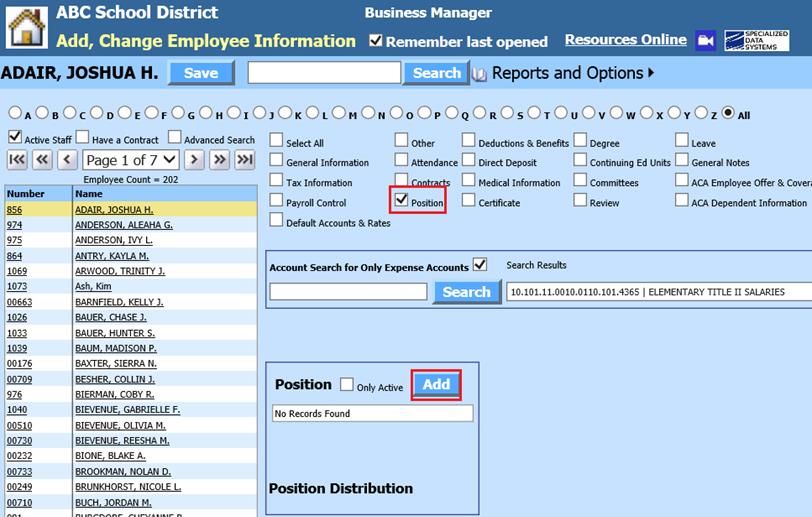
12. Complete fields for employee positions

•Position: Select Position
•Description: Enter Position Description
•Hours Per day: Enter Hours per day worked
•Hourly Rate: Enter Hourly Rate
•Retirement Type TIN: Update, as needed
•Daily Start Time: Enter Start Time
•Unpaid Hours Per Day: This is used for breaks or lunch time that is not being paid for. Example if the employee is to work 8 hours during the day and they are to start at 8 am their workday would be over at 4 pm if no hours were entered into this field. If 1 hour was entered into this field than this employee work day would end at 5 pm.
•Worked Days: M- Monday, T-Tuesday, W-Wednesday, R-Thursday, F-Friday
•Fica (YN): Update, as needed
•Current Year: This field needs to have a Y to allow the supervisor the ability to assign the employee an extra job that they have done
•Start Date: Enter Start date of position
•End Date: Does not need to be completed, unless Position does nave an End Date.
•Percent of Full Time: Enter percent of Full Time, i.e. 1 = 100%, .25 = 25%
•Account Number: Enter Account number to expense
•Percent: Enter Percent for each account number
•Benefit Distribution (YN): Select Y or N
•Gross code: The gross code needs to be assigned for each employee, based on the gross code that has been used for this employee, as it relates to each account. These codes have been assigned for each employee from either the employee demographics screen or the employee contracts screen. (The gross code(s) will be used later on in the process for grouping the employees.)
Time Clock Setup – Assign Badge ID’s to Your Staff
This process provides a way to record a Badge ID to an employee. There are two methods to accomplish this setup:
Method 1: Assigning a Badge ID using Magnetic Strip Reader
1. Select Administrative Utilities
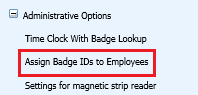
2. Select Time Clock with Administrative Options
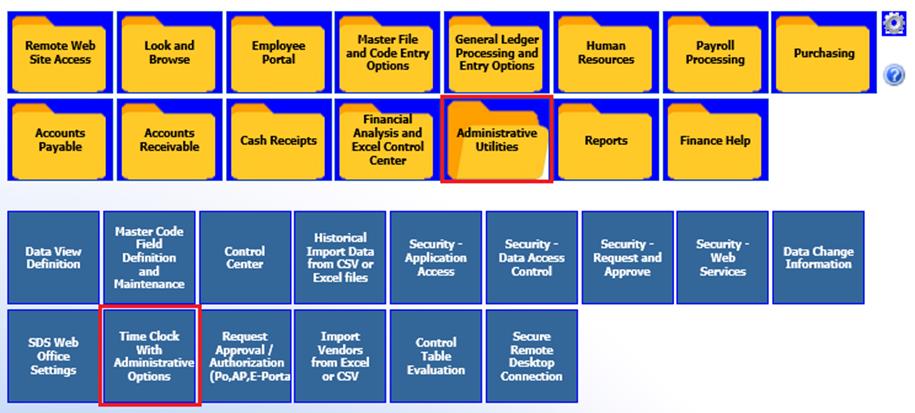
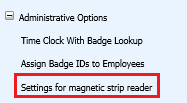
3. Select the + option next to Administrative Options

4. Select Settings for magnetic strip reader
5. Run the card through the magnetic reader. This will assign the strip on the card.
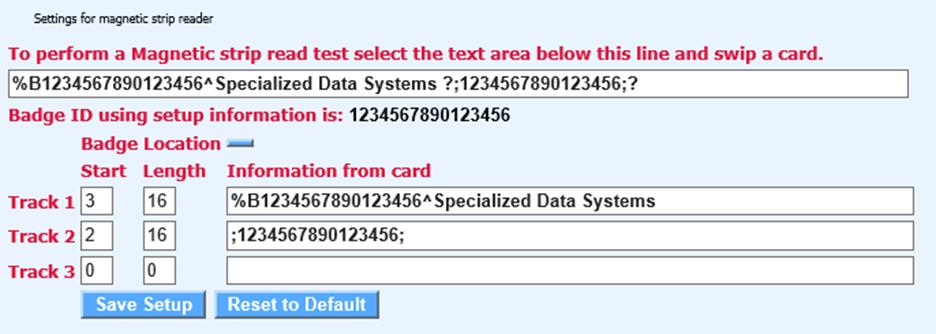
6. Select Save Setup
7. Select the next card to run through the magnetic reader.
8. Select Save Setup (after each swipe)
9. Continue this process until completed
10. Select under the + sign next to Administrative Options
11. Select Assign Badge IDs to Employees
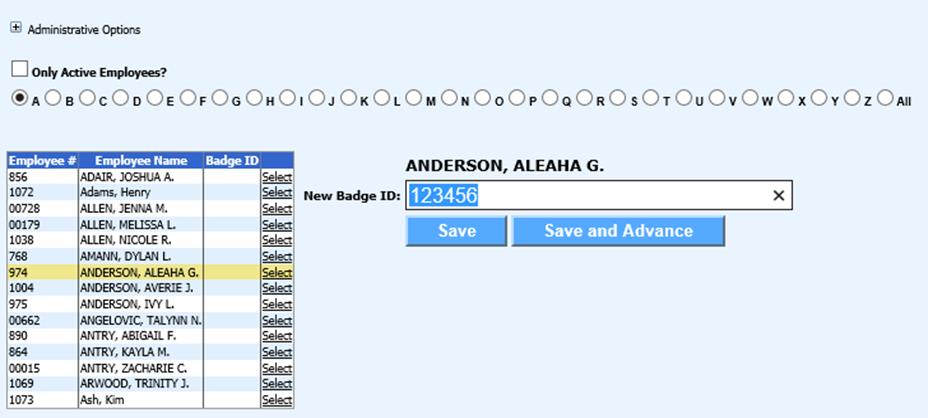
12. Select an employee, swipe a badge in the reader, the ID from the ID card will be displayed.
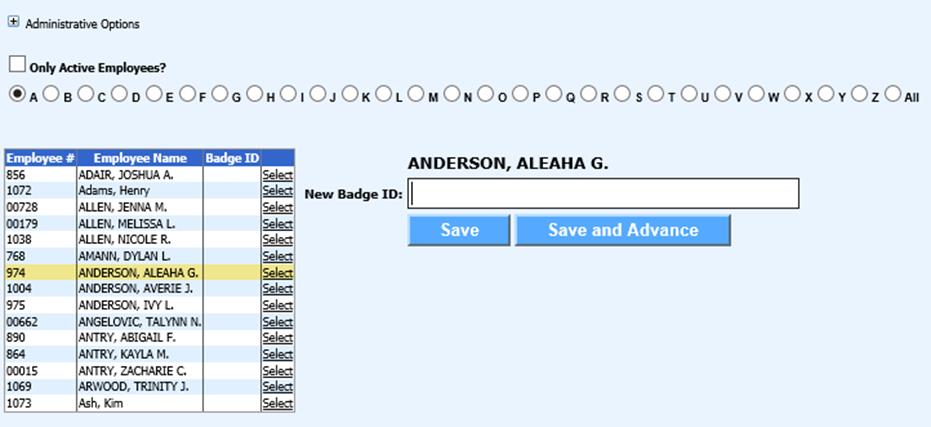
13. Select Save or the Save and Advance.
Method 2: Assigning a Badge ID by Using the Employee Number or Other Assigned Number
If you have chosen to use the keypad or the mouse for the employees to log in and out of the time clock system instead of the swipe cards, you can assign each employee a new ID number or you can have them use their employee number as their badge ID number. If you have them use their employee number as the badge ID number, you do not need to assign them a new badge ID number.
Assigning Employees to a Supervisor
11. Select Administrative Utilities
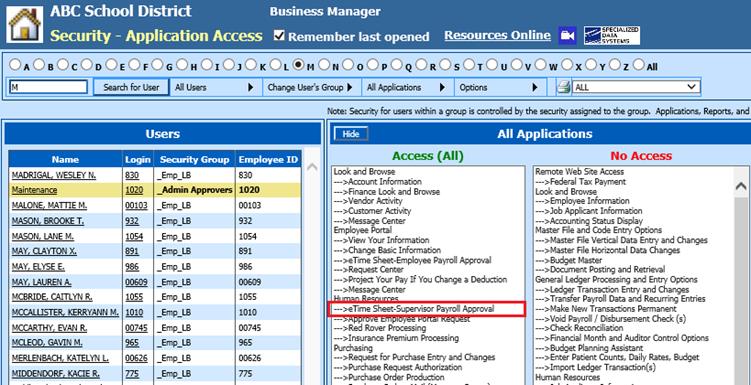
12. Select Security – Application Access
•Verify Supervisor has access to approve employee eTimesheets
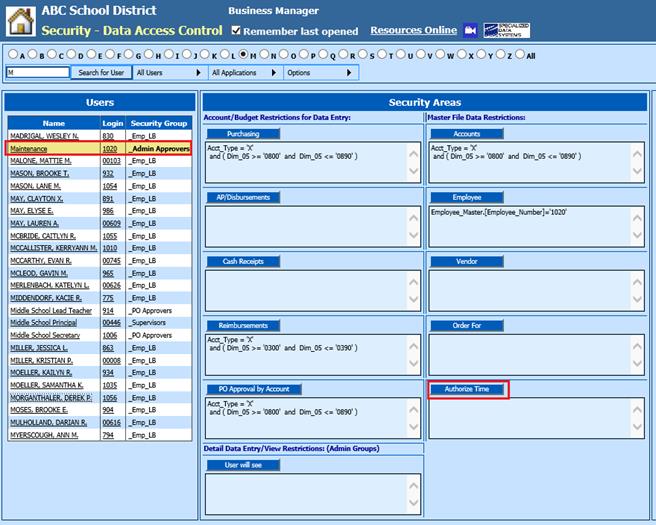
13. Select Security – Data Access Control
14. Users: Select the Supervisor
15. Security Areas: Select the Employee option.

•Under Filter Options, select the Value to assign the supervisor employees(s) they are authorizing.
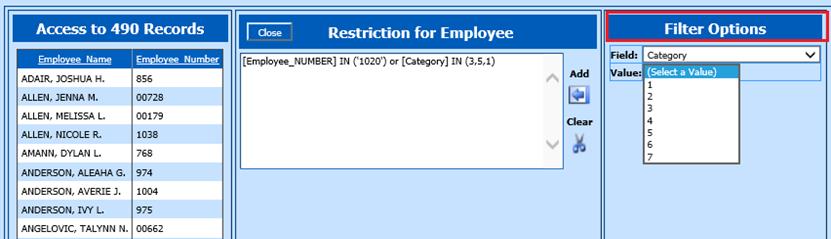
•Use the Add arrow to update formula
•Verify Restriction for Authorize Time listed
16. Select the Authorize Time option.
•Under Filter Options, select the Value to assign the supervisor position(s) they are authorizing.
•Use the Add arrow to update formula
•Verify Restriction for Authorize Time listed
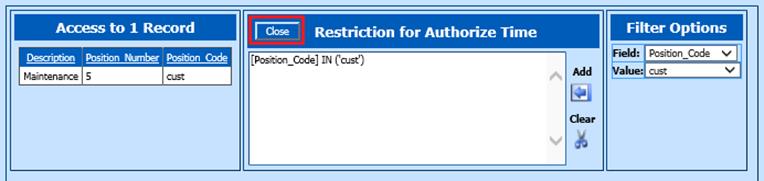
17. Select Close
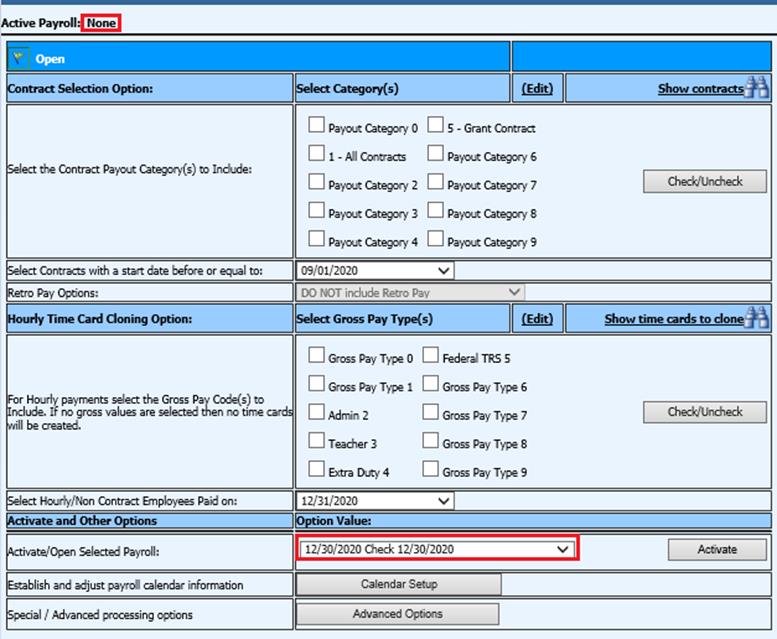
Setting up Payroll
1. Select Payroll Processing
2. Select Activate/Open a Payroll
3. Select Calendar Setup
4. Setup the payroll date for the next payroll
5. Select the payroll date, check date, first workday, and the last work day and then record the new payroll
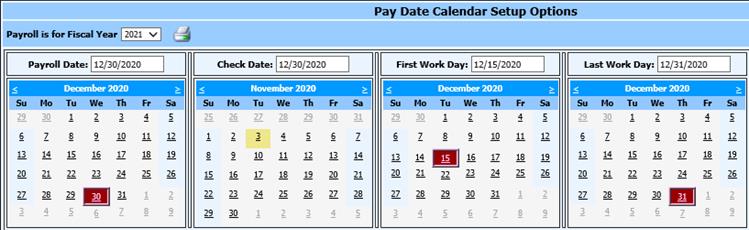
6. The payroll does not have to be activated at this point. However, the payroll date and work days have to be in the calendar area for the process to work.
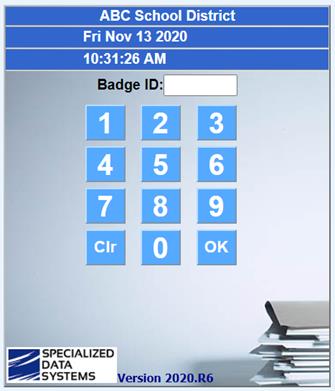
Time Clock Processing
For convenience, the Time Clock
screen should be available 24/7 for your employee’s convenience. In
addition, access will also be needed for the bar code scanner, a proximity card
or a swipe card reader. If employees are manually entering their badge ID#, a
mouse or keyboard will need to be available. Employees will log in each
morning and log out when switching positions or leaving for the
day.
•Set this link as a favorite in your browser or set up a shortcut to the desktop: http://yourschoolwebaddress/Financeoffice/Timeclock.aspx
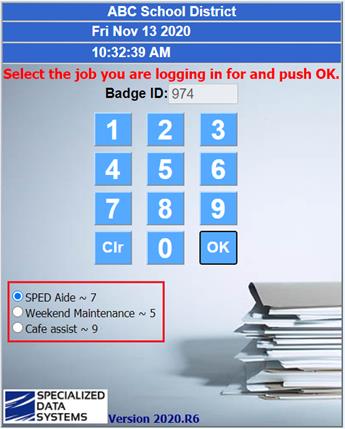
•Use the following link on a Tablet with Multiple Positions; this link will allow employees to select their Position upon entry: http://yourschoolwebaddress/Financeoffice/Timeclockr.aspx
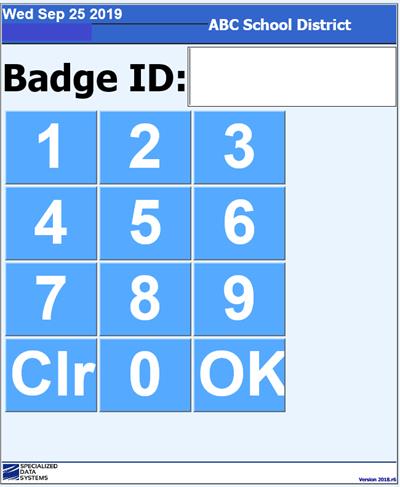
•Use the following link on a mobile device; the entry screen will display in a large text:
http://yourschoolwebaddress/Financeoffice/Timeclockbb.aspx
Note: When an employee logs into the time clock by entering their badge ID number or using a card reader, the screen will display the name of the employee and their position. If the employee has more than one position, he or she needs to select the position being worked. The screen will also tell the employee the “punch” is an arrival to or departure from work.
The time stamp on the time
clock record will reflect the clock time on the workstation being used for the
login. To ensure that the clock time does not get changed, make sure that this
workstation is set as a user workstation which does not have administrative
rights. The time clock record will also have a time stamp of the server time.
The workstation time and server time may be compared to locate any discrepancy
between the login time and the server time.
eTimesheet assignment of time
This process will go through assigning time to allow employees, supervisors, and business office approvals.
1. Select Human Resources
2. Select etime Sheet – Setup
3. 1 Payroll Date: Select the Payroll Date.
4. 2 Pay Groups: Select the pay groups. Pay groups are determined by the number that was setup in the gross code field in the Employee eTimesheet Information.
5. 3 Day Type: Select the day type. The next column displayed will show the days for this pay period.
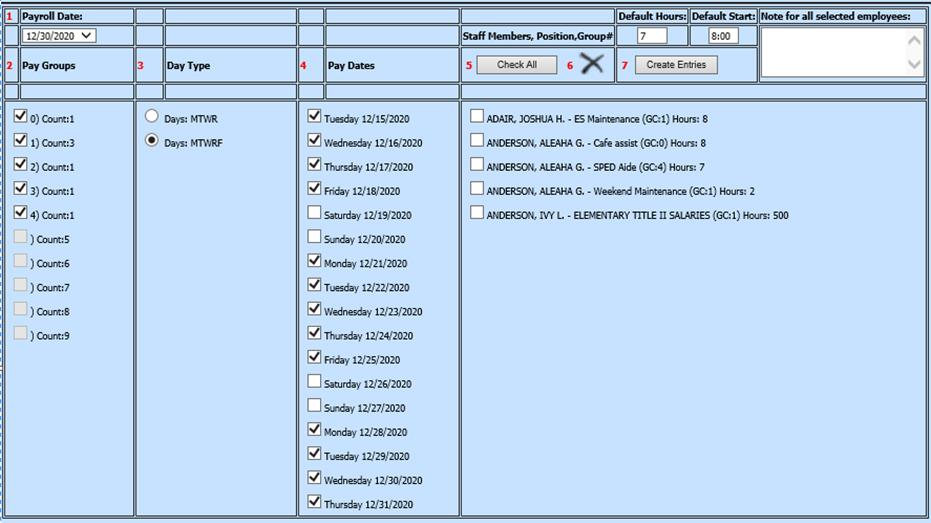
6. 4 Pay Dates: All dates within the payroll calendar setup will display, uncheck dates, if needed.
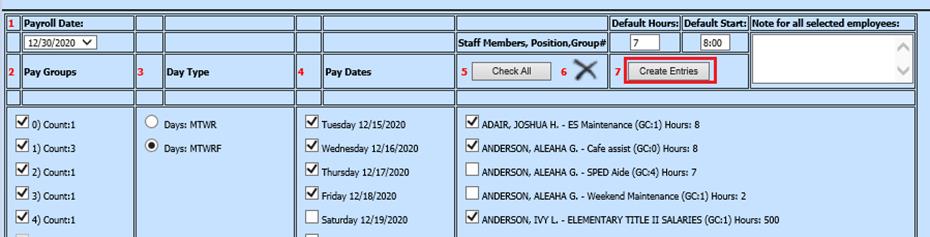
7. 5 Staff Member, Positions, Group#: Select Employees to assign time, or “Check All”.
8. If there is an employee in this area that should NOT be there, select that employee and select 6 “X” to delete.
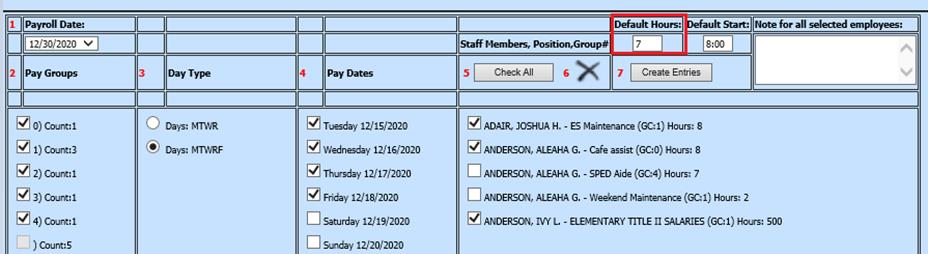
Note: Default Hours and Default Start time will be used, if employee position record fields are blank.
9. 7 Select the button “Create entries”. If a record has already been found, a second record will not be created.
10. If the employee was not setup with a set number of hours to work, the system will use the number set in the default hours field.
What does the Employee see?
Ø Each employee should log into their Employee Portal to view/authorize their hours.
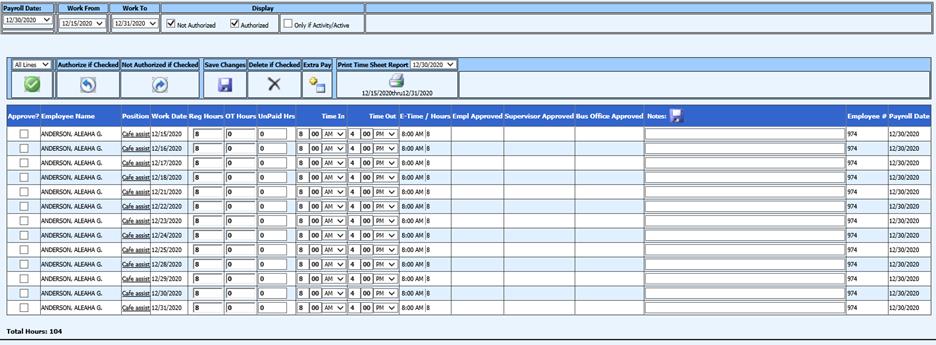
Ø The employee will see all of the days that they were assigned to work. If the hours need to be adjusted, the employee can make the appropriate changes and save the changes.
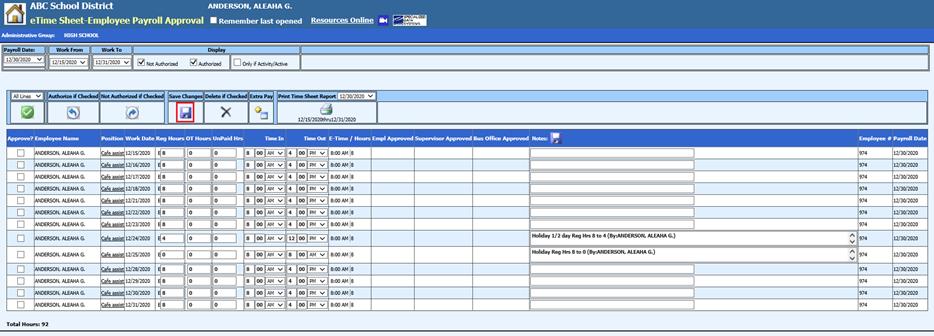
Ø To authorize the eTimesheets, the employee can select the green check option, to check all line items, and then select the “Authorize if checked button”.
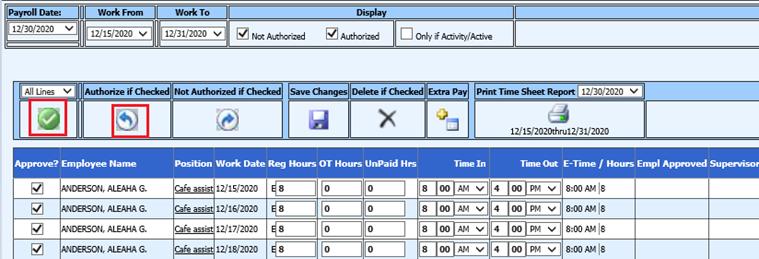
Ø The employee should verify their hours. They should log in weekly to approve and check their time.
Ø There is no automated notification that is sent to the employees to notify them that they have time to approve.
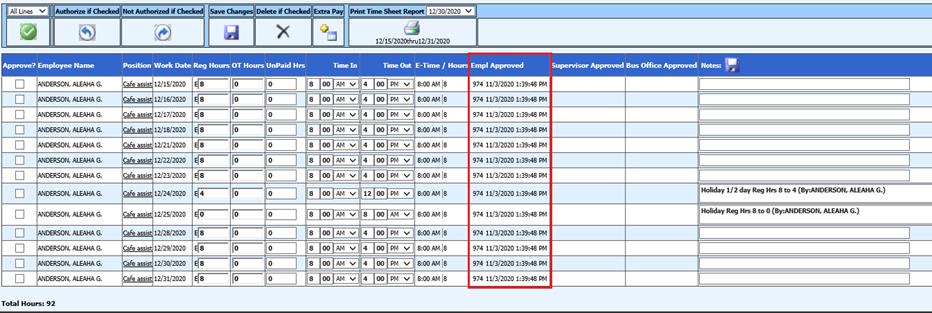
Ø Once the employee has approved their time, the time does not “disappear” from the screen. The date/time is displayed on the screen to indicate the employee has approved the time.
Ø Once the time has been authorized, the employee will see the following.
What does the Supervisor see?
Ø The supervisor will see all of the days that his/her group of employees has been assigned to work. If the hours need to be adjusted, the supervisor can make the appropriate changes and save the changes.
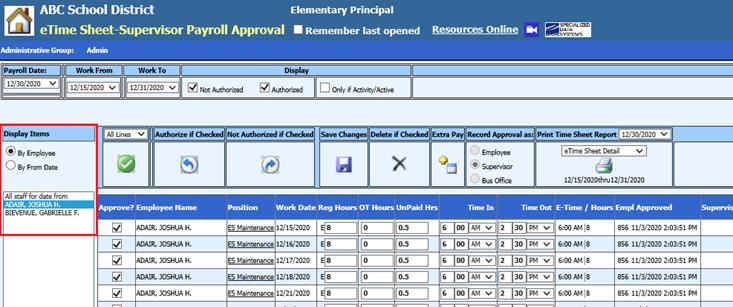
Ø To authorize the eTimesheets, the supervisor can select the green check option, to check the entries, and then select “Authorize if Checked"
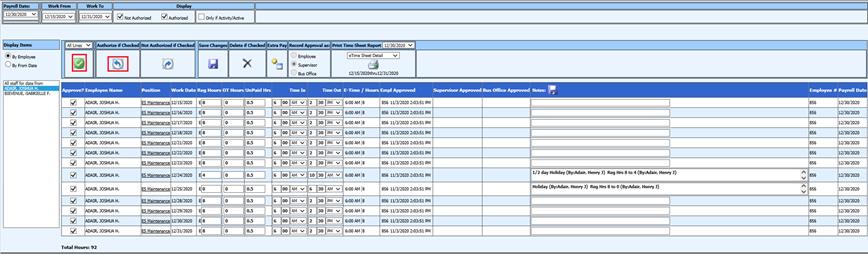
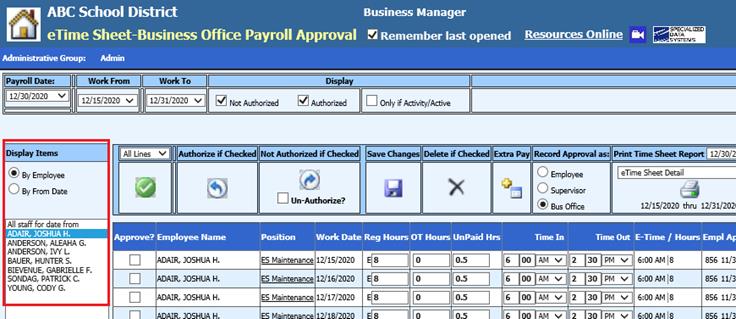
What does the Business Office see?
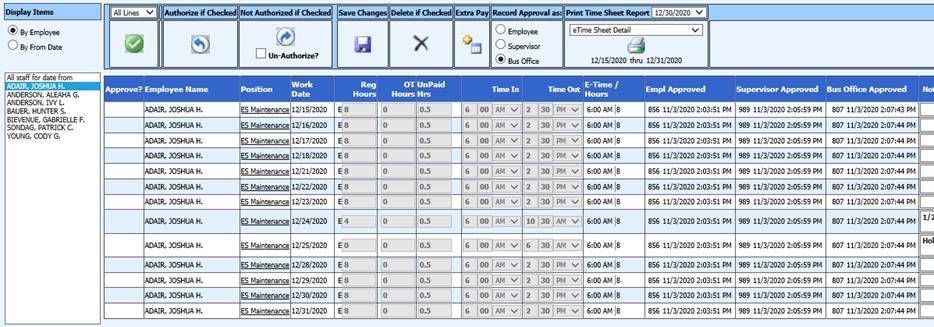
Ø They will see all of the days that each employee has been assigned to work. These entries can be viewed by employee or by date. If the hours need to be adjusted, the business office approver can make the appropriate changes and save the changes.
Ø To authorize the eTimesheets, the business office can select the green check option, to check the entries, and then select “Authorize if checked”. Time selected will be fully approved.
Ø If the time is not approved by the Business office, the time will not be paid.
How to Transfer the Time Cards to Payroll
1. Select Human Resources
2. Select eTime Sheet – Send to Payroll. A list of employees, that have had their payroll time approved, will be displayed
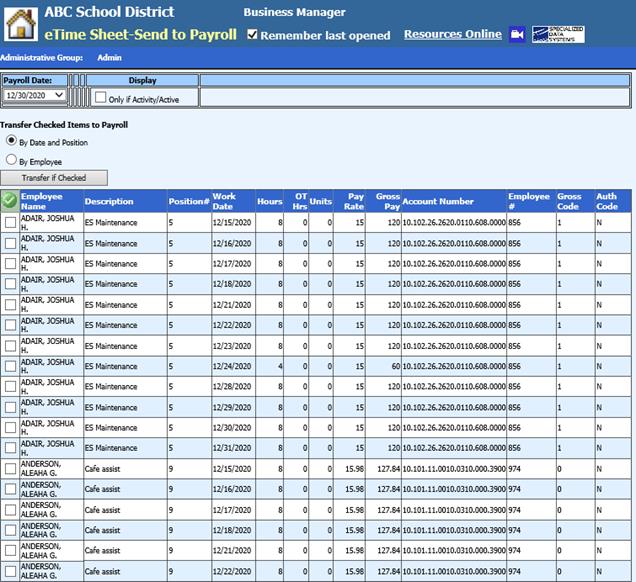
3. To move these e time sheets into the payroll, select the employee records and select “Transfer if Checked”. The records will be listed under Payroll Processing, Gross Pay Entry and Adjustments.
NOTE: If the employee has an Employee Contract setup and you are just tracking the employee time, DO NOT TRANSFER TIMECARDS. This process produces a time card entry for each date assigned. Make sure to verify all Payday reports.
4. Complete payroll processing, as normal