Revised: 7/2021
These instructions walk you through how to import data into
SDS using the Historical Importing process.
Your file can be formatted
as an Excel XLS, XLSX, XLSM or CSV. The preferred format is Excel XLSX or XLSM
since it doesn’t drop leading zeros in the field.
To import a worksheet
into SDS:
1. Select Administrative Utilities
2. Select Historical Import Data from CSV or Excel files
3. You will receive a warning. Please read it carefully and select OK

4. 1 Determine which type of table to import to

o Detail Transaction
o Payroll master
o General Master and Codes
5. 2 Choose what type of data to be imported (select the table that has fields you are going to upload to)
6. 3 Select “Browse” to choose the file that is to be imported. Type in a description for that file
7. Select “Add”
8. 4 If your file has a header row, make sure you have a check in “First record in the import file has field names (header)”. When using a header row on your file you are able to easily identify the columns in the next screen.
o If your file does not have a header row, make sure there is no check mark in this selection. If this option is checked, your first row in your file will not be imported as data; it will be imported as your header row. Once you have determined this option, and then select the blue “Select” and a new screen will display.

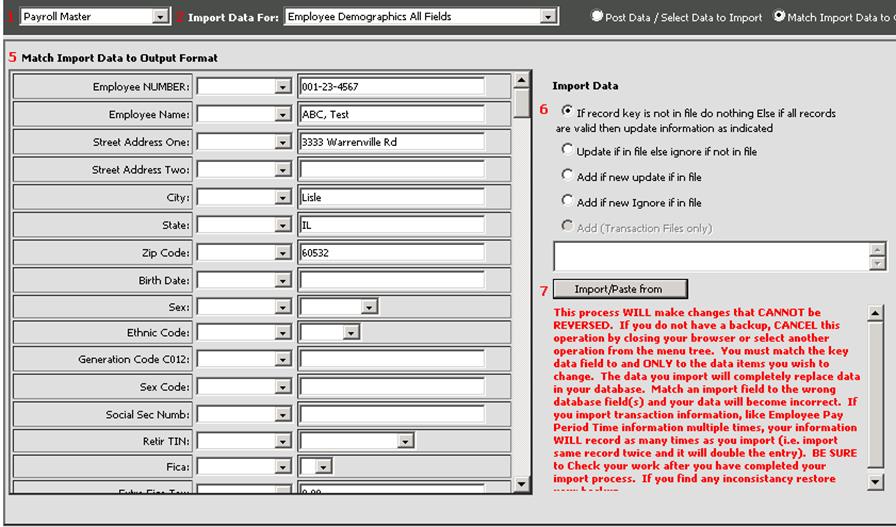
9. 5 This is where the spreadsheet information is linked to the database fields that the program needs to be completed. The information on the right is the default and can be left as is or typed over for change. If you want that information to pull from the spreadsheet, you need to select the column that is to populate that field. To do this, choose the down arrow in the left hand fields and select the column of the spreadsheet to import.

10. 6 Import Data:
o If record key is not in file do nothing else if all records are valid then update information as indicated: This verifies the data in the file corresponds with the current database.
§ If all records do not match up, you will get a message: Adjust your import data and try again. The import has been aborted no records have been updated or added. If you receive this message, you will need to correct the data that you are attempting to import into the database.
§ If all records do match up, you will get a message: Import process is complete, Number of records changed = ?? added = ??
o Update if in file else ignore if not in file:
§ Add if new update if in file: If the employee number is found in the employee master then the data being imported will change the data from what is in the system to the data being imported. In addition if the employee is NOT found in the employee master the imported data will be used to add a new employee
§ Add if new Ignore if in file: If the employee number is NOT found the import data will be ignored. If the employee number is found in the employee master then the data being imported will change the data from what is in the system to the data being imported.
§ Add (Transaction Files only): This option is used for when you are importing files like Budgets, Accounts Payable invoices, etc.
11. 7 Select Import/Paste from and read the important message carefully before continuing

12. You will receive a message stating how many records have been changed and added

Example: Importing Next Year’s Budget to the Next Year Budget Column