Open a Gradebook.

Click on Entry options and move
your mouse down to Gradebook or click on the gray “Gradebook” button.
Open a Gradebook. 
Assignment Wizard
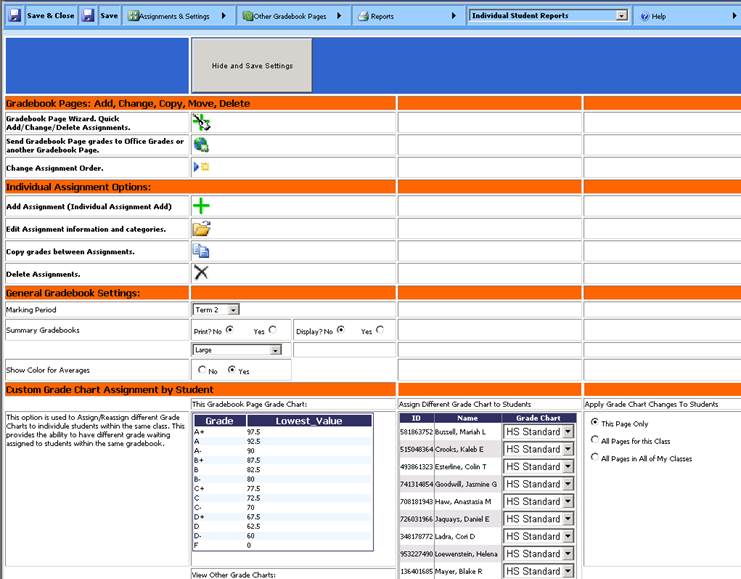
1. Click on Assignments & Settings and go to Assignment Add, Adjust, Move, Copy and Send Grades. This will open to a screen as shown below.
2. Go to the “Gradebook Pages: Add, Change, Copy, Move, Delete” section and click on the green plus icon. This will open to the Assignment Wizard.
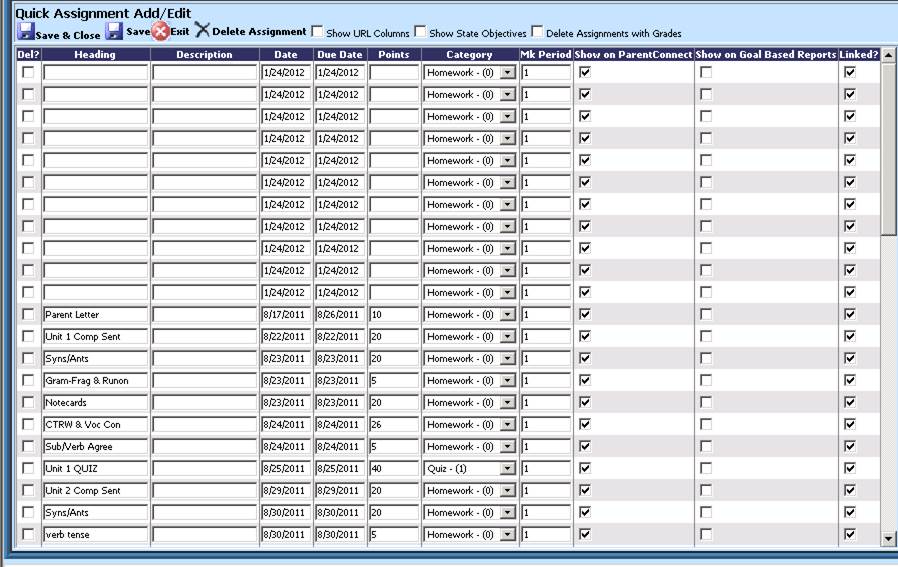
3. At the top of the screen on the first blank line, type in the properties of the assignment. You can add multiple assignments on the same screen.
4. Click the Save diskette when you have finished with assignment entry.

Figure 1Assignment Add, Adjust, Move, Copy and Send Grades Area

Figure 2 Assignment Wizard
•Heading: this will appear in the column heading, on reports and Parent Connect to identify the assignment.
•Description: this gives more detail about the assignment such as “page 18 and 19”, “workbook pretest”, etc. It is recommended but not required to be filled in.
•Date: this will automatically populate with today’s date. Change as necessary. (see calendar option below)
•Due Date: this will automatically populate with today’s date. Change as necessary. (see calendar option below)
•Points: fill in with the amount of points each assignment is worth. All assignments are graded with points earned out of points possible.
•Category: choose the appropriate category for the assignment.
•Mk Period: this specifies the marking period for this assignment and will always default to the term of today’s date.
•Show on Parent Connect: if this gradebook is available on Parent Connect but you do not want this assignment to show, take the check mark out of the box.
•Show on Goal Based Reports: if your school is doing goal based report cards and this assignment is to be included, put a check in the box. If you are planning on doing goal based report cards it is recommended to contact SDS for training.
•Linked: if this gradebook is linked to other gradebooks but you do not want this particular assignment linked,, take the check mark out. Once unlinked, it cannot be re-linked.
•Show URL Columns box: to add a web page link to an assignment, i.e. you are going to the Planetarium for a field trip and want to give this link to parents via Parent Connect, you could add the link to this assignment.
•Show State Objectives: if your system has objectives entered and you want to add them to assignments you can put a check in the box. This will load the objectives at the top of the screen. Choose the objective that you want for the assignment and then click on the “Add Objective” link.
•Delete Assignment: to delete an assignment, put a check in the left most box titled “Del?” next to the assignment you want to remove. Click on the black X. IF that assignment has grades in it, you must put a check in the box titles “Delete Assignments with Grades” prior to clicking the black X.
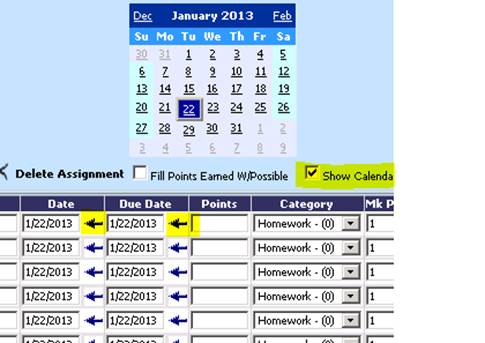
The “Show Calendar” option can be selected to easily fill in
the Date & Due Date fields. If this option is selected, you can select the
date on the calendar and then use the arrow button to push the date into the
Date & Due Date fields.
Add Assignment Area (one assignment at a time)
•Click on Assignments & Settings and go to Assignment Add, Adjust, Move, Copy and Send Grades. This will open to a screen as shown below.
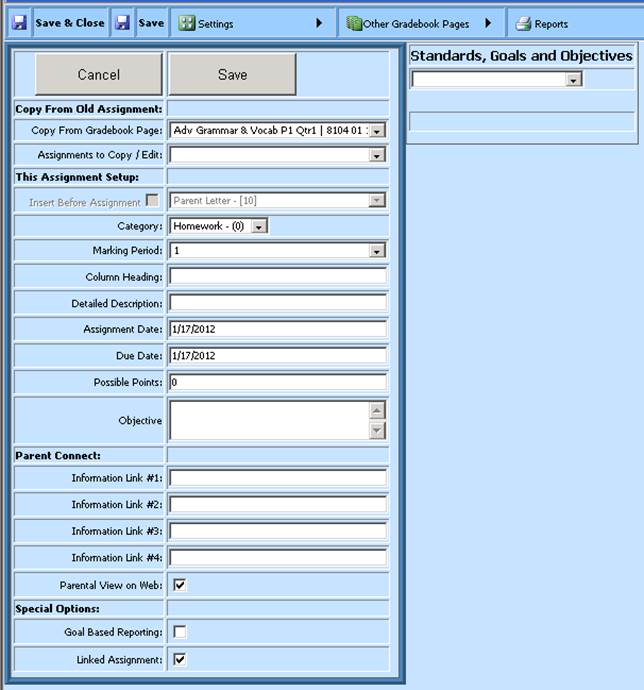
•Go to the “Individual Assignment Options” section and click on the green plus icon. This will open to the Individual Assignment area.

Add Assignment Options
Copy from Old Assignment
If you want to copy and assignment from another gradebook, you can use this area.
Copy from Gradebook Page: Select the gradebook that has the assignment you want to copy.
Assignments to Copy/Edit: Select the assignment from that gradebook to copy. This will populate the properties of that assignment. Edit and save.
Assignment Setup
Choose gradebook category from drop down menu.
Choose the marking period from the drop down menu.
Type in Column Heading, Description, Assignment Date, Due Date, Points Possible, and Objective. (Category, Heading, & Points are mandatory)
Click the gray save button.
Note: Objectives need to be added in the Standards, Goals, and Objectives table before they are available for use in Gradebook. Standards, Goals and Objectives can be entered by the system administrator in the Web Office Processing Center.
Parent Connect
Information Link: This area allows for url entry. If you want to direct your students or parents to a particular website you can add it here. This link will be available on parent connect.
Parental View on Web: this allows for a teacher to remove and assignment from view on Parent Connect.
Special Option
Goal Based Reporting: if this assignment is to be included in the grading for goal based report cards put a check mark in the box
Linked Assignment: In linked gradebooks if this assignment is to be unlinked, remove the check. This will allow assignment to be edited separately from other linked gradebooks.
Edit Assignments
Editing assignments is easier than ever. You can use the Assignment Wizard or the following method.
•Click in the assignment column heading on the  icon.
icon.
•This will open to a page with the assignment’s properties. Edit as necessary.
•Click gray Save button upon exit.
Delete Assignments
You can delete from within the assignment Wizard or by using the following method.
•From within a gradebook, click on Assignments & Settings and go to Assignment Add, Adjust, Move, Copy and Send Grades.
•Go to the “Individual Assignment Options” section and click on the black X icon. This will open to the Delete Assignment area as shown below.
•Choose assignment from drop down box and click  to delete or
  exit without deleting.
Note: If there are grades in a column, put a check box in the “Delete
Assignments with Grades” box prior to clicking on X.

Move Assignment Order
1. Moving an individual assignment in the gradebook can be accomplished as follows.
2. From within a gradebook, click on Assignments & Settings and go to Assignment Add, Adjust, Move, Copy and Send Grades.
3. Go to
the “Gradebook Pages: Add, Change, Copy, Move, Delete” section and click on the
Change Assignment Order  icon. This will open to the Move
Assignment area as shown below.

Move Assignment: Choose
assignment to be moved.
To Just Before Assignment: Choose the
assignment that you want to move in front of.
Choose  to move assignment or
  to exit without moving
assignment.