Data View Definition
Revised 12/12/2018
Data View Definition allows setting up of custom data views
for viewing or editing either student data or master file and code entry data.
This area is also used to set up Request for Change student data views to
be used by parents in Parent Connect to request changes to their student’s
demographic information.
To access this area, in the Web School Office menu, click on
Administrative Utilities|Data View Definition.
Overview of Screen
•
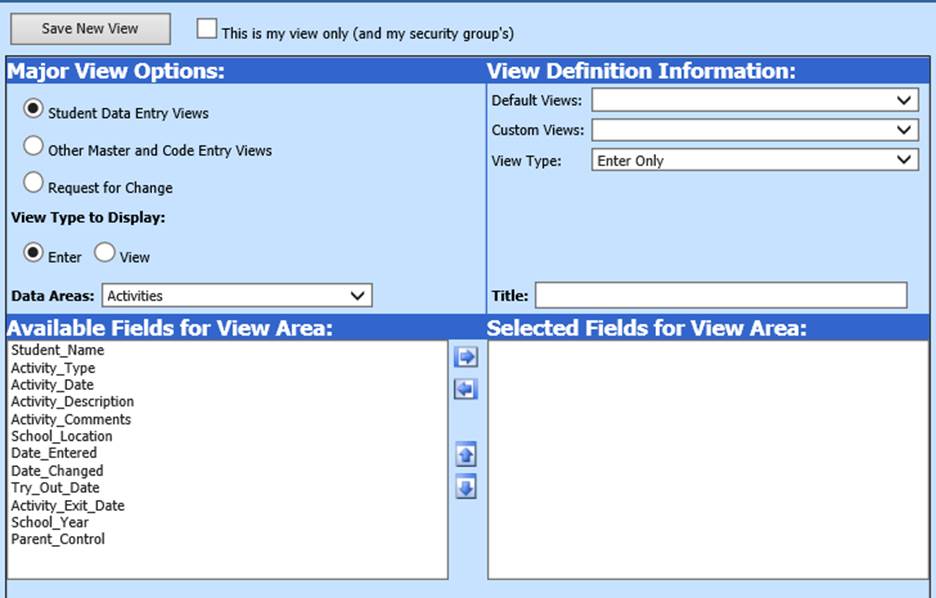
Major View Options: Select the option to create
an Entry View for either Student Data Entry or
Other Master & Code Entry or Request for Change.
•
View Definition Information: Select
pre-defined views: Default Views (those provided by SDS), Custom
Views (those created by you or others) and the View Type (Enter Only or
View Only or Request for Change).
•
View Type to Display: Select an option to define the type of view
you are creating. Enter: will accept data entry. View:
will not accept data entry.
•
Data Areas: Select the table from which data fields will be added
to the view (i.e. Activities).
•
Title: Enter the title of the view that will display on the entry
options menu in data entry areas.

Create a New View using a Default
View
Example:
You want to set up a
view for support staff that do not have security rights to enter data,
but so they can view ALL demographics data and search for
specific information such as all children at same address. These support
staff members might be the superintendent's secretary, Social Workers,
or others like them. Although they do not enter any
data, some employees need to view more student
information than is listed in the basic demographic screen. How to set
this up?
•
In the Web School Office menu, click on Administrative Utilities |Data
View Definitions.
•
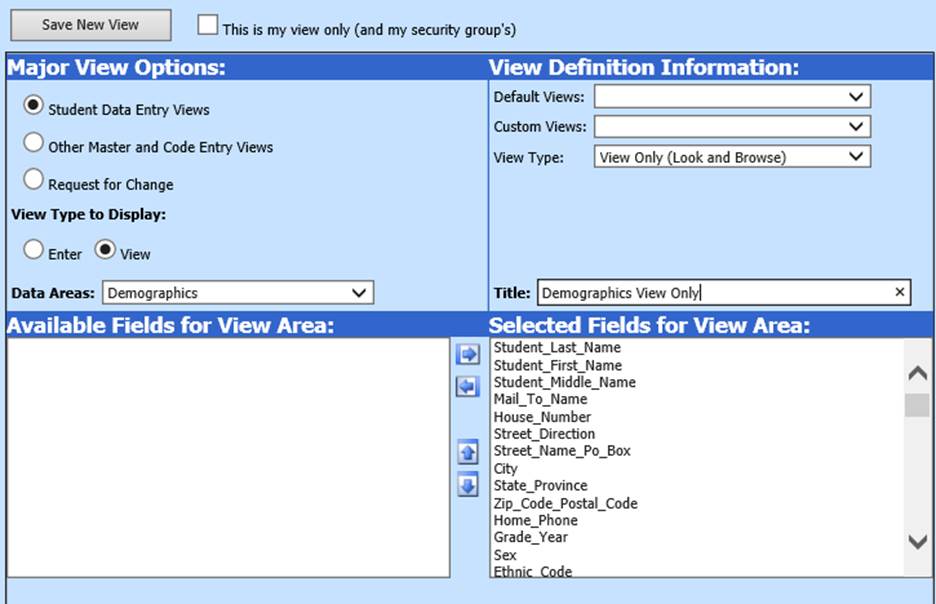
Under "Major View Options", select “Student Data Entry Views”.
•
Select the “Default Views” drop down and choose "Demographics All
Fields".
•
Under “View Type to Display", select the “View” radio button.
•
Enter the title for your display in the “Title” box (i.e.
Demographics View Only).
•
If desired, fields can be removed from the new data view by clicking on
them in the Selected Fields for View Area and clicking the  button.
•
Fields can be re-arranged in the Selected Fields for View Area by
clicking on a field and click the  or
or
 buttons.
•
Click “Save New View”.
o Note: When you go back
into Data View Definitions your Custom View will now be available under the
Custom View Dropdown.
•
Optionally check “This is my view only (and my security
groups)" next to the Save Changes button at the top. This will
only allow you and the security group that you are in to have access to this
custom view.
Create a New View from
Scratch
•
In the Web School Office menu, click on Administrative Utilities |Data
View Definitions.
•
Under "Major View Options", select “Student Data Entry Views”.
•
Under “View Type to Display", select the “Enter” or “View” radio button
depending on whether you want this view to be available for data entry or just
for viewing.
•
Click the Data Areas dropdown and choose the table you want to use to
create your view (i.e. Demographics)
•
Enter in the title for your display in the “Title” box (i.e. All
Demographics ABC School).
•
Highlight the fields in the box on the left that you want to include in
your view and click the  button to
move them to the right hand box. NOTE: When creating view from the Demographics
table, you must include the Student_Last Name, Student_First_Name, and
Student_Middle Name fields in your view.
button to
move them to the right hand box. NOTE: When creating view from the Demographics
table, you must include the Student_Last Name, Student_First_Name, and
Student_Middle Name fields in your view.
•
To re-arrange fields in the right hand box, click on a field and click
the or button to move that field up or down in the
list
•
Click “Save New View”.
o Note that you can “This
is my view only (and my security groups).” This will only allow you or/and the
security group that you are in to see the view you have set up.
•
Tech Note: If the “This is my view only (and my security
groups)” box is not checked when creating new data views, the new view will be
available to all users. The following must be done to keep specific users
from accessing a custom view.
o Enter Administrative Utilities
|Security-Application and Data Access.
o Select the user or user
group that will NOT have rights to the custom view.
o Scroll over to the
Views section of the screen.
o In the Access column,
find the new view you created. 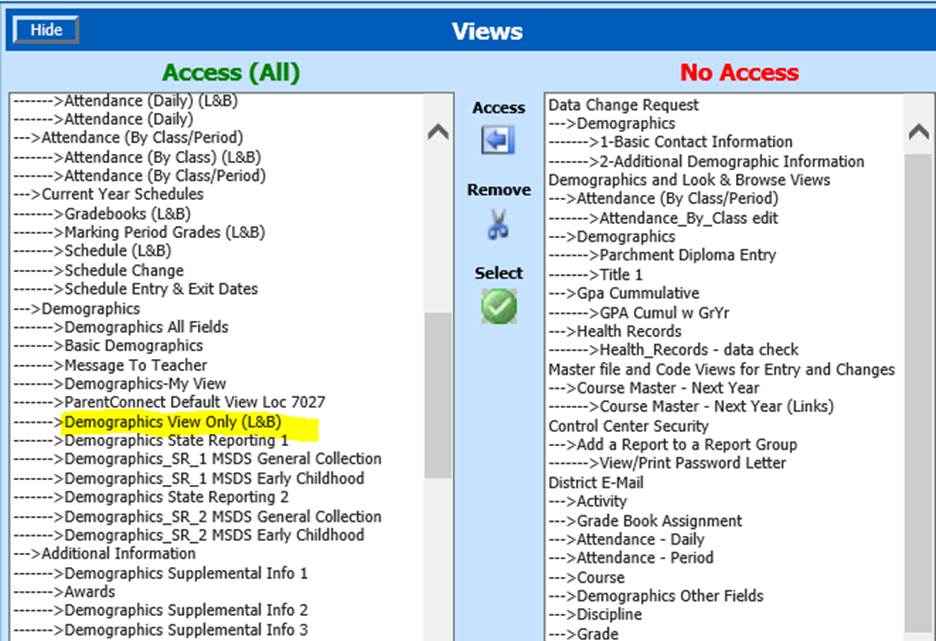
o Click the  button to move the view to the No Access
column.
button to move the view to the No Access
column.
o