Security – Application Access
Revised: 4/2021
This area allows you to Add or Adjust Users and Group
Security for the Program Applications, viewing all security options in grid
form.
•
All Applications – Displays selected areas of the program.
•
Reports – Displays the selected Report options in General
Accounting Reports and Financial Reports, within the Applications.
•
Views – Displays the selected Views [entry and view only] within
the Applications.
These areas are divided into two columns each: Access (All)
and No Access.

List of Existing Finance System Users
Users that are listed in the Users column will have access to the
Finance System. To view the rights of any user, highlight the Name or Login, all
rights that have been assigned [Access] and not assigned [No Access] for this
user will be displayed in the various areas of the security screen.

User Search and Adjusting Options
Alpha Search
Select the letter to search by, all Users beginning
with the selected letter will display.

Name Search
Enter the first or last name, or
portion of a name, select Search for User or Enter, all Users matching your
criteria will display.
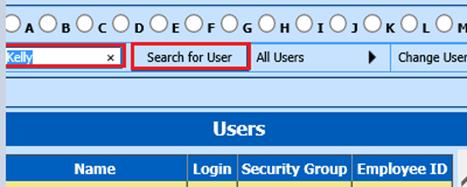
The Users area displays the Name,
Login, Security Group [if assigned] and Employee ID when viewing Users.
Security Groups Search

•
All Users: Displays for selection All Users by
Name
•
Security Groups: Displays for selection Your Defined Security
Groups
•
Users with No Security Group: Displays for selection Users who
have not been assigned to a group, that have an individual security
setup
•
Users or Groups Created Today – Display any Users or Groups who
have been created today
•
Users or Groups Changed Today - Display any Users or Groups who
have been changed today
•
Users in the _ Categories listed will display Users for selection
from Your Defined Security Groups.
Change User’s Group
This option will allow you to
move a User to a new security group and displays all possible options to move
the User into.
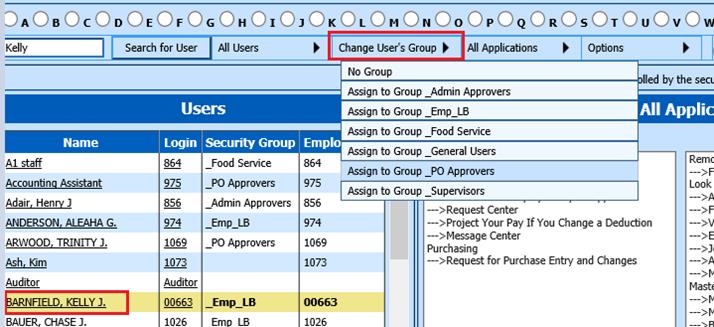
•
Select User
•
Under Change User’s Group, select the Group to which the User to be
moved; i.e. _PO Approvers
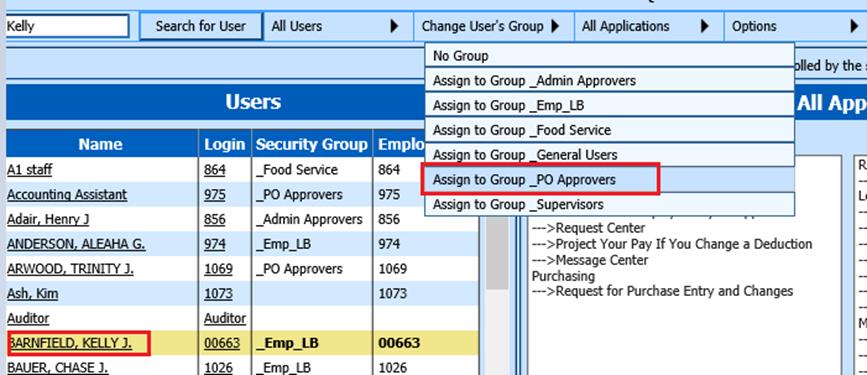
•
While processing the system will generate a Please Wait message. When the
process is complete, an information message box will display. Read the message
to confirm the process status.
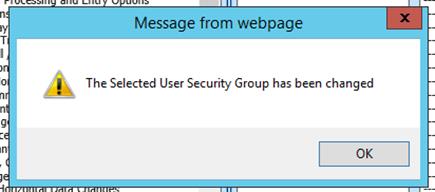
a.
Select OK.
•
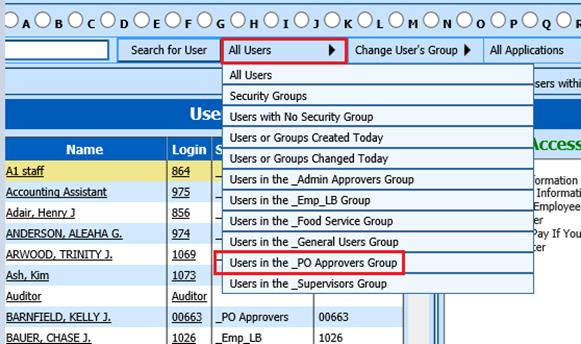
Under All Users, select i.e. “Users in the _PO Approvers Group”
•
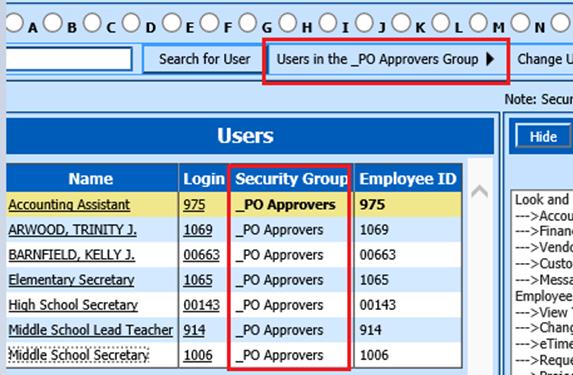
Verify Users in the group are correct
All Applications
This option will allow you to
view the areas of the program a selected group or user has access to.

By selecting the different options
under All Applications, you can pinpoint your view to work with within the
Applications, Reports and Views.
•
All Applications: Displays all areas of the program
•
Administrative: Displays only Administrative areas [Master Files,
Administrative Utilities, etc.].
•
Look & Browse/Employee Portal: Displays only Look &
Browse/Employee Portal areas.
•
Purchasing and Disbursements: Displays only Purchasing and
Disbursements areas.
•
Human Resources and Payroll Control: Displays only Human Resources
and Payroll Control areas.
•
General, Cash and Receivables: Displays only General, Cash and
Receivables [GL/CR/AR] areas.
Options
This area allows you to Change User
information, Add New User(s) or Group(s), Mass Create Look and Browse Users,
Mass Reset Passwords with an option to force users to adjust to strong
passwords, and Roll Back Settings.

•
Toggle Scrolling
Allows you to use toggle scrolling to scroll
up and down each individual Access/No Access column within groups. With this
display option your screen can remain in place while you scroll through the
available columns making comparisons easy.

•
Change User Information
This area allows you to change basic
information regarding a User, or Delete a User from Security.

o If you did not set up User,
using the Change User Group process from Emp_LB: You can use the Lookup
Employee button to search for matching ID. This process will add
Name, E-mail and Office Phone information from Employee Demographics.

o Change User
Information: Adjust a User Name, E-Mail Address or Office Phone number,
Select Save.

o Password: Assign
a new Password, Confirm Password, User must change password at next login;
if you choose to force a password change. Select Save.

o Reset User Security
Questions: Select to reset security questions defined

o Delete: Delete Employee
from Security

o Close to Return to main
page

•
Add New User or Group (New User setup)
This area allows you to Create a New Security User.
Select User: Enter the Employee ID and select the Lookup Employee button.
Searches for ID and adds Name, E-mail and Office Phone information from Employee
Demographics.

To Add a New User:
a.
Enter User ID: Enter less than 10 characters
b.
Enter Password: Enter 8 characters to include a special character
(i.e. @,#,$,%) and number (i.e. 1,2,3)
c.
Confirm Password: Enter in password above
d.
Security Group Option: Select a Security Group from the dropdown to
assign this User.
or
e.
Use Security Below: Select a User with the same security access as your
New User (This would need to be done before entering the New User area). The new
User will have the same settings as the one you selected.
f.
User must change password at next login: This prompts User to
change password on initial login
g.
Employee ID: Enter employee id, select Lookup Employee
h.
User Name: Enter User full name
i.
E-Mail address: This allows the user to log in with their User ID or with
their e-mail address. No more ‘lost’ ID’s
j.
Office Phone: Enter Office phone number for User
k.
Cell Phone: Enter Cell phone number for User

l.
Select Create
m. Select
Close to return to main page.

To Add New Group:
Security Groups allow you to easily organize user
security access for various groups of employees. i.e. _Super, _Principal, _PO,
etc.
a.
Enter User ID: i.e. _Super (enter less than 10 characters, to include
“_”). The Underscore in the first character designates it as a Group and
will allow you to assign individual users to security group.
Note: The password
options are ignored for Group creation.
b.
Security Group Option: Select a Security Group from the dropdown to
assign this User.
or
c.
Use Security Below: Select a User with the same security access as your
New User (This would need to be done before entering the New User area). The new
User will have the same settings as the one you selected.
d.
User Name: Enter Group ame: i.e. _Supervisor Group
e.
Select Create

f.
A webpage message will display stating the new group has been created, select
OK
g.
Select Close to return to main page
•
Mass Create Look and Browse/Employee Portal Users
This will create a user ID for each active (Pay = Y in
Employee Demographics) Employee and set them up for Employee Look &
Browse/Employee Portal access. The new user ID will be the employee number. Each
user will be assigned a password.

Create Employee Portal
Users:
a.
Select the Password assignment. After you make your selection, the Create
Employees Look and Browse Users selection box will display.
b.
Select User must change password at next login to force the user to change their
password when they login for the first time. If unchecked, the initial password
will remain.
Note: If no birth date on file then 12311980
will be used
If no SSN# is on file then
123456789 will be used
c.
Select to Create Employee Portal Users

Note: When you run this
process at a later date, only new employees will be created with Look and
Browse/Employee Portal area security.
Delete
Employee Portal Users
a.
Delete Inactive Employees from Employee Portal
If you use this option,
the program will remove all Inactive (PAY = N in Employee Demographics) users in
the _Emp_LB group that are setup for Look & Browse/Employee Portal access.

b.
Delete All Employee Portal Users
If you use this option, the program
will remove all users in the _Emp_LB group that are setup for Look &
Browse/Employee Portal.

c.
Select Close to return to main page

•
Mass Reset Passwords
This is especially useful to ensure a
more secure data environment. In this area you can reset all passwords for a
group and initiate the use for Strong Passwords for ALL Users. The maximum
password age (Days) option allows for an added depth of security.

a.
Security Group: To Mass Reset Passwords for an Entire Security
Group or Users not assigned to a group, select the Group to adjust from the
Security Group drop down.

b.
Reset Passwords
This will reset passwords for the group

c.
Force Password Change
This option will force ALL users in the
selected area to change their passwords on their next login.

d.
Force all users to have strong passwords Checkbox

e.
Allow Save Password (Expires at Midnight)

NOTE: This option can be
un-checked but once you leave the security area, if the option is selected, it
is PERMANENT.
f.
Setting a Maximum Password Age (Days)
This allows you to set
mandatory password age. This feature adds to your security and will force
password changes for the user based on the value entered.

g.
Select Close to return to main page

•
Allow User to Save Password

•
Roll Back Options This gives you various options to Start Over.
•
Roll Back Setting (Since Selected)
When you are adjusting
security for a user, before you move on to the next user, you have the option to
Roll Back Settings (Since Selected). This will undo all changes you have just
made for the selected User in the Access/No Access area.
•
Roll Back Settings as of (Date)
After you have moved to a
different user, the employee will have a list of available dates to Roll Back
to. Listed here are all dates of security adjustments for a selected user. If
the security adjustment you have made is not what you need and you want to start
over, select one of the Roll Back Settings as of date options listed. This will
Roll Back the security settings for the selected user to the date you select.

NOTE: Keep in mind, the Roll
Back by date will roll back EVERYTHING – including changes to name, email, etc.
to BEFORE any changes were made on the selected day.
•
Employee Access Letter: Select the printer icon to print
Employee access letters. You will be able to select from the Users Added
on date or User security groups.

The security program areas are divided into three groups:
•
All Applications:All Application Menu selections
•
Reports: All reports available in General Accounting Reports and
Financial Reports.
•
View: All Views [entry or view only] within the Applications.
The program areas for User or Group will be listed under
Access (ALL) or No Access.

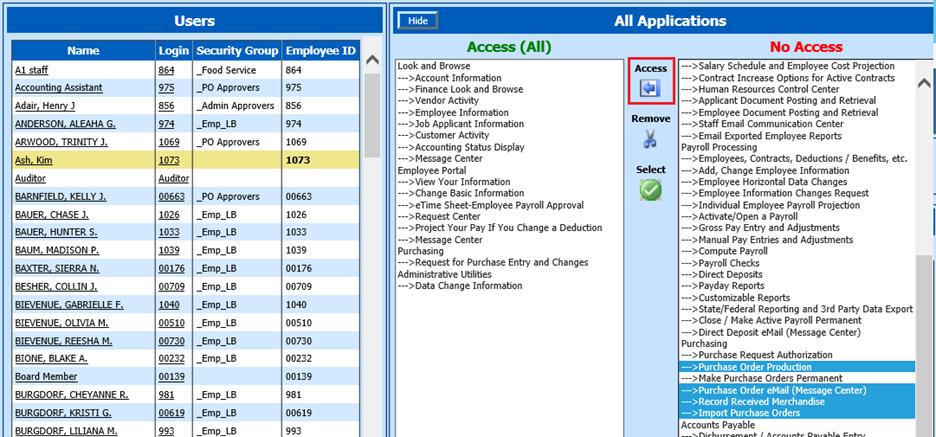
To give access to a selected new
area:
1.
Highlight the area to give access (under No Access)
•
To select multiple areas in a block, select your first choice, hold down
the Shift key and select the last choice. The block will highlight.
•
To pick and choose security options, select your first choice, hold down
the Ctrl key and make the rest of your selections.
•
To Select All Areas, select the Green Checkmark  button. This will select All areas under
Access or No Access.
2.
Select the Access Arrow  button to move the selected security
additions to the Access column. The user now has access to Employee Attendance.
To Restrict Access to a Selected Area:
1.
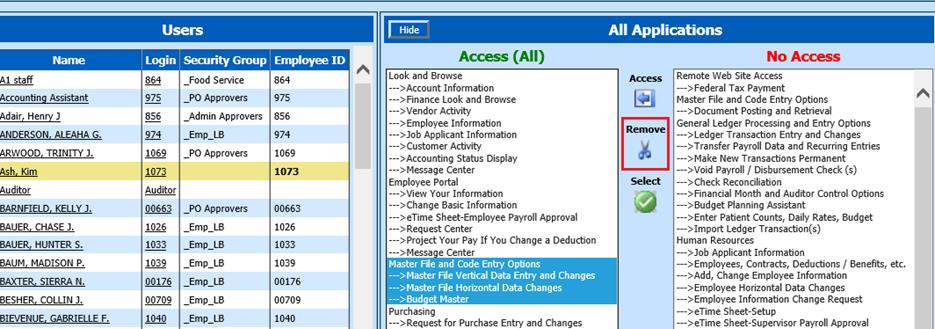
Highlight the area remove access (under Access All)
•
To select multiple areas in a block, select your first choice, hold down
the Shift key and select the last choice. The block will highlight.
•
To pick and choose security options, select your first choice, hold down
the Ctrl key and make the rest of your selections.
•
Click and Drag, you may click and drag to select multiple items. Select
your first choice and drag the mouse up or down to select multiple items.
•
To Select All Areas, select the Green Checkmark  button. This will select All areas
under Access or No Access.
2.
Select the Remove Scissors button  to move the selected security additions
to the Access column. The user is now has no access to Employee Attendance.
Hide/View: This option under each section will
hide or diplay Columns in Application, Reports or Views Group
•
To hide a Group from View, select the Hide button, the section will
close.

•
To view the Group again, select the + button, the sections will be
available.


 button. This will select All areas under
Access or No Access.
  button to move the selected security
additions to the Access column. The user now has access to Employee Attendance.

 button. This will select All areas
under Access or No Access.
  to move the selected security additions
to the Access column. The user is now has no access to Employee Attendance.

