Getting Started
In order to be able to mass register students by course or by student, you must activate the mass registration feature.
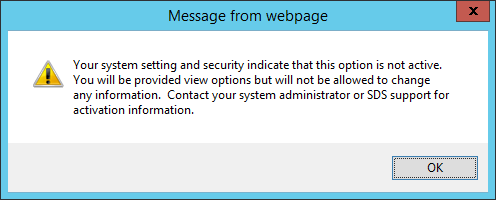
If you enter the Next Year Mass Registration area before activation you will receive the following message:
Next Year Mass Registration allows users to query groups of students and register them for courses. Mass registration can be done by course or by student.
Getting Started
In order to be able to mass register students by
course or by student, you must activate the mass registration
feature.
If you enter the Next Year Mass Registration area before
activation you will receive the following message:
1. Access WSO |Administrative Utilities |Web Settings.
2. Select Next Year Mass Registration. The default value is “N”. Change the setting to “Y” to activate Next Year Mass Registration.

Note: The Prep Work steps outlined below are only
necessary if you wish to be able to filter course selection by Subject Area
and/or Scan Codes. If you are satisfied with seeing all Next Year Course Codes
in the Mass Registration by Student screen, you can skip the Prep Work
steps.
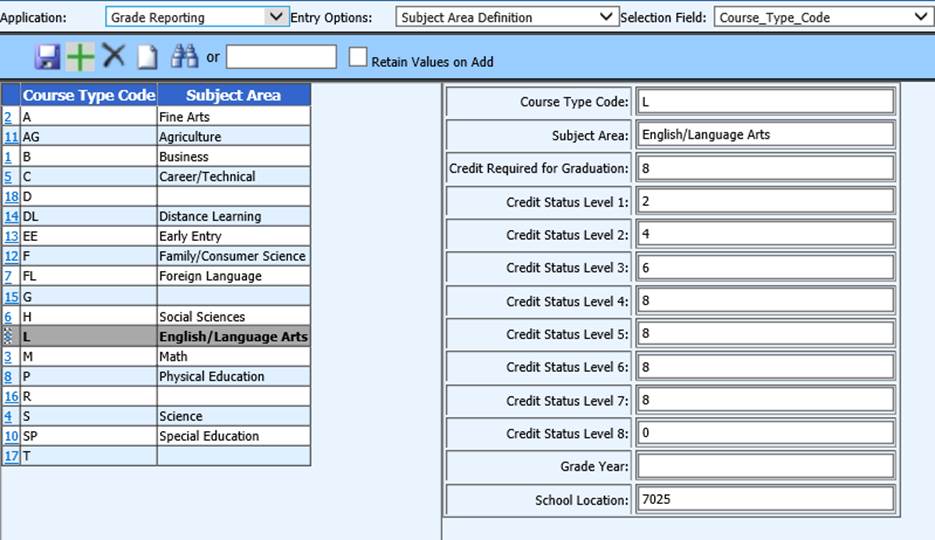
Prep Work – Verify and/or Setup Subject Area Definition
Note: The course Subject Area Definition can be used to track
Graduation Requirements via the Graduation Requirements report. Additionally, it
can be used in Mass Registration area to group courses by subject. Follow
these steps to assign a subject area to each course.
Access WSO
|Scheduling |Master File and Code Entry and Changes | Application = Grade
Reporting or All Entry Options |Entry Options = Subject Area Definition.
1. To add a Course Type Code, click  .
.
2. Enter the Course Type Code.
a. Example: E=English, S= Science, M=Math, H=History, L=Electives, F=Fine Arts/Humanities, P=PE/Health
3. Enter the Subject Area Description.
a. English, Science, Math, etc.
4. Enter the total Credits Required for Graduation. (not required if not using the Graduation Requirement report)
5. Enter the Credit Status Level - Credit Status 1 through Credit Status 8 (Credit Status 5-8 (Optional – if additional areas are necessary.) (not required if not using the Graduation Requirement report)
a. The total credits a student should have by this time. For example, this may be used to define the credits a student should have by the end of the freshman year. EX: 1 credit for English.
6. Select the Grade Year from the drop down. (Optional)
7. Select the School Location from the drop down.
8. Click  to Save
Prep Work – Edit Course Codes Next Year
Access WSO | Scheduling | Master File Changes and Code File Entry and Changes | Application: Scheduling (Next Year) | Entry Options = Course Codes – Next Year (All Fields).
•Course codes must have a Dept/Curr Code assigned (i.e. M = Math). Use the Course Type Code setup in Subject Area Definition
•Course codes must have a Scan Code specified (i.e. 1=Fresh 2=Soph, 3=Junior, 4=Senior, 12=Fresh/Soph, 34=Junior/Senior, etc.)
o ({Do not enter in grade year}). This identifies the available grade level/s for each course. Courses may be available with multiple grade levels identified.
o Junior High/Middle Schools should use 6=6th grade, 7=7th grade, 8=8th grade
See the documents listed below for instructions on mass registering students by course or by student.