
Added 7/23/2018
What is a roll over? It is closing out the current school year and getting your database ready for the next one. It is a yearly process that is done over the summer.
What happens during the rollover?
•The scheduling data from the next year area becomes the current year scheduling data.
•Demographics get adjusted so that the proper students show as active and inactive for the new school year.
Ø Graduates and withdrawn students become inactive. Continuing or new students will be active.
Ø Students’ grade level will be adjusted, if necessary, for the upcoming school year.
•The calendar will be removed so that the new one can be entered.
The Roll over is not a difficult process, but there are several steps and due to the infrequency we understand the need for detailed information. This guide will assist you in a seamless roll over from your current year to the upcoming school year. As always, if you have any questions, please contact the SDS support staff.
User and Data Requirements
•Make sure that the user who will be performing this task has full rights to ALL locations in the database.
•All users will need to be logged out of the program
•ALL locations must be ready to roll over. In districts where the database contains multiple locations, make sure each location is ready because the roll over will do every location. No exceptions!
•Year-end state reporting should be complete, grade changes entered, and report card processing complete.
•Next Year or Current Year Scheduling:
o If you do scheduling in the Next Year area, make sure you are done with scheduling runs and prepared to do manual editing of schedules. The roll over will terminate your ability to do schedule runs.
o If you do scheduling in the Current Year area, make sure you copy your current year course codes and course master over to the next year area BEFORE roll over. Why? Because the next year scheduling data gets copied to current year at roll over. If there is nothing in the next year area then nothing will copy. It will result in a blank course code table and course master after roll over.
•Compress your data and create a backup for archival purposes. (schools that are hosted by SDS will learn how to zip the database and copy to their local workstation a bit later)
Processes to Run Before Rollover
Refresh the Attendance for the entire school year
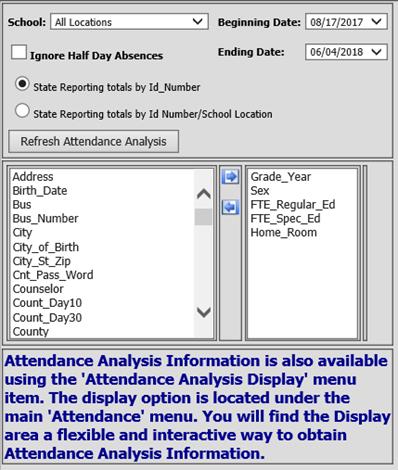
Make sure your date range includes the first and last date of school. This is important for historical reporting.
Figure 1 Attendance Refresh Screen
To Refresh Attendance: (figure 1)
1. From the main menu, click on Processing Center
2. Next, choose Refresh Attendance Analysis.
3. Select a School Location or All Locations.
4. Select a Beginning and Ending Date.
5. Choose the fields in the box on the left,, i.e. Grade_year, Sex, FTE_Regular_Ed, etc that you want to use for subtotals and move them to the right box by clicking on the arrow pointing to the right. Include the fields you may want to see totals for when using historical reporting.
6. Select Refresh Attendance Analysis (This may take several minutes)
7. Click OK when the message displays "Refresh of Attendance Analysis is complete."
8. Done.
Compute GPA and Rank
In case there were any grade changes since the last GPA calculation, it is always a good idea to compute the GPA and re-rank students immediately PRIOR to rolling over. This will ensure that the transcripts and cumulative GPA reflect the grades at the time of roll over.
For Middle School/Junior High Schools: Are there any courses on your course master that are taken for high school credit and are to be included on high school transcripts? If Yes, read section below.
•Go to your course master and locate those courses.
•Scroll over to the field titled “Sequence Code C_135” and enter a Y. This needs to be done BEFORE your last GPA calculation so that the code of Y will be transferred to those students’ transcripts during the calculation process. Coding those classes with a Y will prevent them from being deactivated, along with the other courses in their transcript area that are NOT to be included in high school transcripts. (This will be relevant when you get to the section regarding the deactivation/deletion of transcripts in “Processes to Run AFTER Roll over” later in this document.)

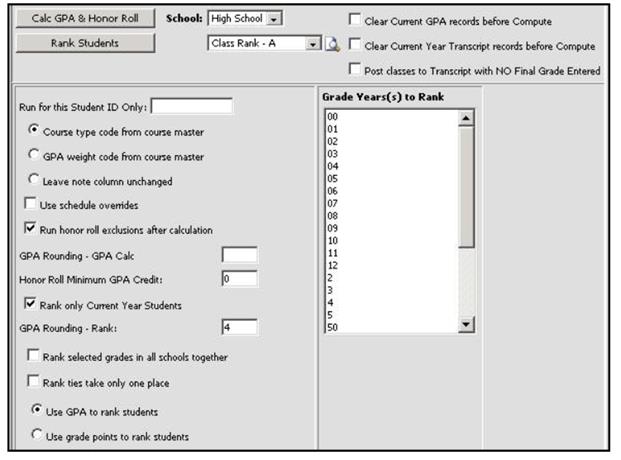
Figure 2 GPA Refresh Screen
To Compute GPA: (figure 2)
1. From the main menu, click on Processing Center
2. Next, choose Compute GPA.
3. Select a School Location from the “School” drop down.
4. Select the appropriate options.
5. Click the “Calc GPA & Honor Roll” button. While processing, it is computing GPA for each term and assigning students to honor rolls. It is also updating transcripts with the latest final grades. You will get a message, Calculation is complete” when it is done (figure 3).
6. Click “Rank Students” to put GPA’s in numeric order, from high to low, by grade level.
Figure 3 Message at Completion of GPA Refresh
Report Recommendations
The roll over will remove all grades except for final, aka transcript grades. While historical reporting is a great option for many reports, only those schools that use the fixed-format report card option will be able to get prior year report cards using historical reporting. For this reason, it is highly recommended that you print copies and/or export the following grades-related reports to a file, for future use if necessary:
•Report cards
•Honor rolls
•Class Rank Reports
For a list of other reports you may want to print or save to file, see this link in our Help Console,
How to Export and Save Reports to File
If you would like to save some reports to a file. it is easily accomplished as follows:
1. Preview the report
2.
On preview screen in top left corner, click on the diskette icon/export
icon, located to the left of the printer icon 
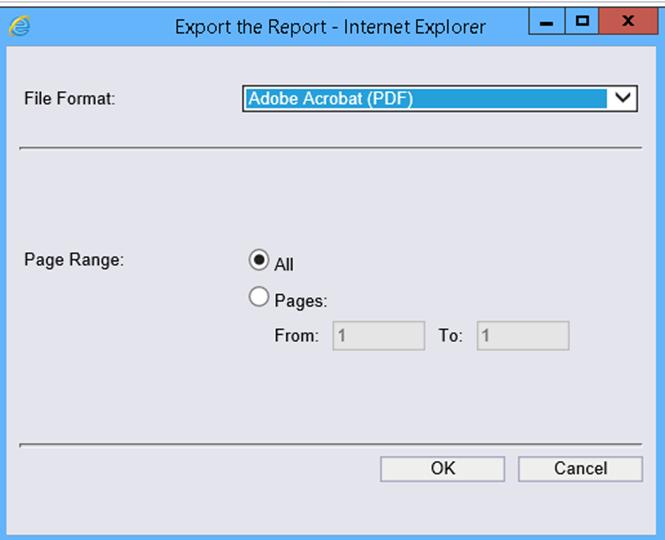
3. A dialogue box will display (figure 4). Choose the format you want from File Format Drop down list. Most choose PDF. Click OK
4. Finally, you will be able to “Save As” and re-name the report, and place it onto your local workstation for future use.
Figure 4 Export Report Dialogue Box
Code Demographics Properly
When the roll over is complete, graduates and withdrawn students will no longer show as current year. Continuing students will remain current students and those who were Pre-entered, such as Pre-K, will now show as your current students. The field that we will be discussing in this section is the “next year active” demographic field. At roll over, that value gets copied to the current year active field. It is important that those who are not expected to return, have a next year active =1.
Students who will be Inactive for the Upcoming School Year
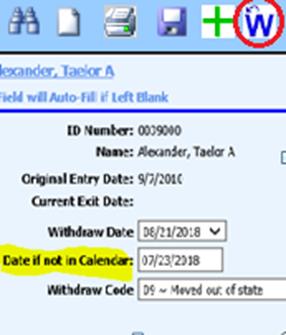
Withdrawn students’ Next Year Active Field Should be 1
When students are properly withdrawn through the “Withdrawal Utility”, their “next year active” field will automatically change to 1. This would include students who withdrew during the current school year and also students who withdraw over the summer. Now that school is out for the summer, if a student informs you that they will NOT be attending and the withdrawal date is effective on a non-school calendar date, you will still withdraw them via the Withdraw Utility, as you have done all year long. The difference is that you will enter their withdrawal date in the “date if not in Calendar” box.
Graduating Students’ Next Year Active Field Should be 1 AND Grade Year should be adjusted to Year of Graduation
Any student who is graduating needs to have their “next year active” field changed to 1. Graduates also need their grade_year field changed to their year of graduation. Why? Because eventually, all graduating classes will be 12 and it is important to give them a unique grade_year value so that their “# in class”, for class rank is accurate and also to generate reports by grade level after roll-over. Here is an easy way to change your seniors:
1. From the main menu, go to Data entry and changes.
2. Next, go to Student Information Entry and Changes Horizontal. Choose a demographics view.
3. Go to the drop down box to the right of the “Mass Change” icon. Choose to view “Current Year Inactive” students. This will include students who finished the school year and students who withdrew during the current school year.

Figure 5 Choose to see Current Year Inactive
4. Next,
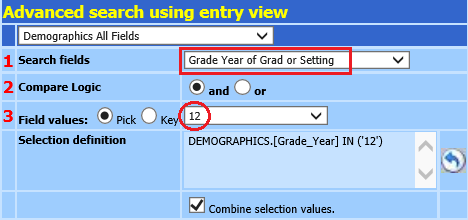
do a search to get only this year’s senior class. Do this by clicking on the
“Search” icon,  . This will display
an area, as shown below that will allow you to query out a segment of students
based on a particular value in a field from the demographic view you are
using. In this case, you will choose the grade year that represents your
outgoing students’ grade level. (“Outgoing” refers to students who are leaving
and will not be enrolled in any location in your database, i.e. seniors.)
The number of students on the screen will change as you create this query.
. This will display
an area, as shown below that will allow you to query out a segment of students
based on a particular value in a field from the demographic view you are
using. In this case, you will choose the grade year that represents your
outgoing students’ grade level. (“Outgoing” refers to students who are leaving
and will not be enrolled in any location in your database, i.e. seniors.)
The number of students on the screen will change as you create this query.
Figure 6 Search Options- By Grade
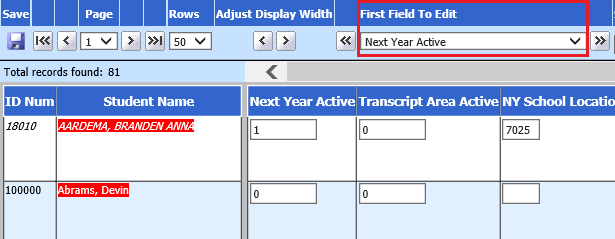
5. Choose “Next Year Active” in the “First Field to Edit” drop down box. See screen print below. All outgoing students should be coded as 1. Edit as necessary.
6. Finally, choose “Grade_Year” in the “First Field to Edit” drop down. All seniors should display, change their grade year value of 12 to graduation year, i.e 2018 graduates to 18. This will make them a unique group in the transcript table.
Verify other “Next Year” fields for Next Year Students
Check out the NY_School location fields on students going to a different school location next school year. You may want to also check out other fields, if in use, such as NY_homeroom, if applicable. These fields should reflect the values desired for the next school year (after roll over). The NY_School Location field gets copied to School_Location field during roll over.
Deletion of students/permanent removal:
Are there any students that you want completely removed/deleted from your database? Enter a 1 in ALL three of their demographics fields “current year active”, “next year active”, and “transcript active”. During the roll over, you will have the opportunity to delete students with a 1 in ALL three of those fields.
State Reporting: State reports for the current school year should be completed before the roll over process is done.
Creating a Backup:
Self-Hosted: Schools that host their own data should compress and create a back up of their data for archival purposes before doing the roll over. Contact your system administrator regarding that process.
Hosted by SDS: We have a utility that will allow you to zip your database and download it to your local computer.
Download your database from an SDS hosted site as follows:
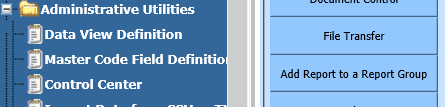
1. From the main menu, go to the Administrative utilities folder.
2. Choose Control Center and then File Transfer
Figure 9 How to access the File Transfer Utility
3. Put a checkmark in the “Create zip file only” box. Click on the “Send Database to SDS” button. This will take a minute or two to create a zip file named “ToSDSFile.zip”. Once it is complete you will get a message indicating that your file is complete and ready for download.
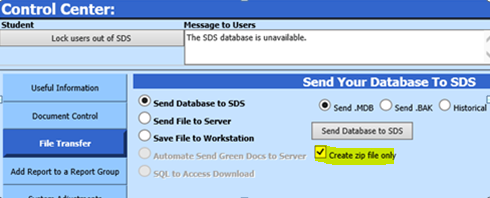
Figure 10 Message to indicate your file is ready

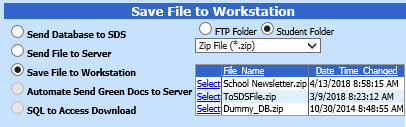
4. Once the “ToSDSFile.zip” is created, put the dot in “Save File to Workstation”. This will display a new drop down box to the right. Choose “Zip File (*.zip)” from the list, figure 11. It will display all of the zip files in your student folder. If you order the list by date, it will show at the top.
Figure 11 Choose Zip File and locate ToSDSFile.zip on the list
5. Click on the blue “Select” link to the left of the file name, a link to download will appear above the list. Right mouse click on that “ToSDSFile.zip” link and “save target as” (figure 12) or “save file as” depending on the browser you are using. You can then navigate to where you would like to download the file, and also change the name.
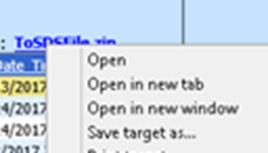
Figure 12 Right mouse click on file name and "Save target as"
6. Click “Save” and it will download to your local workstation. The ToSDSFile.zip contains the sdsxplan.mdb, your School Office database.
Now that you have a backup, we are ready to ROLL!
•Go into Administrative Utilities and then to SDS Web Office Settings. Scroll down to the “Year of Web Roll over” setting (figure 13). Make sure it displays the school year that you just finished (pre-roll over) in a 9 digit format YYYY-YYYY i.e. “2017-2018”. “Save Changes” upon exit. Log out and then log back in, so that the system recognizes the change in this setting.
Figure 13 SDS Web Setting for Roll Over - replace 20xx-20xx with pre-rollover school year.

•Next, go to Administrative Utilities and to “Prepare to Open
School (Roll-Over)” (figure 14). 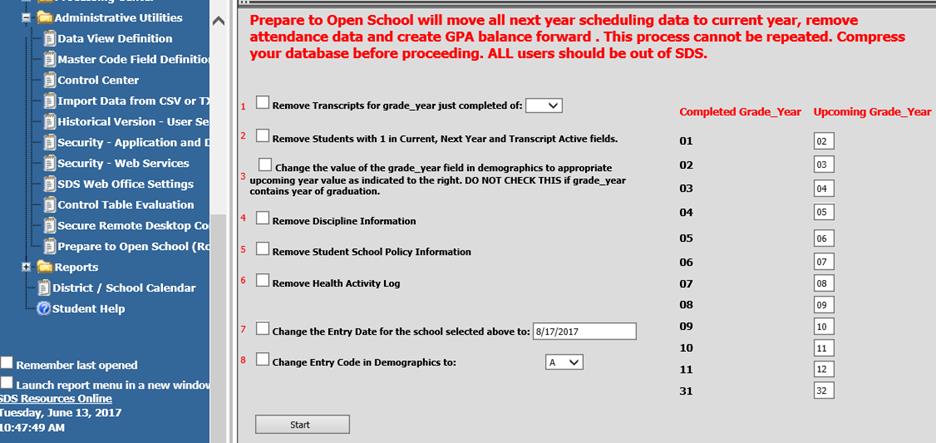
Figure 14 Prepare to Open School (Roll-Over) screen
Roll Over options:
1. Remove Transcript for grade_year just completed (grade drop down box) If you want to remove all transcript detail records from an entire grade level, select that grade from this list and check mark this box. The grade chosen is the PRE roll over grade value. If you are unsure, leave unchecked. There is a utility that will be able to remove or inactivate transcript records after roll over.
2. Remove Students with 1 in Current, Next Year,and Transcript Active Fields If you want to permanently remove a student(s), enter a 1 in all three of those fields in Demographics and check mark this box.
3. Change the value of the grade_year field in demographics to appropriate upcoming year value as indicated to the right DO NOT CHECK THIS if grade_year contains year of graduation: Look at the list of grade_year values to the right. The “Completed Grade_Year” is the Current/PRE-Roll over value. The “Upcoming grade year” value list is what they should be POST roll over. Adjust as necessary. Make sure to check the box if you want values to change. Leave box unchecked IF you have year of grad as the value since those values stay the same.
NOTE: If you have updated the NY Grade Year field in Demographics with the appropriate grade year for the next year school year and would prefer to have those values rolled over to the Grade Year field, you can leave box 3 unchecked and the system will copy the NY Grade Year field to the Grade Year field during the rollover on students with Next Year Active=1. If the NY Grade Year field is blank on any student, the current Grade Year value will not be overwritten with a blank.
4. Remove Discipline If you would like to remove/delete all discipline records from your database, check this box.
5. Remove Student Policy Information If you use the School policy area and would like to remove the record of letters sent, check this box.
6. Remove Health Activity Log If you use the Health Activity log and would like to remove last year’s entries, check this box.
7. Change entry date to _____ (box for manually entered date): If you want all of your students to have the same entry date, check this box. Most schools do not check the box so that they keep the entry dates that reflect the students’ entry or re-entry into the district.
8. Change Entry Code in Demographics to ____ (entry code box drop down): Do you want all of your active students to show the same entry code? If so, choose the entry code from the drop down box and make sure to check the box.
•Fill out the Prepare to Open/Roll-Over screen, so that it fits your desired outcome.
•Click the Start Button. It may take 2 to 30 minutes to process. When it is done you will get a message “Process is complete” (Figure 15)
Figure 15 Message when finished with Roll Over
Processes to Run after Rollover
 Student System Adjustments You will
run a process that will make sure that the changes to demographics, i.e.
grade_year, will be carried throughout all tables such as health records and
current year schedules. You will also have an opportunity to inactivate or
delete a grade level’s prior year transcripts. This is important to
incoming freshman with middle school transcript records. It allows them to
“start from scratch” regarding high school transcripts and GPA.
Student System Adjustments You will
run a process that will make sure that the changes to demographics, i.e.
grade_year, will be carried throughout all tables such as health records and
current year schedules. You will also have an opportunity to inactivate or
delete a grade level’s prior year transcripts. This is important to
incoming freshman with middle school transcript records. It allows them to
“start from scratch” regarding high school transcripts and GPA.
Update Student Name, Grade Year, etc. from Demographics
1. From the main menu, go to Administrative Utilities and then to Control Center.
2. Choose Student System Adjustments. (Figure 16)
3. Scroll down to “Update Student Name, Grade Year, etc from Demographics”. Check “Include Inactive Students” and click on the “Apply Now” button to the right. When it is finished you will get a message letting you know how many records were updated.
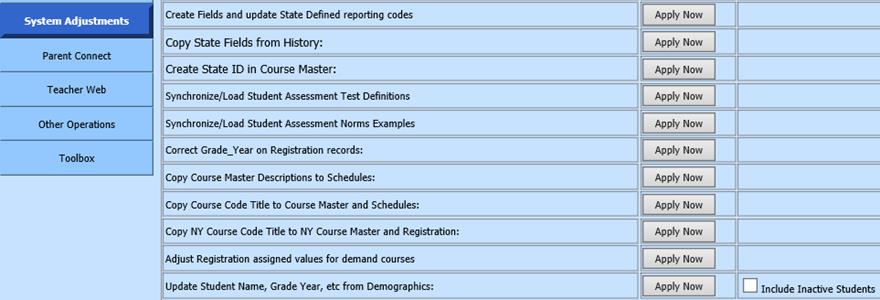
Figure 16 Student System Adjustments
Deactivate or Delete Transcripts from Selected Grade for selected school years
This utility will allow you to select a specific grade level and either delete the transcripts or inactivate the transcripts for the school years that are selected, (figure 17). This is useful for incoming freshman so that they can start high school without transcript information from prior years.
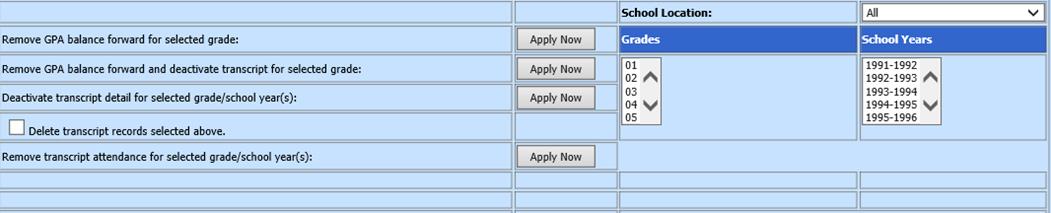
Figure 17 Student System Adjustment Deactivate/Delete Transcripts Area
1. From the main menu, go to Administrative Utilities and then to Control Center.
2. Choose Student System Adjustments
3. Scroll down to “Deactivate Transcripts for Selected Grade Year”
4. Over to the right is “School Location” drop down box. Choose the school location of the grade level of which you are going to deactivate or delete, from the drop down box.
5. In the “Grades” box choose the grade_year value of the students. This value is the POST/AFTER roll over value.
6. In the “School Years” box, choose all school years that should be deactivated or removed. Hold your ctrl key down as you click on grade years to highlight multiple years.
7. TO DEACTIVATE: Press the “Apply Now” button to the right of Deactivate transcript detail for selected grade/school year(s).
8. TO DELETE: Put a checkmark in the “Delete transcript records selected above” and then press the “Apply Now” button to the right of Deactivate transcript detail for selected grade/school year(s).
What is the difference between deactivate and delete?
•Delete transcripts: This option will remove those transcript records permanently. If you are unsure, then deactivate instead of delete. You can always delete them later, if necessary.
•Deactivate transcripts: This option will leave them viewable, however, they will be coded in such a way that they will not be included on future transcript reports or included in cumulative GPA. The code that prevents them from being included on transcripts or cumulative GPA is that it will put an N in the transcript detail table field titled “Sequence code C_135”
Compress your data During the roll
over, a variety of data may be removed including the calendar, next year
schedule data, etc. Due to this, it is recommended that you compress your
data. This will decrease the size of the database, reset indexes, and make
it more efficient.
Verify Data
•Check out your post-roll over data. Make sure you see the proper students with the proper grade_year.
•Check your schedules and any other data you feel is necessary.
Review Codes
Are your codes sufficient for your needs? If not, it is a
good time to make edits to your code lists. For more information on
reviewing codes,
Review Grade Area Setup
If you are planning on making any changes to your grade area setup,
it needs to be done before teachers create their grade books for the new school
year. If you want to make sure your grade area setup is setup properly for
seamless gradebook creation, contact SDS support. We would be happy to
review your setup.
Enter Calendar Creation of a new calendar needs to be done prior
to the first day of school.

Figure 18 Initial School Calendar Setup
1. From the main menu, go to the Attendance Folder.
2. Next, click on “School Calendar Setup and Changes” option. (Figure 18)
3. Choose the school location, (#1) from the “School Location” drop down box.
4. Click on the Red flag icon, (#2a) “Calendar Setup”. A new screen will display. (figure 19)
5. Put a checkmark in (#3) “Create a new Calendar” box.

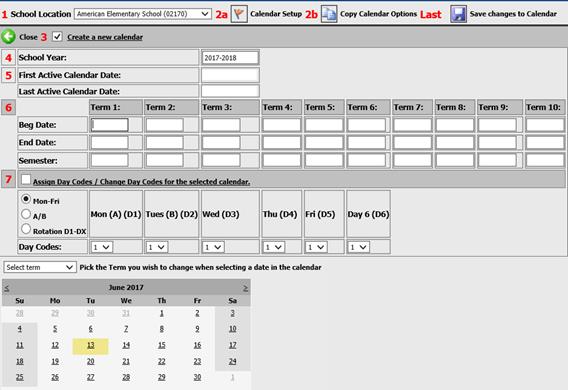
Figure 19 Calendar and Term Dates Setup Screen
6. The school year (#4) should be populated with the proper school year, ie. 2018-2019. If not, enter it manually in the 9 digit format (YYYY-YYYY).
7. Next, fill in the Term dates grid. They can be manually entered but it is easiest as follows:
8. Go to Calendar’s “Select Term” drop down box. Choose Term 1 Begin Date from list.
9. Locate the first STUDENT-attendance date on the calendar and click. It should populate both the (#5) First Active Calendar Date and the Term1 Beg Date on the date range grid above. The drop down will automatically change to that term’s end date. Click on that date to populate box. It will change for each term’s begin and end date.
10. (#6) Continue selecting term dates until you have filled in all of your terms’ dates.
11. Fill in Semester boxes located under each set of term dates. This is important so that transcripts and attendance reports are correct.
12. The calendar will assign day codes of 1 to all dates unless you indicate in #7 how you want to auto-fill your day codes. Fill out to match your situation.
13. The LAST step is to save your calendar. When you click on the save diskette, the calendar will create. Once created, go to calendar and inactivate student non-attendance dates and save.
Have a GREAT year!
