
Revised 8/1/2018
School Calendar Setup is used to create a calendar for each location for the start and end of the school year calendar. It also defines the beginning and ending dates of each marking period. This has to be done before any attendance can be taken.
# 1 Select a School Location (i.e. High School)
# 2a Click on
 . A new screen will then
display.
. A new screen will then
display.
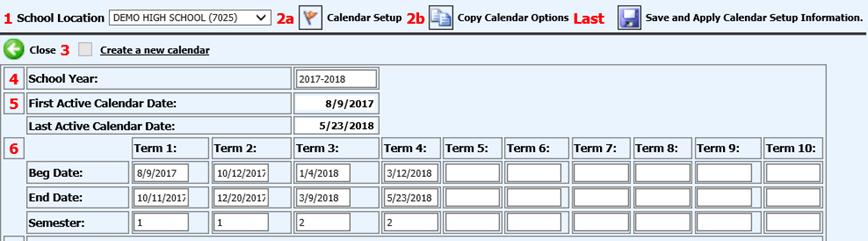
# 3 Create a
new calendar check box.
• If you need to re-create a calendar and have entered attendance the check box is not active. If you are certain that you can create a calendar that will still have all dates available for dates with attendance select the link “Create a new calendar”. The check box will then be activated.
• Click in the check box next to “Create a new calendar”.
# 4 Enter a School Year (i.e. 2017-2018).
# 5 Enter
• “First Active Calendar Date” (i.e. 8/9/2017).
• “Last Active Calendar Date” (i.e. 5/23/2018).
# 6 Enter
•Beg Date for All Terms.
•End Date for All Terms.
•Semester for All Terms.
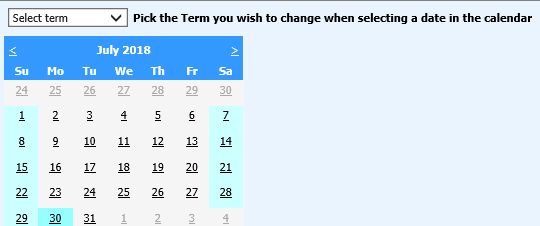
•Note: The calendar at the bottom of the screen may be used for filling in the term beginning and ending dates rather than typing the dates, if preferred.
1. Select a term option from the “Pick the Term you wish to change when selecting a date in the calendar” dropdown
2. Click the appropriate date in the calendar for the selected term option
3. The selected date will fill in the selected term box at the top of the screen.
# 7 By checking “Assign Day Codes / Change Day Codes for
the selected calendar, Day Codes will assign to all Active school
days.
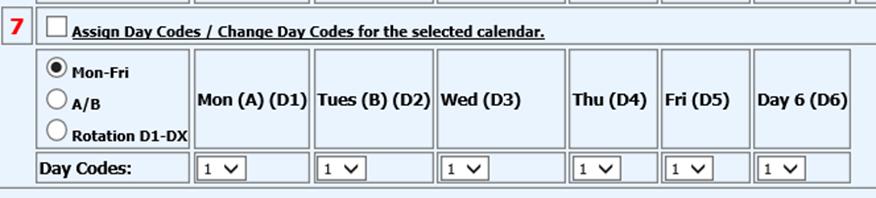
1. Select one of the following radio buttons: Mon-Fri, A/B or Rotation D1-DX.
2. Select Day Codes by clicking on the dropdown in each column.
3.
Click on  “Save and Apply Calendar Setup
Information”.
“Save and Apply Calendar Setup
Information”.
4.
Note: By clicking on  , it will close without saving your changes.”
Make sure you SAVE first then hit the close icon. While saving, if term
dates are not in chronological order or dates overlap, the
field will highlight in red with a message to correct it. Make the change
and click save again.
, it will close without saving your changes.”
Make sure you SAVE first then hit the close icon. While saving, if term
dates are not in chronological order or dates overlap, the
field will highlight in red with a message to correct it. Make the change
and click save again.
5. After
clicking on “Save and Apply Calendar Setup
Information”, the calendar dates will be listed at the bottom of the screen.
6. Click
on the close icon to return to the main
calendar screen.
7. Inactivate any non-attendance dates by selecting the N circle on those dates.
8. If desired, the Day Type field can be used to enter a 1 character description such as H for Holiday, E for Emergency, S for Snow Day.
9. After
inactivating dates, click on “Save Calendar” to save the changes
# 2b Copy Calendar
Options.

a. This option provides a tool to copy a calendar from a school to another school.
b. Click on  Copy Calendar Options.
c. Click on the drop down next to From and select the school you would like to copy from.
d. Click on the drop down next to To and select the school you would like to copy to.
e. Make any necessary changes to the calendar grid.
f. Click Save Calendar|
Click .
g. Once you are back on the main screen review the calendar display options and the calendar.
h. Click to save the calendar.