Revised: 7/2020
In
this area, you will find many standard SDS reports. By using the Activate
Sort Definition Area and View & Export, you can query certain criteria to be
pulled into the standard reports. Once you create these custom reports, you have
the ability to share or save them for future use. You can also find a short cut
to General Accounting Reports, in many areas of the program, depending upon what
section you are working in.
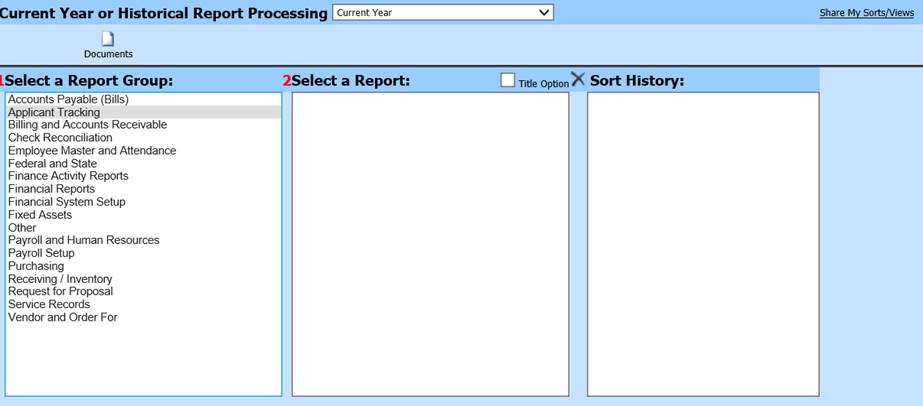
The standard reports are arranged in groups:
•Accounts Payable: All AP reporting; i.e. Open AP report, Bills Payable Report, Paid Accounts Payable, Check Register, etc.
•Applicant Tracking: Job Applicant reports; Certificates, Degrees and Master list
•Billing and Accounts Receivable: All AR reporting; i.e. AR Aging, Statements, Customer List, AR Invoices, etc.
•Check Reconciliation: Date driven Check Reconciliation and Cleared Check report.
•Employee Master and Attendance: Attendance reporting, Employee Master, Employee Contract reporting, etc.
•Federal and State: State specific reporting
•Finance Activity Reports: Cash Receipt reporting and Transaction Balance reporting
•Financial Reports: Detail Account reporting, Balance Sheet (pre-web), etc.
•Finance System Setup: Budget Code book, Purchasing Catalogs and State Code reports
•Fixed Assets: Fixed Asset reporting
•Other: Data Change Log, Security report, Messenger and Login reports, etc.
•Payroll and Human Resources: ACA, Payroll, Time Card reports, etc.
•Payroll Setup: Deduction/Benefit Master list, Bank Information, Tax listing, etc.
•Purchasing: Purchase Order reporting
•Receiving/Inventory: Daily Receipt reports
•Request for Proposal: Request for Proposal report
•Service Records: Service Records report
•Vendor and Order For: Vendor Detail, Vendor 1099, Vendor Publication, etc.
To preview and print a standard General Accounting report:
1. Select Reports
2. Select General Accounting Reports
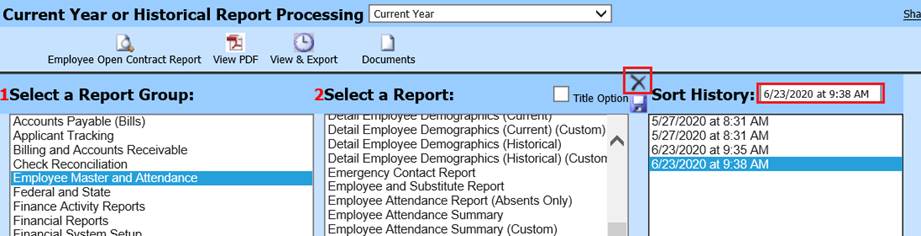
3. 1 Select a Report Group: i.e. Employee Master and Attendance
4. 2 Select a Report: i.e. Employee Master List
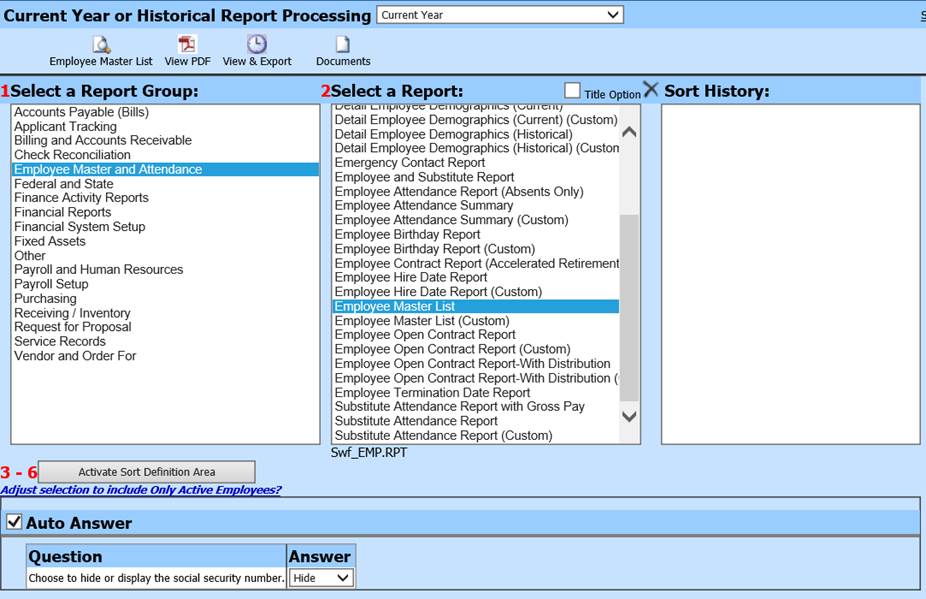
5. Activate Auto Answer: Once you have selected your report, create any sorts you would like, answer the questions under “Activate Auto Answer” and put a check in the box next to Activate Auto Answer. By putting the check in “Activate Auto Answer” it will retain those same parameter answers the next time you run that same report and sort.
a. Question: Choose to hide or display the social security number
b. Answer: Hide or Display
6. Preview Report
To preview a standard General Accounting report using Activate Sort Definition Area:
1. Select Reports
2. Select General Accounting Reports
3. 1 Select a Report Group: i.e. Employee Master and Attendance
4. 2 Select a Report: i.e. Employee Open Contract Report
5. 3 – 6 Select “Activate Sort Definition Area” to sort the report.
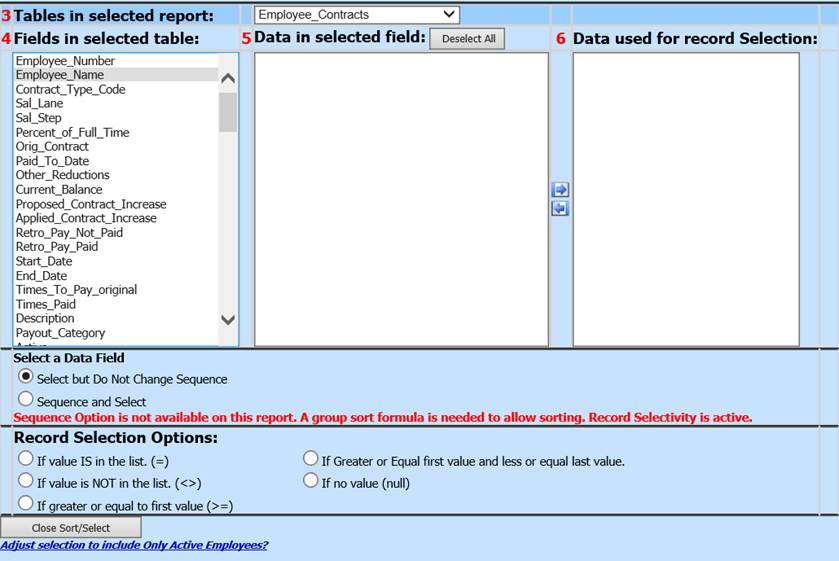
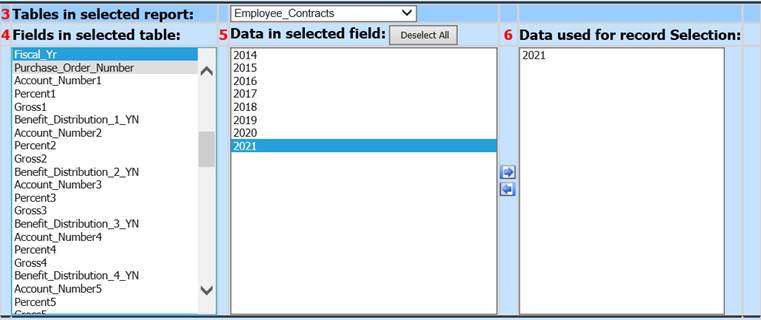
a. 3 Select Tables in selected report: i.e. Employee_Contracts
b. 4 Fields in selected table: i.e. Fiscal_Yr
c.
5 Data in selected field:
Select data, use  to move to
6; i.e. 2021
to move to
6; i.e. 2021
d. 6 Data used for record Selection: Verify Data listed is correct
e. Select Data Field:

i. Select but Do Not Change Sequence: If this options is selected, it will not change the grouping on the report
ii. Sequence and Select: If this option is selected, it will change the grouping on the report
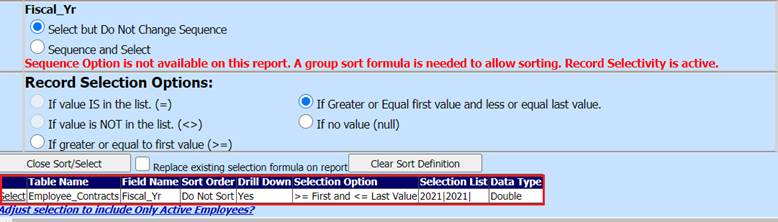
f. Record Select Options:

i. If value IS in the list (=): The report will show detail that is = to the data chosen under “Data used for record selection”
ii. If value is NOT in the list (<>): The report will show detail that is <> than the data chosen under “Data used for record selection”
Note: The two options above will not be active if your field is a numeric field (as opposed to an alphanumeric field)
iii. If greater or equal to first value (>=): If selected, this will display data that is greater or equal to the first value in “Data used for record selection”
iv. If Greater or Equal first value and less or equal last value: If one item is listed, this is equivalent to saying “is equal to”. If two are chosen, they allow for a lower or upper range.
v. If no value (null): When looking for a “Null” record, a normal sort will not work. You can’t ask for less than or equal to a value in a field that has no value (null). This option gives you a way to find records with no entry in a particular field.
g. Select Save New Sort
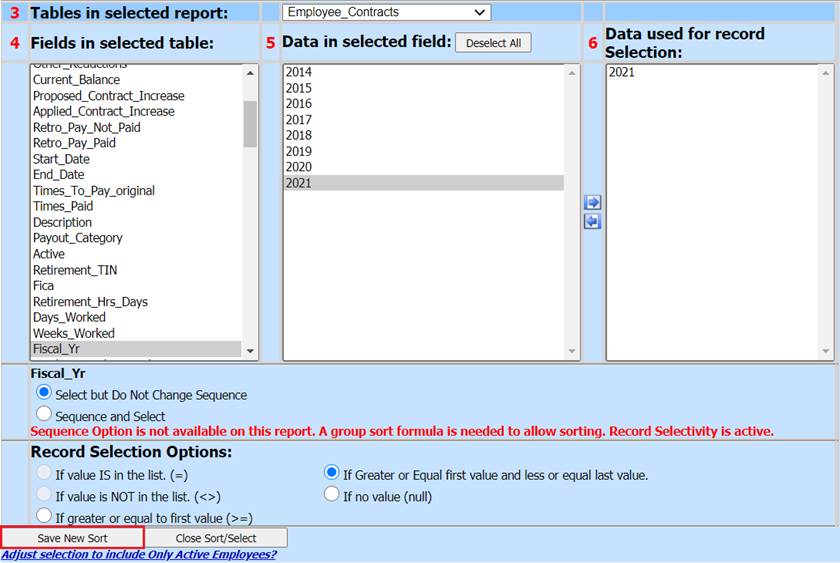
i. The formula will be added below
ii. Add any additional sorts, if needed
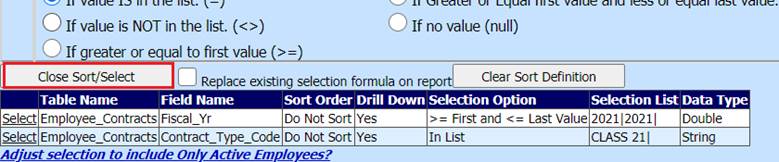
h. Select Close Sort/Select
i. You will return to the main Reporting screen.
6. Activate Auto Answer: Once you have selected your report, create any sorts you would like, answer the questions under “Activate Auto Answer” and place a check in the box next to Activate Auto Answer. By checking “Activate Auto Answer” it will retain those same parameter answers the next time you run that same report and sort.

a. Question: Choose to hide or display the social security number
b. Answer: Hide or Display
7. Preview, Print or Export the report
8. Close Report
9. If you wish to save the sort/selection setup: Under Sort History, select Date and time stamp
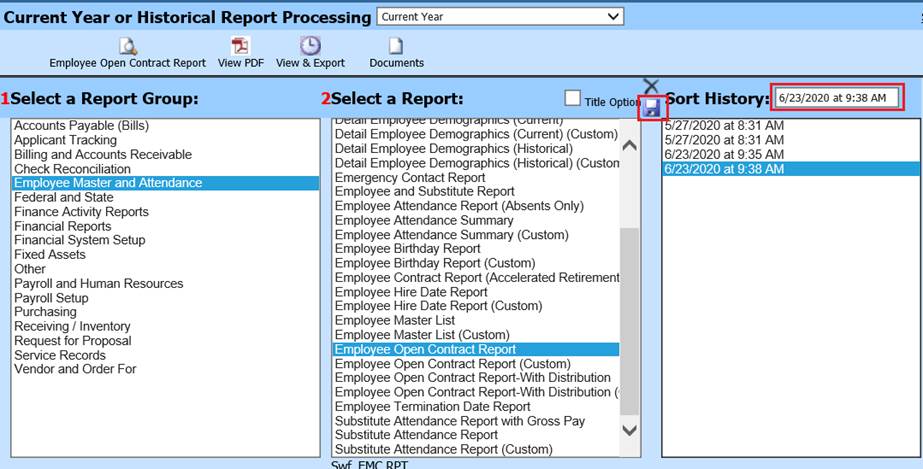
10. Enter a new Title for report; i.e 2021 Active Contracts
11. Select Save
a. The new Title will be saved and listed under Sort History

To delete a saved report:
1. 1 Select a Report Group
2. 2 Select a Report
a. Select Sort to delete
3. Select X to remove from Sort History list
To preview a standard General Accounting report using View/Export:
1. Select Reports
2. Select General Accounting Reports
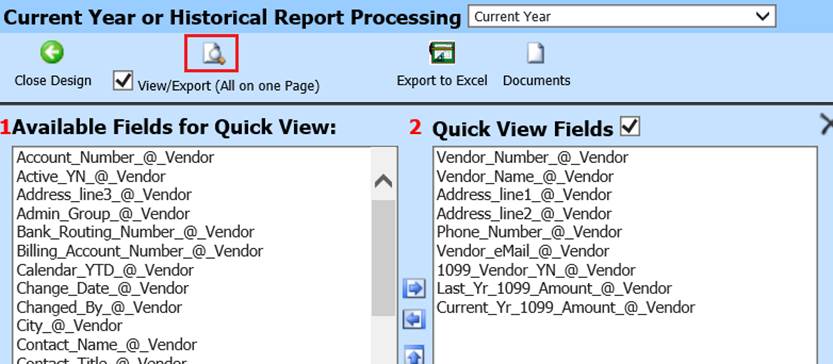
3. 1 Select a Report Group: i.e. Vendor and Order For
4. 2 Select a Report: i.e. Vendor Master List (1 Lines)
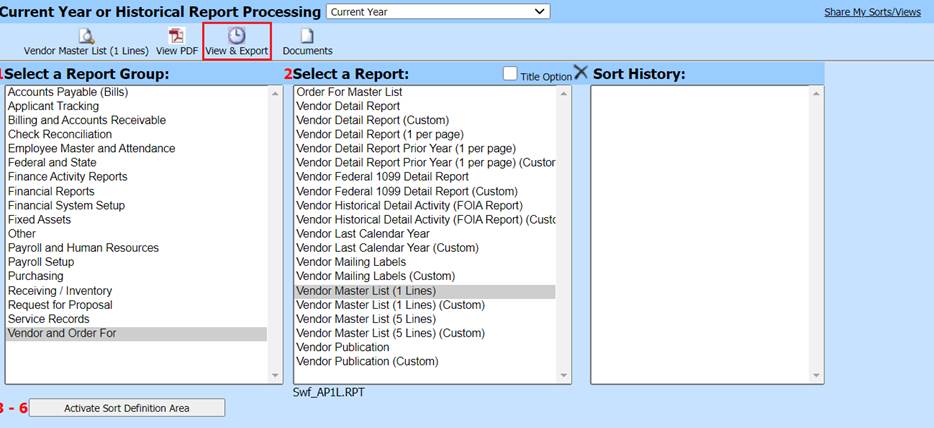
5. Select View & Export
6. A new window will display
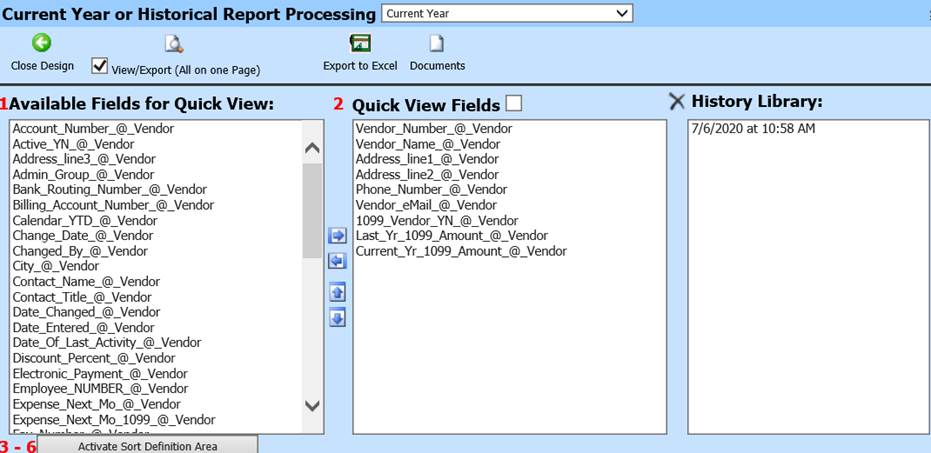
a. 1 Available Fields for Quick View:
i. All specific fields available to choose from for the report needed
NOTE: the “@_Vendor” indicates what table contains the field
b. 2 Quick View Fields
i. Fields to be listed on the report
c. History Library:
i. Reports previously created
7. Under 1 Available Fields for Quick View: Select Fields to add into report
8.
Use  to move selected field into
2 Quick View Fields column
to move selected field into
2 Quick View Fields column
9.
If you wish to remove any fields from the standard report; highlight fields, and
then use  to move into 1 Available Fields for Quick View.
10. Select View/Export (20 per Page) to view All detail lines on one page
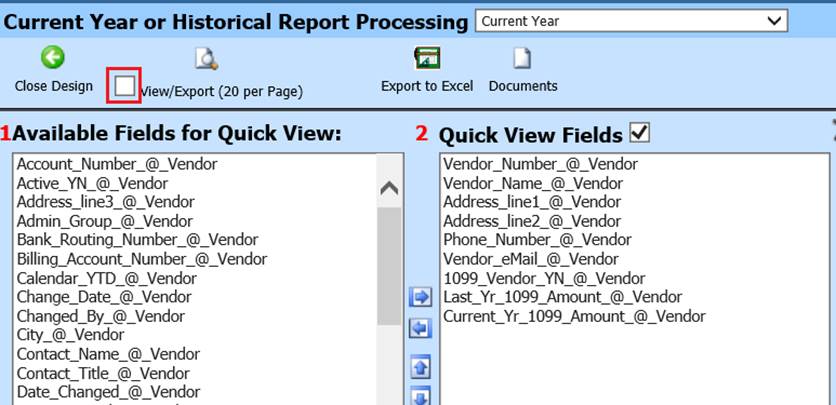
a. If unchecked, will display 20 detail lines per page
11. Preview Report
12. Select + Quick View Export to save new report

a. Determine the format you wish to save the new report
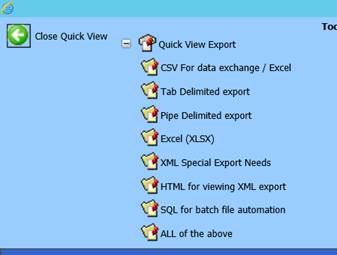
i. CSV For data exchange/Excel
ii. Tab Delimited export
iii. Pipe Delimited export
iv. Excel (XLSX)
v. XML Special Export Needs
vi. HTML for Viewing XML export
vii. SQL for batch file automation
viii. All of the above
13. Once you have selected the format needed, you will be taken back to the main page.
14. Select Documents
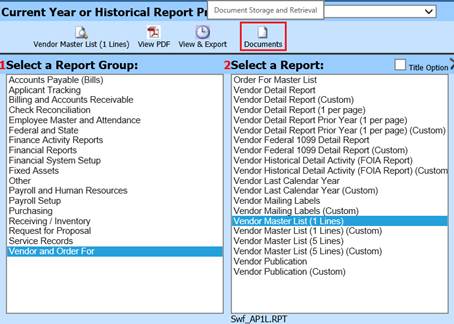
15. The report folders will be available to select from and save as needed.
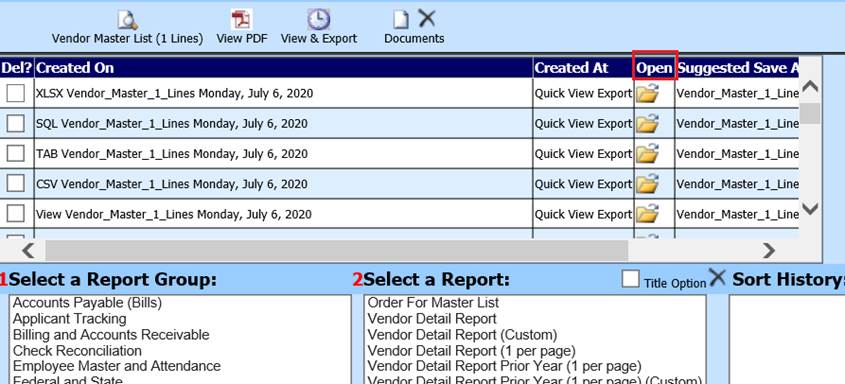
a. These folders will be available, unless you choose to Delete the report.
i. To delete report: Select “Del?” next to the report
ii. Select X

Sharing a Saved Sort
1. Select Share My Sort/View: To share your report with another staff member

2. A new screen will populate:
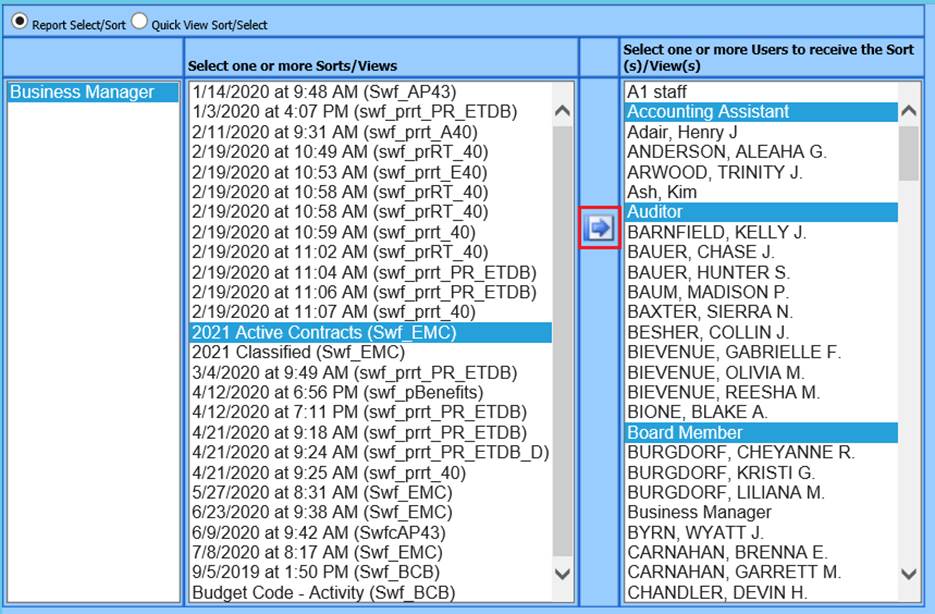
3. Select the report under Sort/View
4. Select the User(s) to share report
5.
Select  to share Sort/View
selection
to share Sort/View
selection