
Revised: 5/2023
The Deductions & Benefits Master allows for adding and maintaining deductions and benefits used in processing of payroll.
1. Select Human Resources
2. Select Human Resources Control Center
3. Select Deductions & Benefits Master
Review of all fields in Deductions & Benefits Master entry view:

•Code: You can use alpha or numeric to set up the codes
•Description: Enter the description of the deduction or benefit
•Is this a Deduction or Benefit: Select Deduction (Employee Paid) or Benefit (Employer Paid)
•Vendor: Enter vendor receiving payment for the liability

•Active: This field is used to indicate whether the deduction is active or inactive. If the deduction is active a ‘Y’ must be entered. If the deduction is inactive then an ‘N’ must be entered
•Active Date: Start dat of withholding the Deduction or Benefit
•Last Active Date: Last date to withhold the Deduction or Benefit *Last active date must be at least one day after the last payroll date (i.e. payroll date 5/30/23- if you want the deduction to process on that payroll, the last active date must be 5/31/23)
•Amount:
o If the deduction or benefit amount is the same dollar amount for all employees or the majority of employees with this code, enter this amount
o If the deduction/benefit is not the same for each employee, enter a zero in the amount field. You must enter the amount for the deduction/benefit individually in the employee deduction or benefit
•Percent:
o If the deduction or benefit amount is the same percentage for all employees or the majority of employees with this code, enter this percent.
o If the deduction or benefit is not the same percentage for each employee, enter a zero in the percent field. You must enter the percent for the deduction/benefit individually on each employee’s deduction/benefit area.
•Creditable Earning Factor: Illinois: update CD Factor by specific percentage listed
•Gross Code indicators: This field will have the word ‘ALL’ unless you want to specify the type of gross amount to be used. The system has several gross codes listed below:
o G1: Is the total gross amount of the payroll without any deductions.
o G2: Is the taxable gross earnings. This amount is the total gross amount less any tax-sheltered items.
o G3: FICA gross earnings. This amount is the total gross amount less any FICA sheltered items. The code for matching FICA would be assigned this gross code indicator.
o G4: Is the retirement gross for the code T in the Retirement TIN column in the Employee Master Setup screen. The Retirement TIN column is located in the Employee Master. This gross code will cause this deduction to calculate only on wages with the Retirement code T
o G5: This is the retirement gross for the code I in the Retirement TIN column in the Employee Master Setup screen. The Retirement TIN column is located in the Employee Master. This gross code will cause this deduction to calculate only on wages with the Retirement code I.
o G6: This is the retirement gross code for the code N in the Retirement TIN column in the Employee Master Setup screen. The Retirement TIN column is located in the Employee Master. This will cause this deduction code to calculate only on wages with the Retirement Code N.
o G7: This is the Medicare Employee and Employer gross code. It is used in states where employees are subject only to the Medicare only portion of FICA.
o G8: Is the State Taxable gross code. This amount is the total gross amount less any state tax sheltered items.
o Codes 0 – 7 are user-defined codes. If you use one of these codes only the wages assigned to it will apply.
•Maximum Cutoff Period. In this field you will determine the time frame for the deduction
o F = fiscal
o C = Calendar
o N = Not applicable.
•Maximum Gross is currently not in use.
•Maximum to Withhold: This field is the maximum amount of a deduction that should be withheld from an employee's payroll. This amount can be either for the fiscal year or calendar year. It is also used in conjunction with the Maximum Cutoff Period field.

•Federal, State, Local Tax Shelter: This field should be answered with a Y for yes, N for no, F for Federal only shelter or an S for state only shelter depending on the type of deduction it is. Note: This column is used to increase taxable gross wages due to a benefit that is subject to tax. For a benefit to be added to the employee’s taxable gross a ‘T’ needs to be entered into this column. Life Insurance premiums over $50,000 would be an example.
•FICA Shelter: This column should be answered with a Y for yes, N for no, F for Federal only shelter or an S for state only shelter depending on the type of deduction it is. Note: This column is used to increase FICA gross wages due to a benefit that is subject to tax. For a benefit to be added to the employee’s FICA and Medicare gross a ‘T’ needs to be entered into this column. If an employee has time that that is subject to the full FICA calculation and time for just Medicare there are two more options to manage this calculation process. If the benefit is to only add to the employees time with the full FICA calculation then a “3” is required in this field. If the benefit is only to add to the employee’s Medicare gross then a “7” is required in this field.
•Retirement Shelter: This column should be answered with a Y for yes, N for no, or F for Federal only shelter or an S for state only shelter depending on the type of deduction it is. Note: This column is used to increase Retirement gross wages due to a benefit that is subject to Retirement gross. For a benefit to be added to the employee’s taxable gross a ‘T’ needs to be entered into this column. Other codes:
o 4-Decreases G4(T) wages only
o 5- Decreases G5(I) wages only
o A-Increases G4(T) wages only
o B-Increases G5(I) wages only
•Taxable Income and Taxable Fringe: need to be marked with a Y for yes or N for no depending on the deduction code and how it relates to your setup. (If you have questions on these fields contact your auditor.)
•Cash In Lieu: For information on this setup: http://help.schooloffice.com/FinanceHelp/#!Documents/cashinlieuofafringebenefit.htm
•Garnishment uses MWA: For information on this setup: http://help.schooloffice.com/FinanceHelp/#!Documents/wagegarnishment.htm
•Timing Code: This is a user-defined code. The Timing Code purpose is to group and separate different times that deductions or benefits will be used in computing payroll. If it is to be used on the first payroll of the month you may want to give it a timing code of 1. Deduction or benefits used in every payroll may have a timing code of 3. You will select which timing codes you want to use each payroll when you start the compute net pay process.
•Transfer Option: This field controls the creation of invoices to automatically pay payroll liabilities or to not create Payroll Liability checks. The default value is “NA”. With this value entries to pay liabilities will be generated in the Accounts Payable area when the payroll liability transfer is performed. If the value “NOCHK” is entered everything in payroll will look the same. However when the payroll liabilities are transferred the deductions coded as “NOCHK” will not be transferred. The records still print on the payroll liability list they just are not automatically generated for disbursements. The appropriate payroll liability will still be posted as part of the payroll transaction. The purpose of this option is to allow for the payment of liabilities at a future time based on a bill. This is fairly common with insurance premiums.
•Active if Not Paid YN: Employee still receives Fringe Benefits When Not Paid. A Y should be used if an Employee still receives a benefit.
•Batch Number Override field is used to override the default batch number for the payroll liabilities. You can place any number in this column such as a ‘99’ which makes the batch number for the payroll liabilities always a batch ’99.’ This is helpful in keeping the batch numbers different from the other accounts payable invoice batches so you may pay your liabilities separate from your regular accounts payable items.
•Computation Order: Select the computation order to be withheld in payroll, if needed
•Deferred Compensation; Nonqualified Plan; Earned Income Credit; Dependent Care Benefit; Pension Plan; all need to be marked with a Y for yes or N for no depending on the deduction code and how it relates to your setup. (If you have questions on these fields contact your auditor.)
•Deduction Type: There are three different codes for this field.
o D – Full Distribution. If the time card field Benefit Distribution is a ‘Y’ or ‘N’ the benefit will distribute to the expense accounts associated with the time card account. With this code it disregards anything coded in the contracts or manual time cards Benefit Distribution YN field.
o P – Partial Distribution. If the time card field Benefit Distribution has an ‘N’ the benefit will not distribute to the expense accounts associated with the time card account.
o S – Special Distribution. Special Distribution will match all S records in the time cards. All time card fields Benefit Distribution = ‘S’ will have the salary account distributed to it. If the time card(s) field Benefit Distribution = ‘1’ then the last salary account in ascending order found with a ‘1’ will be distributed to. If the time card field Benefit Distribution <> ‘S’ then the salary account will not distribute to it. If multiple time cards field Benefit Distribution = ‘1’ and ‘2’ and ‘3’, than the salary account found with the lowest number (in this case ‘1’) will be distributed to.
•Box 12 and Box 14 are used for W2 setup information, see current year W2 instructions.
•Misc Code 1 is reserved by the system and used with various state reporting.
•Voluntary: Indicates a Voluntary Deduction.
•Premium Distrubution Benefit_Type: State of Illinois: Select Medical, Dental, Vision, Life or Long Term Disability, if needed.
•Deduction/Benefit Reporting Group: State of Illinois: Select NEC, IMRF, THIS, TRS, etc.
•Deduction/Benefit Graduated Step
Values are used to calculate deductions
on a graduated scale. This can be used by entering the amount of wages to be
calculated in Step 1 earnings and the percent in Step 1 Percent. The calculation
program will then compute the amount of the deduction to be withheld using the
Step 1 percentage up to this amount. The next dollar amount the deduction is to
be calculated on should be entered in the Step 2 Earnings and the percent in the
Step –2 Percent etc.
Here is an Example of FICA over max setup:
1. Step 1 Earnings To: This field should contain the FICA maximum dollar amount that the deduction can be computed on for both types of insurance’s. (OASDI: Old Age Survivor and Disability Insurance and HI: Health Insurance – Medicare.) This information can be obtained from IRS Circular E.
2. The next field Step 1 Percent will contain the full FICA percent for both of the insurances, which are currently 7.65.
3. The Step 2 Earnings To field for FICA over max needs to be $99,999,999.00.
4. The Step 2 Percent field will need to contain the percentage of FICA earnings over the maximum, which is the Medicare portion of the insurance. This percentage is 1.45.

•Expense Object for Benefit: This field will be blank on all the deductions (Fringe Benefit = N). It must be completed for every benefit. This object code relates to the expense number in your chart of accounts that you want that benefit to be expensed to.
•Liability Classification: This field is used to create the credit side of the payroll entry in the balance sheet for the liabilities (deductions) that are generated from the payroll process. Enter the state code from the liability account class for each deduction. Note: ALL deductions must have a liability classification code in this column. You will need to refer to your state accounting manual for the liability class.
•Payment Reason: State of Illinois:
•Add to Creditable Earnings: State of Illinois
•Add to Gross Pay Type: State of Illinois

•Override Benefit Expense: The fields Fund, Location, Special Reporting Element, Program, Object, Job Classification, Designated Grant/Project, School Code, Instructional Organization, Term, Special Cost Center, Level of Instruction can be used to override the default code in the expense account for this benefit. Example: If you wanted your retirement expense to go to just one fund you would place that fund number in the Fund field. This would cause the expense for this code to be posted to that fund.
•Override Liability: The Fund, Location, Special Reporting Element, Program, Object, Job Classification, Designated Grant/Project, School Code, Instructional Organization, Term, Special Cost Center, Level of Instruction overrides are used to override the default code in the liability account. Example: If all the liabilities were to be paid from one fund that fund code would be used in Fund liability override so that the payment for the liabilities would come from that fund if this is desired.
Reports and Options
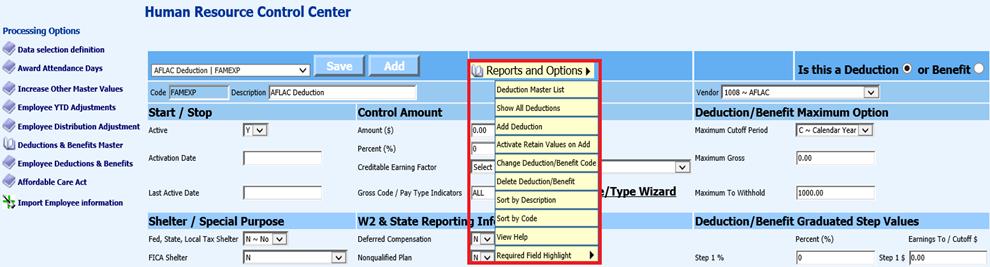
•Deduction Master List: Report listing of all Deductions/Benefits Active in your system
•Show All Deductions: Only Active Deductions/Benefits are listed. Use this to Display All Deductions/Benefits
•Add Deduction: To add a new Deduction or Benefit, you can also use the “Add” tab
•Activate Retain Values on Add: Activate the copy option to clone another deduction or benefit information to the new code
•Change Deduction/Benefit Code: If the Code has not been used yet, you can activate this code change option.
•Delete Deduction/Benefit: Activate the Delete option
•Sort by Description: ability to sort by description name
•Sort by Code: ability to sort by deduction/benefit code
•View Help: Access to Finance Help Council
•Required Field Highlight: Adjust the brightness of the state required fields
Adding a New Deduction or Benefit Code
1. Select the bullet if it is a Deduction or Benefit.
2. Select Add
3. Enter Code: This can be numeric or alpha characters
4. Enter Description
5. Select Vendor from the drop down selection

6. Continue entering data in fields required, for the new Deduction or Benefit.
Changing Deduction or Benefit Information
1. Select Deduction or Benefit from the drop down selection
2. Make needed changes
3. Select Save
4. You will receive a Saved: time stamp confirming you have completed the changes

NOTE: This only changes the Deduction/Benefit master description in the master file but not throughout the database for the employees.
To change the descriptions for the employee records follow the steps below.
1. Select Administrative Utilities
2. Select Control Center
3. Select System Adjustment
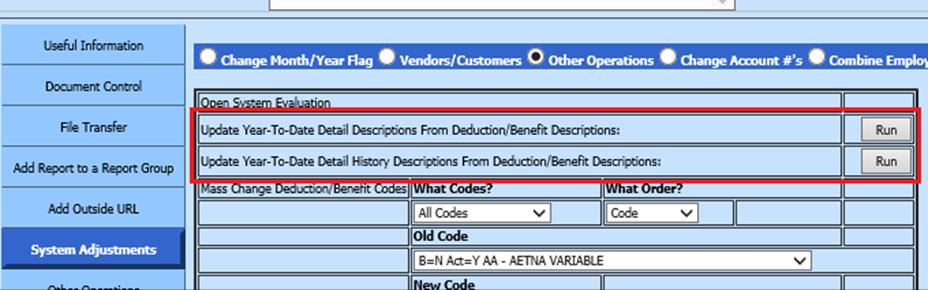
4. Update Year-To-Date Detail Descriptions from the Deduction/Benefit Description: Select Run button
5. Update Year-To-Date Detail History Descriptions from the Deduction/Benefit Description: Select Run button.