After you have entered and verified all of your data, the next step is to print the forms.
METHODS OF DELIVERY OF 1095 FORMS
1. Printed Paper Copy of the form.
2. Delivery to the Employee Portal via Message Center (RECOMMENDED)
3. Delivery through email (REQUIRES EMPLOYEE AUTHORIZATION)
PRELIMINARY STEPS IF 1095 FORMS WILL BE DISTRIBUTED VIA MESSAGE CENTER
1. Activate Employee Portal
a. If you are currently using the Employee Portal and your employees receive their payroll direct deposit voucher via the Message Center, make sure that you have added the employee portal for any new employees. If you have not, follow the instructions in the link below:
http://help.schooloffice.com/financehelp/#!Documents/settingupsecurityfortheemployeeportal.htm
b. If you have not activated the Employee Portal and would like to start using this method of delivery for your payroll direct deposit vouchers, W2 forms, and 1095 Forms, follow the instructions from the first link, for activation, and the second link, for setup and security changes.
http://help.schooloffice.com/financehelp/#!Documents/activatingtheemployeeportal.htm
http://help.schooloffice.com/financehelp/#!Documents/settingupsecurityfortheemployeeportal.htm
2. To Activate and Assign an additional master password for exported files
1. Select Administrative Utilities
2. Select “SDS Web Office Settings”
3. Select the “General” Tab
4. In the field “PDF Password Protection Master Password” enter the password to be assigned in addition to the optional user password for all exported files.
5. In the field “Password Protect PDF export to Message Center”, enter a “U” to allow the user to determine the password.
6. At the same time you could put a “U” in the Password Protect Payroll Vouchers when e-mailed if you would like.
7. Select “Save Changes”
8. Logout of SDS and back in to apply this setting.
PRELIMINARY STEPS IF 1095 FORMS WILL BE DISTRIBUTED VIA EMAIL
If you haven’t previously used the email feature to distribute forms such as Direct Deposit vouchers, or W2’s to employees then it is recommended that the system operator first run a quick test of the email process by sending only one 1095 form, probably sending the form to their own email address.
It is important to complete all the setup steps listed below:
Enter Server and Return Email Address Information
1. Select Administrative Utilities
2. Select SDS Web Office Settings
3. Select the Email Settings tab at the bottom left of the screen.
Enter Server Name or IP Address
1. Enter the external full DNS name or external IP address of the SDS Web Office Server. This address will be used for the URL in the e-mail that is sent (if applicable).
a. For Hosted Clients, this is not needed for emailing but would be: (ex: ssl.schooloffice.com)
2. Enter the SMTP Server: Enter the name or IP address of your SMTP Server. This address will be used by SDS Web Office to send e-mails. Make sure the SDS Web Office Server has permissions to relay e-mail through this.
a. For Hosted Clients, enter: 172.60.9.199
3. Enter the Return Email Address
4. Send a test email message
5. Save the settings
Enter Email Information for the Person Sending 1095 Forms by Email
1. Select Master File and Code Entry Options
2. Select Master File Vertical Data Entry and Changes
3. Entry Options dropdown, select “Users”
4. In the Teacher Name list on the left, locate the person who will be sending the Direct Deposit Vouchers by Email and select that person
5. Enter that person’s “email address”
6. Select the Save icon
Enter Email Information for all Employees who are Receiving a 1095 Form by Email
1. Select Payroll Processing
2. Select Employee Horizontal Data Changes.
3. On the Entry Options dropdown menu, select Employee Demographics (All Fields)
4. On the “First Field to Edit” dropdown menu, select “Email Name”
5. Enter the employee’s email address into ‘Email Name’ field for all employees who are to receive their 1095 by Email
6. Select the Save icon
Setting up the Verification to allow 1095 Forms to be Emailed to the Employee
1. Select Payroll Processing
2. Select Employee Horizontal Data Changes
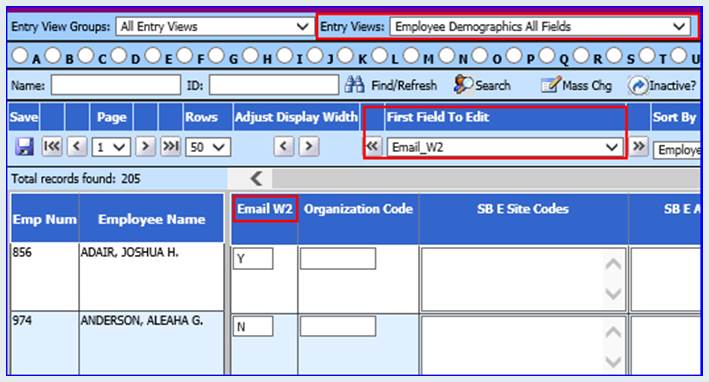
3. On the Entry Options dropdown menu, select Employee Demographics (All Fields)
•Select the “First Field to Edit” dropdown menu, select “Email W2” (This field will also be used to activate emailing of 1095 forms)
4. Upon receiving verification from the employee that they are authorizing their 1095 to be sent to them via email, change this field to a ‘Y’. The ‘Y’ in this field will then allow the 1095 to be sent electronically.

The field “ Email W2” is used for Federal forms, including W2 and 1095 forms.
To activate the 1095 email Option in SDS Web Settings
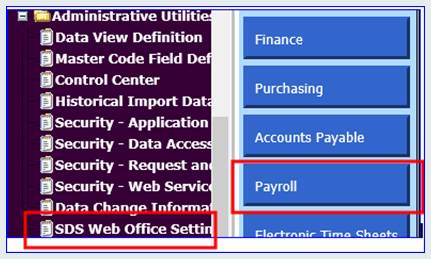
1. Select Administrative Utilities
2. Select SDS Web Office Settings.
3. Select the “Payroll” tab at the left side of the screen.
4. Scroll to the bottom of the options and locate “W2 Email Delivery-Allow”. (This option is also used for allowing 1095 forms to be delivered via email)
5. Enter a “Y”
6. Select “Save Changes”

