 to create the
new Statement Date
to create the
new Statement DateRevised: 6/2021
The check reconciliation process by statement date allows the use of the bank statement date for reconciling purposes. This will allow you to return to previous dates to see what has cleared, what was outstanding, the adjusted bank balance, and the balance of the accounts in the balance sheet that are associated with the reconciliation.
If you have not activated this options, see following link for detailed instructions:
To begin using the Check Reconciliation process, you will need to make sure all of your entries have been posted to the system. Verify your Journal Transactions, Accounts Payable, Cash Receipt, and Payroll employee checks have all been made Permanent (posted to the ledger). See below links to go through these posting processes:
NOTE: When the payroll transactions are posted to the ledger, the amount of the direct deposit per fund will be the amount that is posted to the check reconciliation area.
http://help.schooloffice.com/financehelp/#!Documents/makecheckspermanentposttoledger.htm
http://help.schooloffice.com/financehelp/#!Documents/makecashreceiptspermanent.htm
http://help.schooloffice.com/financehelp/#!Documents/makenewtransactionspermanent.htm
http://help.schooloffice.com/financehelp/#!Documents/closemakeactivepayrollpermanent.htm
Once all of the above items have been made permanent (posted to the ledger), you are ready to start the check reconciliation process.
1. Select General Ledger Processing and Option
2. Select Check Reconciliation
3. Select the Check Group to reconcile
4. Select the to create the
new Statement Date
5. Update the Activity Date From and Activity Date To dates if needed. They will default to the date range of the statement date
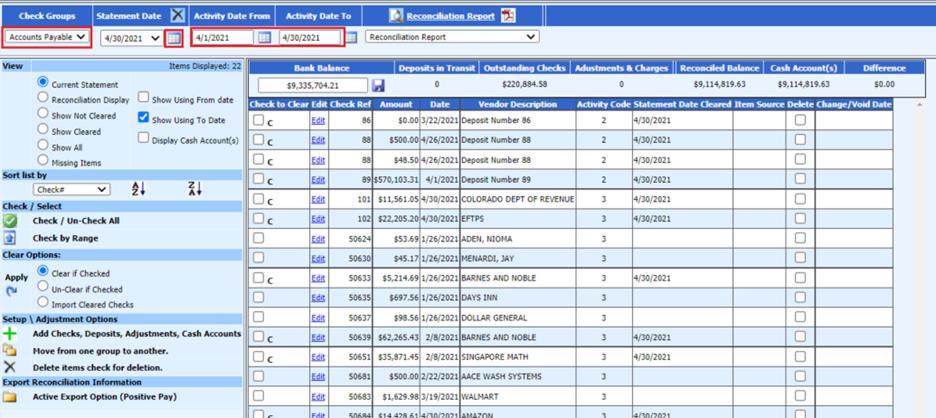
6. Enter the Ending Bank Balance for the selected Check Group. Select the save diskette button

7. Under View section, determine what view to use for clearing items
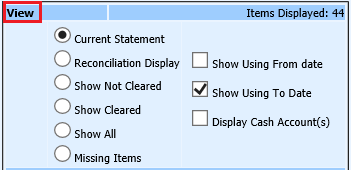
For additional detailed information on using Views, see below link:
http://help.schooloffice.com/financehelp/#!Documents/view.htm
8. If using the Check Reconciliation process using statement date for the first time, add in cash account (s) used for the Check Group listed.
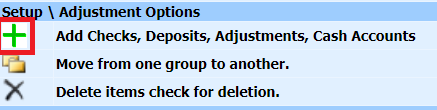
For additional detailed information on using Add Checks, Deposits, Adjustments, Cash Accounts see below link:
http://help.schooloffice.com/financehelp/#!Documents/addchecksdepositsadjustmentscashaccounts.htm
9. In Sort List by: Select how you would like to view the items to clear
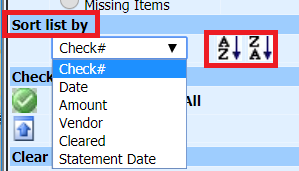
For additional detailed information on using Sort list by, see below link:
http://help.schooloffice.com/financehelp/#!Documents/sortlistby.htm
10. Check to clear items from the bank statement
11. Select Clear if Checked
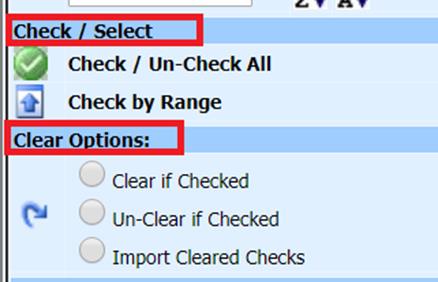
For additional detailed information on using Clearing, Un-Clearing transaction entries or Importing Cleared Checks, see below link:
http://help.schooloffice.com/financehelp/#!Documents/clearingchecksdepositsorjournalentries.htm
12. Once the items have been marked cleared, this will place a “C” for cleared next to the marked items. The system will also complete the “Statement Date Cleared” column with the date of the statement you are reconciling.

13. After all of the items have been cleared for the statement date, verify the information is correct. The first way to verify the information is on the display screen. The second option is to print reports.
a. The “Bank Balance” was entered in the display screen for the check group and statement date at the start of the process. After the deposits, checks and journal entries have been cleared the system gives you a total of the “Deposits in Transit”, “Outstanding Checks” and “Adjustments & Charges”.

b. The “Reconciled Balance” is the calculation from the “Bank Balance” + “Deposits in Transit” – “Outstanding Checks” + or – “Adjustments & Charges”

c. The “Cash Account(s) is the total of the General Ledger Cash Accounts that were setup for the check reconciliation group.

d. The “Difference” column is the difference between the “Reconciled Balance” and the “Cash Account(s)”. This amount should be zero once the reconciliation is completed for each group. If this is not zero, see Check Reconciliation tips & tricks.

14. Print Cleared Check Report for balancing with bank statement cleared checks

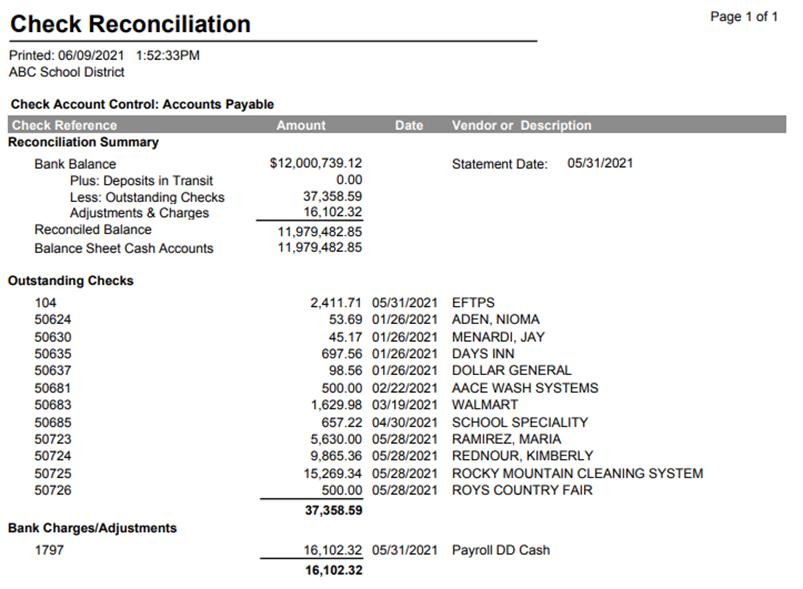
15. Print Reconciliation Report
a. Under Views: If you wish the Cash Accounts to display on report, Check “Display Cash Account(s)”:

b. Preview Report
i. Report with Balance Sheet Cash Accounts
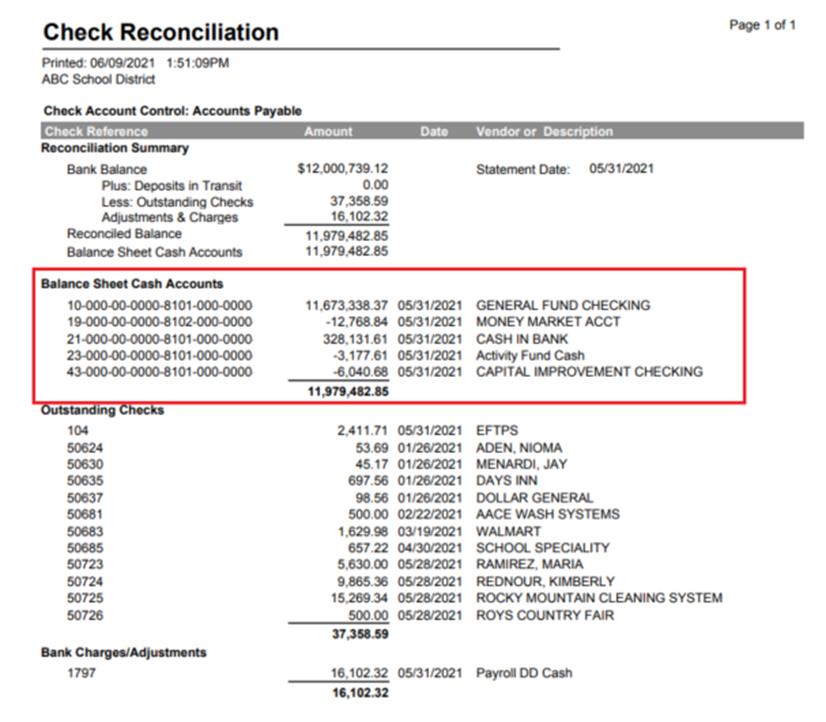
ii. Report without Cash Accounts
1. Check Display Documents: To attached Bank Statements to the Statement Date

a. Select Paper Icon
b. Select Browse
i. Search for document saved on workstation
c. Update Description
d. Select Add
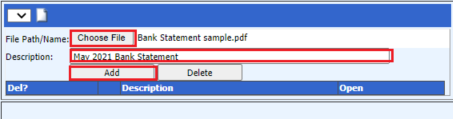
e. Bank Statements attached will be listed. Select Folder icon to open saved documents

For additional Check Reconciliation tips and tricks, see the following link: http://help.schooloffice.com/FinanceHelp/#!Documents/checkreconciliationtips.htm