Revised: 4/2021
Invoice entry for disbursements
has options to have no PO involved or it can have multiple PO's and Accounts. It
also prints helpful reports such as Invoice Edit List, Bills Payable report for
School Boards, Check Reconciliation, Signed Checks if you select the password
protected option and many more.
1. Select Accounts Payable
2. Select Disbursements /Accounts Payable Entry
•New Entries will be recorded for:
o Current Month: (C) Your system current Finance Month
o Next Month: (N) the next system Finance Month
o Recurring: Creating Recurring Accounts Payable transactions
o Prior Month: (P) the system Prior Finance Month
o Month/Year: System date selection of Invoice entry
•Import: Using an XLSX workbook, Import information directly into AP for processing
•Reimbursements: Employees submittal of their reimbursements entered through the Employee Portal, upon approval they will be located in this selection.
•A/P Reports:
o Bills Payable
o Check Register
o Open Accounts Payable
o Paid Accounts Payable
•Vendor Search
(q-list): The “q-List” is an
option intended to be a quick way to select vendors from a list on the
screen. When checked, a list of vendors is displayed on the left
side of the screen. Selecting a vendor from the list is the same as selecting
from the drop down list on the regular screen.
In addition to the list on
the screen, a paging control using the blue arrows just above the vendor list,
pages the vendors 40 at a time.
•An “Alpha Picking” bar with the letter A-Z. This is similar to other alpha selection used on other screens. One difference is that after the first letter is selected the next possible letters will be displayed and the letters that are not valid will be shaded down. This allows for the selection of more than just the first letter of a vendors name.
•Account Dimension Filter
o Search out the Account by Dimensions
o Expense Accounts (default)
o Revenue
o Balance Sheet
•Show PO’s that are:
o Open
o Closed
•Budget Warning
o Current Year Budget
o Next Year Budget
Invoice Entry without using a Purchase Order
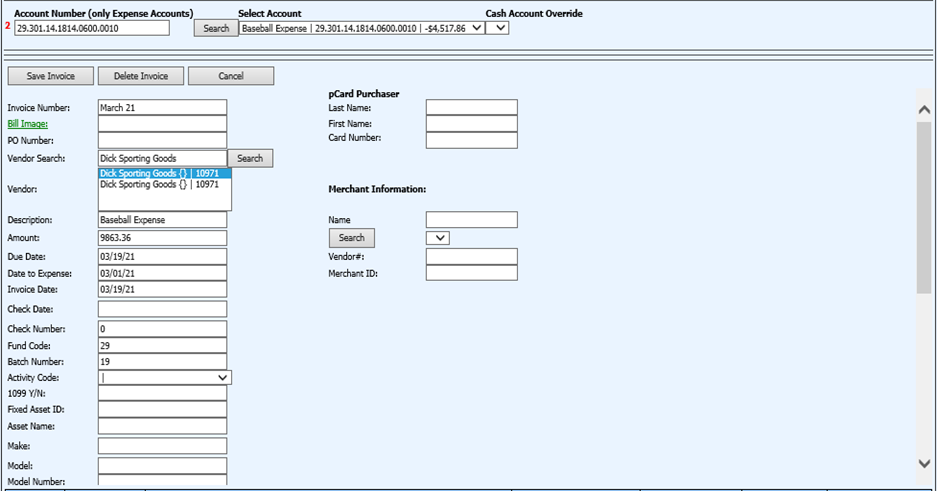
1. 1 PO# to Pay or Vendor# or Name: Enter the Vendor Name or Number or enter the first few letters of the vendor name and select “Search”.
o If your vendor is not listed, please refer to following link for additional information on setting up a new vendor. http://help.schooloffice.com/financehelp/#!Documents/howtosetupanewvendor.htm
2. From the drop down selection, select the Vendor.
3. When using Green Accounting, make sure the selection is checked.

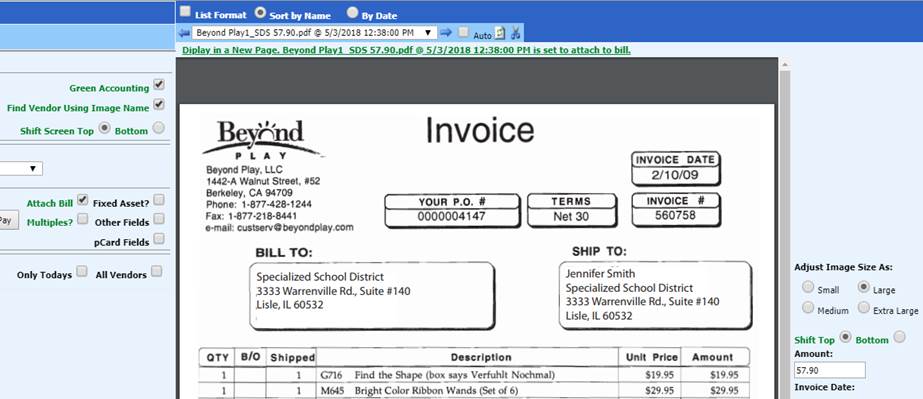
4. Find Vendor Using Image Name. Bill images will show to the right side of the display.
5. Selecting Bottom will take you to the Quick Entry on the far right.
6. 2 Account Number: Enter in part or all of the Account number or Account Description.
7. Select “Search” or hit Enter.
8. From the “Select Account” drop down selection, select the account to expense.
9. If using the “Cash Account Override”, select the Cash Account associated with the expense entry.

10. 3 Complete the fields needed for the Invoice entry:
o Amount: Amount of Invoice line entry
o Invoice Date: Date of Invoice
o Invoice#: Invoice Number
o Description: Description of invoice, the account number description is defaulted
o Batch#: Defaulted number is day of month. You can change to your own designated number, if needed
o Expense On: Finance date expensed to the system, selected under New Entries will be recorded for
o Item Type: Accounts Payable, Imprest, Payroll
11. Make sure “Attach Bill” is selected at all times when paying an invoice from a scanned image. This tells the system to attach the selected image to the bill when PAY or Enter is selected.

12. Select “Pay” or hit Enter.
13. The invoice information will be listed below the double line, with an Accounts Payable total for the Vendor.
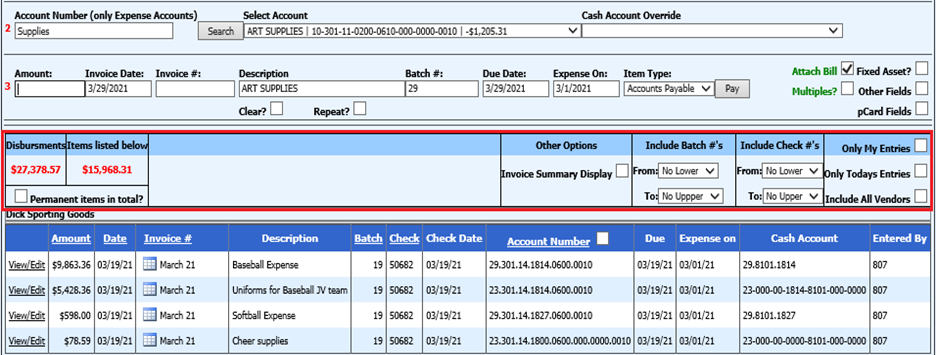
•Disbursements: This total includes all entries not made permanent.
•Items listed below: This total includes only the displayed items.
•Permanent items in total: This will display all entries made permanent.
•Other Options: Invoice Summary Display: This will display all items totaled by vendor and invoice amount.
•Include Batch #’s: Display the batch number range needed.
•Entry display view: View using Only My Entries; Only Todays Entries; Include All Vendors.
NOTE: Entries made prior to 1/28/2019 will not have the user ID who made the entry so the “Only My Entries” option will only apply to items entered after this update.
Invoice Entry with a Purchase Order
1. 1 PO# to Pay or Vendor# or Name: Enter the Vendor Name or Number or enter the first few letters of the vendor name and select “Search”.
o If your vendor is not listed, please refer to following link for additional information on setting up a new vendor. http://help.schooloffice.com/financehelp/#!Documents/howtosetupanewvendor.htm
2. From the drop down selection, select the Vendor.
3. When using Green Accounting, make sure the selection is checked.

4. Find Vendor Using Image Name. Bill images will show to the right side of the display.
5. Selecting Bottom will take you to the Quick Entry on the far right.
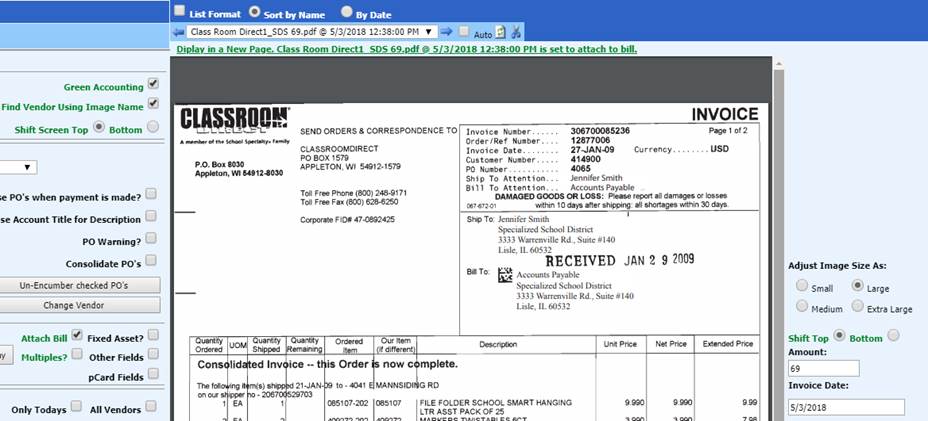
6. When there are open Purchase Orders, they will appear in the 2 area.
7. Select the Purchase Order to pay by placing a check mark in the pay column. If there is only one Purchase Order, the system will automatically select it.
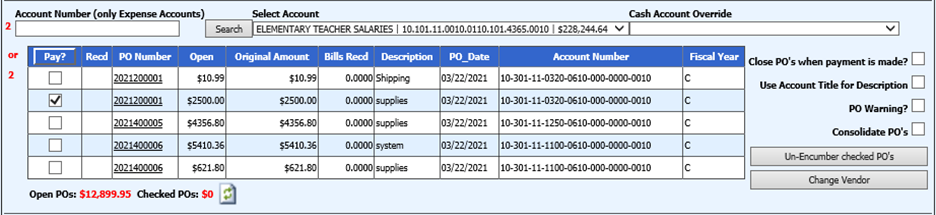
•Close PO’s when payment is made: Place a check mark if the PO will be fully completed upon invoice entry.
•Use Account Title for Description: Use the account title description instead of the PO description.
•PO Warning: Place a check mark to remove the PO warning message received upon PO entry, without assigning a PO to the invoice entry.
•Consolidate PO’s: When checked, the consolidation process will be activated to consolidate purchase order payments by account number. The detail PO lines will be summarized by account number and a summary entry will be made. This summary entry will then have the payment applied. Once you select this process, it may not be reversed.
•Un-Encumber checked PO’s: If a PO is entered in the system and you will not be paying it now, you can release the encumbrance amount by selecting the PO line entry then select “Un-Encumber checked PO’s”.
•Change Vendor: If the PO entered is to be paid by another vendor than initially originated, select “Change Vendor”. Select the Vendor to pay.
8. If using the “Cash Account Override”, select the Cash Account associated with the expense entry.
9. 3 Complete the fields needed for the Invoice entry:
o Amount: Enter amount of Invoice, if different from the Purchase Order amount
o Invoice Date: Date of Invoice
o Invoice#: Invoice Number
o Description: The description field must be blank for the description to be brought down from the PO description line.
o Batch#: Defaulted number is day of month, you can change to your own designated number, if needed
o Expense On: Finance date expensed to the system, selected under New Entries will be recorded for
o Item Type: Accounts Payable, Imprest, Payroll
10. Make sure “Attach Bill” is selected at all times when paying an invoice from a scanned image. This tells the system to attach the selected image to the bill when PAY or Enter is selected.

11. Select “Pay” or hit Enter.
To View/Edit Invoices you
have entered and saved:
Check
the box to Show ALL Entries or Only Today’s Entries. When selected, the list of
open invoices will appear in list form below the entry screen.
•If you find you need to make adjustments to the invoice previously entered, select the “View/Edit”.

•A new screen will populate. You can now make the needed changes to the invoice entered. If a check has already been produced, you will not be able to make any adjustments to the invoice; you will then need to complete the Void process.